
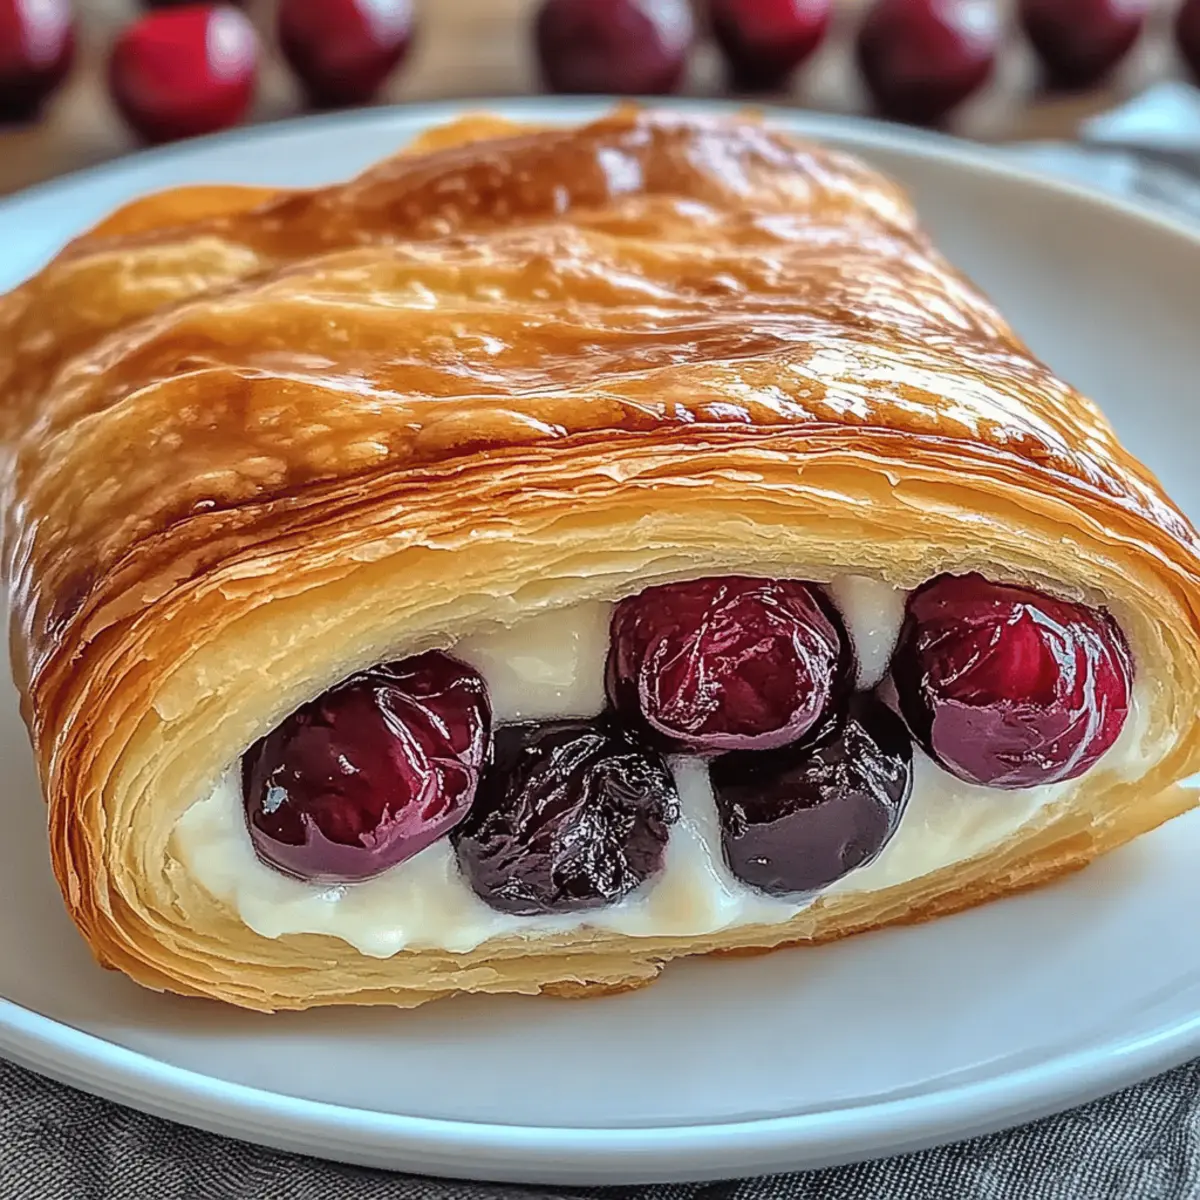
The moment I took my first bite of a Cherry Cheese Danish in a cozy bakery, that flaky warmth enveloped me, sparking a craving I never knew I had. Today, I want to share how effortlessly you can recreate this delightful pastry at home. With a blend of sweet cherries and creamy cheese in each bite, this easy baking recipe transforms simple ingredients into a perfect breakfast treat or a show-stopping brunch item. Not only is this Cherry Cheese Danish customizable with your favorite fruits, but using store-bought puff pastry makes preparation a breeze—ideal for busy mornings or spontaneous gatherings. Have you ever wondered how you could impress your friends with a homemade pastry that rivals those from the local café? Let’s get started!

Why is this Cherry Cheese Danish a Must-Try?
Mouthwatering Flavor: The combination of sweet cherries and creamy cheese creates an unforgettable taste that tantalizes your taste buds.
Effortless Preparation: With easy-to-follow steps and store-bought puff pastry, you’ll be amazed at how quickly you can whip these up.
Customizable Goodness: Swap cherries for your favorite fruits—be it blueberries, peaches, or even a spicy twist with jalapeños.
Perfect for Gatherings: Whether it’s brunch or a cozy evening treat, these Danishes are sure to impress friends and family, making them ideal for any occasion.
Versatile Snack: Not just for breakfast, enjoy these treats any time of day for a delightful snack!
Dive into this easy baking adventure and create your own cozy pastry moment at home!
Cherry Cheese Danish Ingredients
• Get ready to bake a delightful treat!
For the Pastry
- Puff Pastry – Store-bought saves you time and ensures a flaky texture.
For the Cheese Filling
- Cream Cheese – This rich ingredient gives a creamy consistency; swap with mascarpone for a unique twist.
- Granulated Sugar – Enhances the sweetness of the filling perfectly.
- Vanilla Extract – A must-have for adding depth to your filling’s flavor.
For the Cherry Topping
- Cherry Pie Filling – Offers a burst of sweetness; use homemade for a fresh taste or canned for convenience.
For the Finish
- Egg (for egg wash) – Achieves that shiny, golden crust; you can use milk as a substitute for a non-egg option.
Get ready to enjoy your homemade Cherry Cheese Danish, bursting with flavor and warmth!
Step‑by‑Step Instructions for Cherry Cheese Danish
Step 1: Preheat Oven
Begin by preheating your oven to 375°F (190°C). This crucial step ensures that your Cherry Cheese Danish bakes evenly, resulting in that perfectly golden and flaky texture we all love. As the oven warms up, you can focus on preparing your ingredients and workspace.
Step 2: Prepare Puff Pastry
On a lightly floured surface, roll out your thawed puff pastry. Cut it into four 4x4-inch squares, ensuring the edges are clean and straight. This will create the lovely shape for your Cherry Cheese Danish, giving you a delightful canvas for the creamy filling and cherry topping.
Step 3: Make Cream Cheese Filling
In a mixing bowl, blend softened cream cheese, granulated sugar, and vanilla extract using an electric mixer. Beat the mixture for about 2-3 minutes until it's smooth and fluffy, creating a creamy filling that will complement the cherries beautifully. The mixture should be well-combined and airy.
Step 4: Assemble Danishes
Place a spoonful of the cream cheese filling in the center of each pastry square. Then, top it with a generous spoonful of cherry pie filling. Carefully fold the corners of the pastry over the filling to create a sealed packet. Make sure they are well-closed to prevent any leaking during baking.
Step 5: Apply Egg Wash
In a small bowl, whisk together one egg to create an egg wash. Using a pastry brush, apply a thin layer over the tops of each assembled Danish. This will give your Cherry Cheese Danish a glossy, golden finish once baked. Be careful not to overapply to avoid sogginess.
Step 6: Bake
Arrange the assembled Danishes on a baking sheet lined with parchment paper. Place them in the preheated oven and bake for 20-25 minutes. Watch for them to rise and turn a beautiful golden brown, signaling they are ready to come out of the oven and be enjoyed.
Step 7: Cool and Serve
Once baked, remove the Cherry Cheese Danishes from the oven and allow them to cool on a wire rack for about 5 minutes. This cooling time helps them set up perfectly. Enjoy the pastries warm for the best flavor and texture experience, and don't hesitate to share with family and friends!

Make Ahead Options
These Cherry Cheese Danishes are perfect for meal prep enthusiasts! You can prepare the cream cheese filling a day in advance, keeping it stored in an airtight container in the refrigerator for up to 3 days. Additionally, you can assemble the danishes (without the egg wash) and refrigerate them for up to 24 hours before baking. This not only saves you time on hectic mornings but ensures they retain their flaky goodness. When you’re ready to enjoy your homemade pastries, simply brush them with egg wash and bake as instructed. You’ll have that cozy bakery delight right at your fingertips with minimal effort!
Cherry Cheese Danish Variations & Substitutions
Feel free to get creative with this Cherry Cheese Danish recipe and make it your own—a delicious transformation awaits!
-
Blueberry Twist: Swap out cherry filling for blueberry pie filling for a fruity, sweet spin. This is perfect for those who adore blueberries and want to enjoy a burst of flavor with every bite.
-
Peach Perfection: Use peach pie filling instead of cherries for a fresh, summery delight. The juicy peaches add a delightful sweetness that pairs beautifully with the creamy cheese filling.
-
Spicy Kick: Add diced jalapeños to the cream cheese filling for an unexpected heat. This twist will ignite your senses and surprise your taste buds with every delicious chomp!
-
Dairy-Free Option: Substitute dairy cream cheese with a dairy-free alternative to make a vegan version. This way, everyone can indulge, leaving no one behind in this delightful treat!
-
Nutty Flavor: Stir in a tablespoon of almond extract to the cream cheese filling for an aromatic layer of nutty flavor. It adds a new depth that balances beautifully with the sweetness of the fruit.
-
Chocolate Drizzle: Once cooled, drizzle melted chocolate over the top for a decadent touch. This adds a rich, sweet contrast that transforms your pastry into an indulgent dessert.
-
Cinnamon Sugar Dusting: Before baking, sprinkle a mix of cinnamon and sugar on top of the egg wash for a sweet, spiced crust. It creates a delightful crunch with every flaky layer, elevating your Danish to another level!
-
Mini Versions: Cut the pastry into smaller squares for mini Danishes, perfect for snacks or brunch bites. These adorable morsels are just the right size for sharing or enjoying alone!
Once you've chosen your variations, you can enjoy this cozy pastry with a warm cup of coffee or tea. And if you're feeling adventurous, consider trying it alongside a homemade fruit compote for an extra touch of sweetness! Each twist on this Cherry Cheese Danish promises to delight and impress—happy baking!
How to Store and Freeze Cherry Cheese Danish
Fridge: Store any leftover Cherry Cheese Danish in an airtight container for up to 3 days to maintain freshness and flavor.
Freezer: Wrap each Danish tightly in plastic wrap and then in aluminum foil. They can be frozen for up to 2 months, preserving that homemade goodness.
Reheating: For best results, reheat straight from the fridge or freezer in a preheated oven at 350°F (175°C) for 10-15 minutes until warmed through.
Making Ahead: Assemble the Danishes a day in advance, refrigerate unbaked, and then bake when you're ready for a delicious fresh treat!
Tips for the Best Cherry Cheese Danish
-
Thawing Properly: Make sure the puff pastry is fully thawed to prevent it from tearing while you prepare.
-
Chill for Flakiness: If time allows, chill the rolled-out dough before filling to achieve a superior rise and flakiness when baked.
-
Watch for Over-Browning: Keep a close eye on your Cherry Cheese Danish during the last few minutes of baking to avoid dryness; every oven varies!
-
Use Egg Wash Sparingly: A light application of egg wash helps achieve that luscious golden finish without causing sogginess.
-
Get Creative: Experiment with different fruit fillings, like blueberries or peaches, adjusting the sugar in the cream cheese filling accordingly.
What to Serve With Cherry Cheese Danish?
The cozy sweetness of a Cherry Cheese Danish is just waiting for the perfect complements to elevate your mealtime experience.
-
Fresh Fruit Salad: A vibrant mix of seasonal fruits adds freshness, balancing the richness of the Danish beautifully.
-
Creamy Yogurt Parfait: Layered with granola and fruit, this adds a creamy texture that pairs well with the pastry’s crunch.
-
Strong Brewed Coffee: The bold flavors of coffee contrast delightfully with the sweet and creamy filling, creating a comforting duo.
-
Herbal Tea: A warm cup of chamomile or mint tea offers a soothing contrast, perfect for enjoying alongside the Danish.
-
Scrambled Eggs: Fluffy, buttery scrambled eggs provide a hearty element, making your breakfast or brunch feel complete.
-
Chocolate Drizzle: Drizzling warm chocolate over the Danishes introduces a decadent touch, perfect for special occasions.
-
Caramel Sauce: A light drizzle of caramel enhances the sweetness and adds a touch of indulgence to every bite.
Each pairing invites you to explore different flavor profiles, making your Cherry Cheese Danish not just a treat, but a centerpiece for delicious gatherings.

Cherry Cheese Danish Recipe FAQs
How do I select the best cherries for the filling?
Absolutely! For the tastiest Cherry Cheese Danish, look for fresh cherries that are firm, plump, and have a deep red color. They should be free from dark spots or blemishes. If you're using canned cherry pie filling, opt for brands with simple ingredients and look for a rich, red color in the syrup.
How should I store leftover Cherry Cheese Danish?
To keep your Cherry Cheese Danish fresh, store it in an airtight container in the fridge for up to 3 days. If you'd like to maintain their taste and texture, it's best to enjoy them within this timeframe. You can also leave them at room temperature for a few hours if you plan to eat them soon.
Can I freeze Cherry Cheese Danish?
Yes, you can! Wrap each unbaked Danish tightly in plastic wrap and then in aluminum foil. They can be frozen for up to 2 months. When you're ready to bake, simply remove them from the freezer, place them on a baking sheet, and bake straight from frozen; just add a few extra minutes to your baking time.
What should I do if my pastry tears?
Very often, pastry tears can happen due to improper thawing. If you notice a tear, don't worry! Simply use a bit of water to moisten the edges and press them together gently. You can also patch the tear with a little extra piece of pastry if you have any leftover, ensuring that the filling stays contained.
Are there any dietary considerations I should be aware of?
Indeed! If you're making these Cherry Cheese Danishes for friends or family with dietary restrictions, you can easily swap ingredients. For a dairy-free option, use vegan cream cheese and check that your puff pastry is dairy-free. Always ensure that the cherry filling is free from common allergens like nuts, especially if using a store-bought variety.
Can I prepare these Danishes in advance?
Absolutely! You can assemble the Cherry Cheese Danish a day ahead and keep them in the refrigerator. Just wrap them tightly in plastic wrap until you're ready to bake them. This method saves time and allows for fresh-baked pastries in the morning or for a gathering without the last-minute rush. Enjoy making them!
Irresistible Cherry Cheese Danish That's Easy to Make at Home
Ingredients
Equipment
Method
- Preheat your oven to 375°F (190°C).

- On a lightly floured surface, roll out puff pastry and cut it into four 4x4-inch squares.
- Blend softened cream cheese, granulated sugar, and vanilla extract in a mixing bowl until smooth.
- Place a spoonful of the cream cheese filling in the center of each pastry square and top with cherry pie filling. Fold corners to seal.
- Whisk together one egg and brush a thin layer over the tops of each Danish.
- Arrange the Danishes on a baking sheet lined with parchment and bake for 20-25 minutes until golden brown.
- Remove from oven and allow to cool on a wire rack for about 5 minutes before serving.


Leave a Reply