
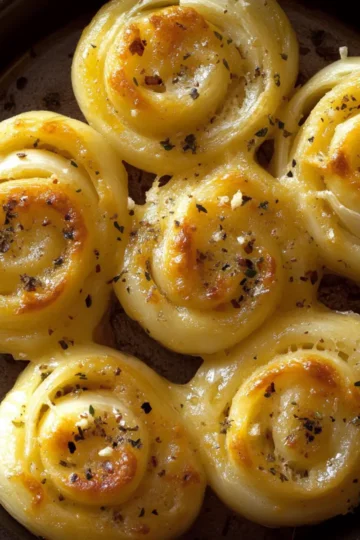
The scent of warm, freshly baked biscuits filled my kitchen, and I couldn't help but smile at the memories flooding back—family gatherings, laughter, and, of course, the comforting taste of Thanksgiving stuffing. But this time, I’ve taken a delightful twist with Easy Thanksgiving Stuffing Biscuits. They capture all the cozy flavors of traditional stuffing in a quick and easy format perfect for any occasion. Fluffy, savory, and vegetarian-friendly, these biscuits make a fantastic addition to your breakfast table or a simple but impressive sliders option. With every bite, you’ll discover the joy of convenience and nostalgia combined. Are you ready to bring some festive cheer to your kitchen? Let's dive into this delectable recipe!

Why Are These Stuffing Biscuits a Must-Try?
Irresistible Flavor: Every bite delivers the savory, homey essence of traditional stuffing, perfect for Thanksgiving or any cozy gathering.
Quick & Easy: With just a few simple steps, they transform into fluffy biscuits that can be ready in no time, making them a perfect option for busy days.
Versatile Options: Feel free to customize! Whether you're indulging in a cheesy surprise or keeping it plant-based, these biscuits can accommodate everyone’s tastes.
Nostalgic Comfort: They evoke memories of family feasts, wrapping the warmth of the holiday season into each flaky bite.
Make-Ahead Friendly: Prep ahead for stress-free cooking—just store the dough in the fridge until you're ready to bake! Check out my tips on storage solutions to keep them fresh.
Best of all, they pair beautifully with your favorite sides, turning any meal into a delightful experience. Enjoy these biscuits warm, perhaps with a dollop of cranberry sauce or nestled in a festive slider.
Stuffing Biscuits Ingredients
Experience the joy of making your own Stuffing Biscuits with these essential ingredients:
For the Batter
- Bread Flour – Provides structure and chewiness; substitute with all-purpose flour for a slightly different texture.
- Baking Powder – Acts as a leavening agent; ensure it's fresh for the best rise.
- Baking Soda – Needs acidity to activate; perfect when paired with baking powder for optimum fluffiness.
- Granulated Sugar – Adds a hint of sweetness; you can omit it for less sweetness in your biscuits.
- Kosher Salt – Enhances the flavor; feel free to use sea salt if you prefer.
- Unsalted Butter – Contributes richness and flakiness; substitute with salted butter if needed, adjusting salt elsewhere.
For the Vegetables
- Celery – Adds crunch and depth; swap with bell peppers for a different flavor profile.
- Onion – Brings sweetness and moisture; use shallots for a milder taste if desired.
- Carrots – Provide natural sweetness; grated carrots are ideal for a finer texture.
- Fresh Thyme – Offers aromatic flavor; dried thyme can work in place of fresh.
- Fresh Sage – Adds a robust herbal note; substitute rosemary if needed.
- Black Pepper – Imparts subtle heat; white pepper is a milder option.
- Olive Oil – Ideal for sautéing vegetables; feel free to swap in butter for a deeper flavor.
For the Liquid
- Buttermilk – Delivers moisture and tanginess; use regular milk mixed with vinegar if necessary.
- Fresh Rosemary – Enhances the flavor; dried rosemary can be substituted or omitted entirely.
Embrace the comforting, homemade goodness of these stuffing biscuits!
Step‑by‑Step Instructions for Easy Thanksgiving Stuffing Biscuits
Step 1: Prepare Vegetables
Start by placing the celery, onion, carrots, fresh thyme, fresh sage, salt, and black pepper into a food processor. Pulse until finely chopped, ensuring the vegetables are well mixed and evenly cut. This should take about 30 seconds. The mixture should be colorful and aromatic, setting the stage for your delicious Stuffing Biscuits.
Step 2: Sauté Vegetables
In a skillet, heat 2 tablespoons of olive oil over medium heat. Once hot, add the finely chopped vegetable mixture and sauté for 10–12 minutes, stirring frequently until the vegetables are tender and fragrant. They should turn a lovely golden color, releasing a mouthwatering aroma reminiscent of holiday gatherings.
Step 3: Preheat Oven
While the vegetables are sautéing, preheat your oven to 425°F (220°C). This is the ideal temperature for baking the Stuffing Biscuits to achieve that tender, flaky texture. Preheating the oven early ensures that the biscuits will rise perfectly when you place them inside.
Step 4: Combine Dry Ingredients
In a large mixing bowl, whisk together 2 cups of bread flour, 1 tablespoon of baking powder, ½ teaspoon of baking soda, 1 tablespoon of granulated sugar, and 1 teaspoon of kosher salt. Mix until fully combined; the flour should appear light and airy. This mixture forms the base of your stuffing biscuits, contributing to their delightful structure.
Step 5: Mix Wet Ingredients
In a separate bowl, whisk together 1 cup of buttermilk with ½ cup of melted unsalted butter until smooth. Ensure the butter has cooled slightly before mixing to avoid cooking the other ingredients. This wet mixture adds moisture and flavor to the Stuffing Biscuits, enhancing their overall deliciousness.
Step 6: Form Dough
Gently stir the wet mixture into the dry ingredients, then fold in the cooled sautéed vegetables. Mix until just combined; be careful not to overmix as this can make the biscuits tough. The dough should be slightly sticky, combining all the savory flavors beautifully into one cohesive mixture.
Step 7: Shape Biscuits
Using a large spoon or ice cream scoop, drop generous spoonfuls of dough onto a lined baking sheet, spacing them about 2 inches apart. The dough should form mounds that will spread and rise while baking. These will transform into tasty Stuffing Biscuits, capturing the spirit of Thanksgiving in every bite.
Step 8: Bake
Place the baking sheet in the preheated oven and bake for 12 minutes, or until the tops of the biscuits are lightly golden and puffed. Keep an eye on them; they should be fluffy and inviting, filling your kitchen with delightful aromas that evoke memories of family feasts.
Step 9: Finish with Butter
After the initial baking time, brush the tops of the biscuits with a mixture of melted butter and fresh rosemary. Return them to the oven for an additional 6-8 minutes until golden brown and fragrant. This simple step adds a fragrant finish to your stuffing biscuits, amplifying their flavors.
Step 10: Serve Warm
Once baked, let the biscuits cool for a few minutes on the baking sheet before transferring them to a serving platter. Serve them warm to enjoy the soft and flaky texture. These Easy Thanksgiving Stuffing Biscuits are now ready to be the star of your table, perfect for enjoying with sides or on their own.

What to Serve with Easy Thanksgiving Stuffing Biscuits
Transforming simple ingredients into a delicious side or main dish is a magical part of home cooking.
- Creamy Mashed Potatoes: Their velvety texture complements the fluffy biscuits, creating a comforting duo that warms the heart.
- Sweet Cranberry Sauce: The tartness of cranberry sauce cuts through the savory biscuits, bringing a beautiful balance to every bite.
- Roasted Seasonal Vegetables: It adds a crunch and freshness, elevating your meal with natural sweetness and vibrant colors. Imagine the earthy notes of roasted carrots and Brussels sprouts enhancing your fall feast!
- Fresh Green Salad: A crisp salad with a zesty vinaigrette provides a refreshing contrast, brightening up your meal and keeping things light.
- Savory Turkey Sliders: These biscuits are perfect for making mini turkey sliders, layered with cranberry sauce and crisp lettuce for a festive treat.
- Pumpkin Soup: The warm, spiced flavors marry beautifully with the stuffing biscuits, creating a heartwarming pairing ideal for chilly evenings.
- Herbed Butter: Spread on warm biscuits, this herbed butter offers a rich flavor boost, enhancing their savory notes and making every bite indulgent.
- Hot Apple Cider: Enjoy a cup alongside the biscuits for a cozy beverage that adds sweetness and warmth to your table.
- Chocolate Chip Cookies: For dessert, finish your meal with a sweet treat! The contrast of soft cookies after savory biscuits creates a delightful end to any gathering.
How to Store and Freeze Stuffing Biscuits
Room Temperature: Store leftovers in an airtight container for up to 2 days to keep them fresh and maintain their delightful fluffiness.
Fridge: For longer storage, refrigerate in an airtight container for up to 4-5 days, ensuring they stay moist and ready to enjoy anytime.
Freezer: Freeze unbaked dough or baked biscuits in a freezer-safe container for up to 1 month. Just thaw overnight in the fridge before baking or reheating.
Reheating: To reheat, place biscuits in a preheated oven at 350°F (175°C) for about 10-15 minutes until warmed through and crisp.
Stuffing Biscuits Variations & Substitutions
Customize these delightful stuffing biscuits to match your tastes and dietary needs, creating a symphony of flavors and textures!
-
Cheesy Surprise: Add a generous handful of shredded cheese for a gooey, melty center. A sprinkle of sharp cheddar enhances the savory flavor profile beautifully.
-
Bacon Bits: Toss in crispy cooked bacon for a smoky twist. The rich flavor of bacon complements the herbs perfectly, creating a heartwarming dish.
-
Vegan Option: Swap buttermilk for plant-based milk and use vegan butter to make these biscuits entirely plant-based. They’ll still be creamy and delicious!
-
Sweet Twist: Drizzle with honey or maple syrup before serving for a sweet contrast that beautifully balances the savory notes. It’s a surprise that’ll delight your guests!
-
Herb Garden: Experiment with different fresh herbs, like dill or parsley, to add unique flavors. Each herb brings a fresh dimension, making the biscuits stand out.
-
Spicy Kick: Add a pinch of cayenne pepper or a dash of hot sauce to the vegetable mixture for a delightful heat. Spice can elevate the flavor and excite the palate!
-
Gluten-Free: Use a gluten-free all-purpose flour blend in place of bread flour. This allows everyone to enjoy these biscuits without sacrificing flavor.
-
Nutty Flavor: Incorporate some finely chopped nuts, like walnuts or pecans, for added texture and richness. They provide a delightful crunch in every bite.
Feel free to explore these variations and make these stuffing biscuits your own! Whether you’re enjoying them warm with a dollop of cranberry sauce or using them to create festive sliders, they’ll add joy to any meal. For more serving suggestions, check out my take on how to pair them with your favorite sides.
Expert Tips for Perfect Stuffing Biscuits
-
Cool Vegetables First: Allow sautéed vegetables to cool before mixing into the dough to prevent cooked biscuits. This ensures perfect flakiness in your stuffing biscuits.
-
Fresh Leavening Agents: Always check the expiration date on your baking powder and baking soda. Fresh leavening agents are key for achieving that desirable rise in your biscuits.
-
Opt for Bread Flour: Using bread flour yields the best structure for your stuffing biscuits. While all-purpose flour is an option, it may result in denser textures.
-
Gourmet Finishing Touch: For an elevated flavor, brush the tops with a seasoned melted butter mixture right before completing baking. It adds a beautiful sheen and rich taste.
-
Make-Ahead Convenience: Biscuit dough can be prepared in advance and stored in the fridge for up to 2 days. This allows you to have fresh biscuits with minimal effort on busy occasions!
Make Ahead Options
These Easy Thanksgiving Stuffing Biscuits are perfect for meal prep, saving you time on busy days! You can prepare the biscuit dough up to 24 hours in advance and store it in the refrigerator. Simply follow the initial steps for preparing the vegetables and combining the wet and dry ingredients, then shape the dough and cover it tightly with plastic wrap. When you're ready to bake, preheat the oven and drop spoonfuls of the chilled dough onto a baking sheet, then follow the baking instructions as usual. This way, you'll have delicious, homemade stuffing biscuits that are just as flavorful, without the last-minute rush!

Easy Thanksgiving Stuffing Biscuits Recipe FAQs
How can I ensure my bread flour is fresh?
Absolutely! Check the expiration date on the package before using. If you’ve had it for some time, give it a smell—if it’s off, it's best to get a fresh bag. Fresh bread flour is essential for achieving that chewy texture!
What’s the best way to store leftovers?
After enjoying your delicious stuffing biscuits, store any leftovers in an airtight container at room temperature for up to 2 days. If you want to keep them fresh longer, refrigerate them for up to 4-5 days. Just be sure to let them cool completely before sealing to avoid moisture build-up!
Can I freeze my stuffing biscuits?
Yes, you can freeze them! For unbaked dough, scoop the dough onto a baking sheet and freeze until solid. Then transfer the frozen mounds into a freezer-safe container for up to a month. When you’re ready, bake them straight from the freezer, just adding a couple of extra minutes to the baking time. If baked, cool them completely before wrapping tightly in plastic wrap and then foil.
What if my biscuits don't rise properly?
If your biscuits don't rise as expected, it could be due to outdated leavening agents. Always check the freshness of your baking powder and baking soda. Additionally, ensure you don’t overmix the dough; gentle folding keeps the air pockets critical for rising intact!
Are these biscuits suitable for vegetarians?
Very! These Easy Thanksgiving Stuffing Biscuits are vegetarian-friendly. You can also make them vegan by substituting buttermilk with a plant-based milk and using vegan butter. Feel free to get creative and add ingredients that fit your dietary needs while preserving that comforting stuffing flavor.
Can I add my own favorite ingredients to the stuffing biscuits?
Absolutely! The more the merrier! Feel free to include ingredients like shredded cheese, cooked bacon, or even herbs like rosemary for added depth. All these variations can amplify the flavor while still keeping the heart of the stuffing biscuit intact.

Irresistible Stuffing Biscuits for a Cozy Thanksgiving Twist
Ingredients
Equipment
Method
- Place the celery, onion, carrots, fresh thyme, fresh sage, salt, and black pepper into a food processor and pulse until finely chopped, about 30 seconds.
- In a skillet, heat olive oil over medium heat. Add the chopped vegetable mixture and sauté for 10–12 minutes until tender.
- Preheat your oven to 425°F (220°C) while the vegetables are sautéing.
- In a large bowl, whisk together bread flour, baking powder, baking soda, granulated sugar, and kosher salt.
- In a separate bowl, whisk together buttermilk and melted butter until smooth.
- Gently stir the wet mixture into the dry ingredients and fold in the sautéed vegetables until just combined.
- Drop spoonfuls of dough onto a lined baking sheet, spacing them 2 inches apart.
- Bake for 12 minutes or until golden and puffed.
- Brush the tops with melted butter and rosemary, then return to the oven for an additional 6-8 minutes.
- Let the biscuits cool for a few minutes before serving warm.

Leave a Reply