
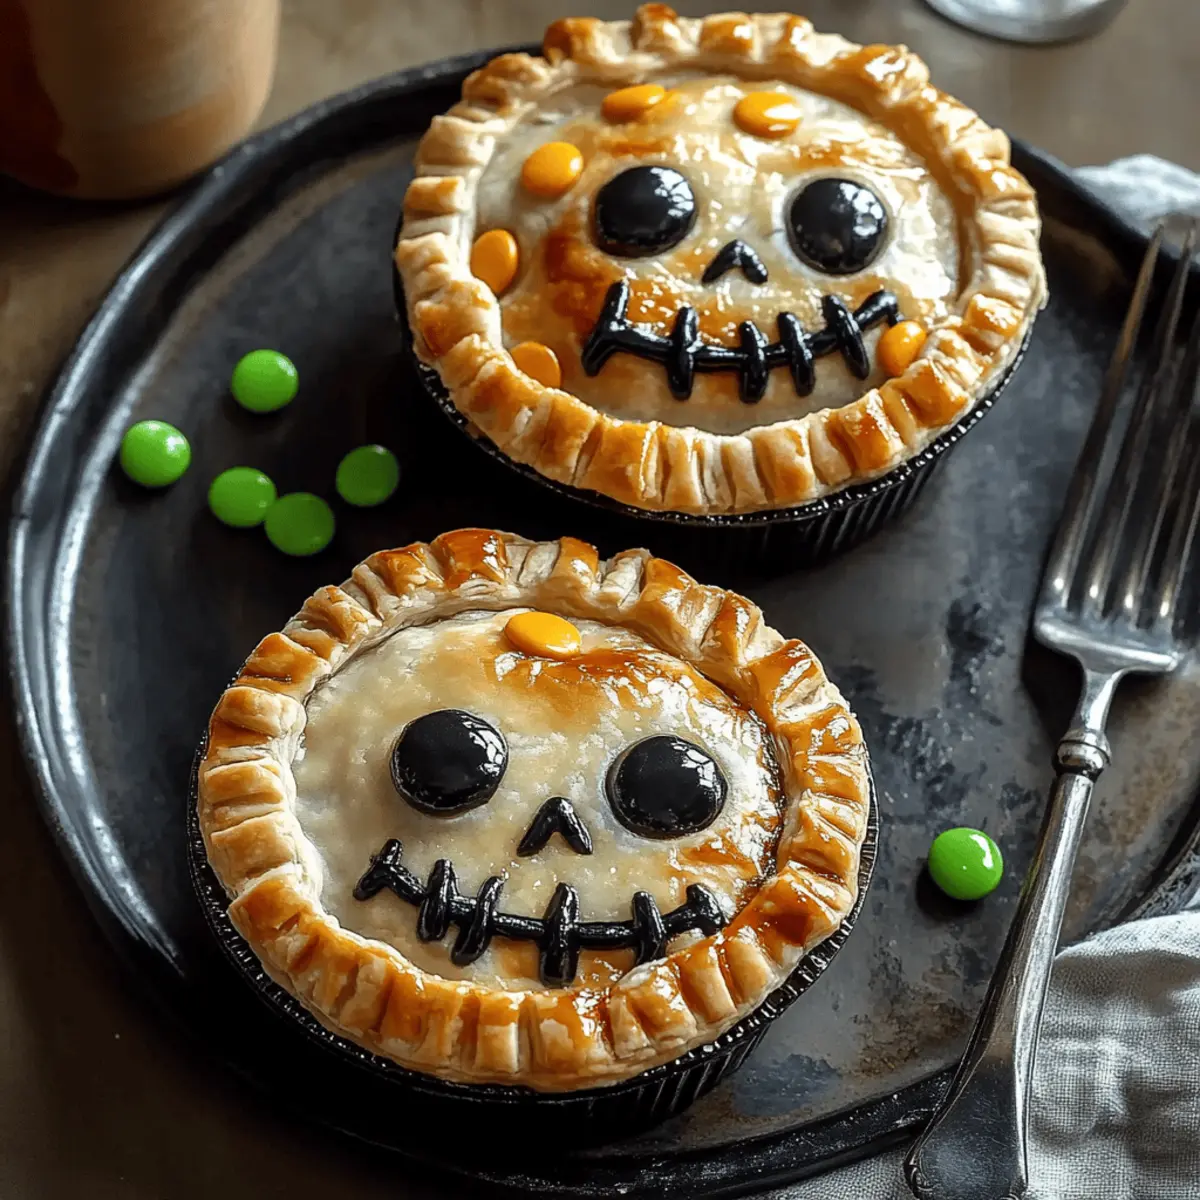
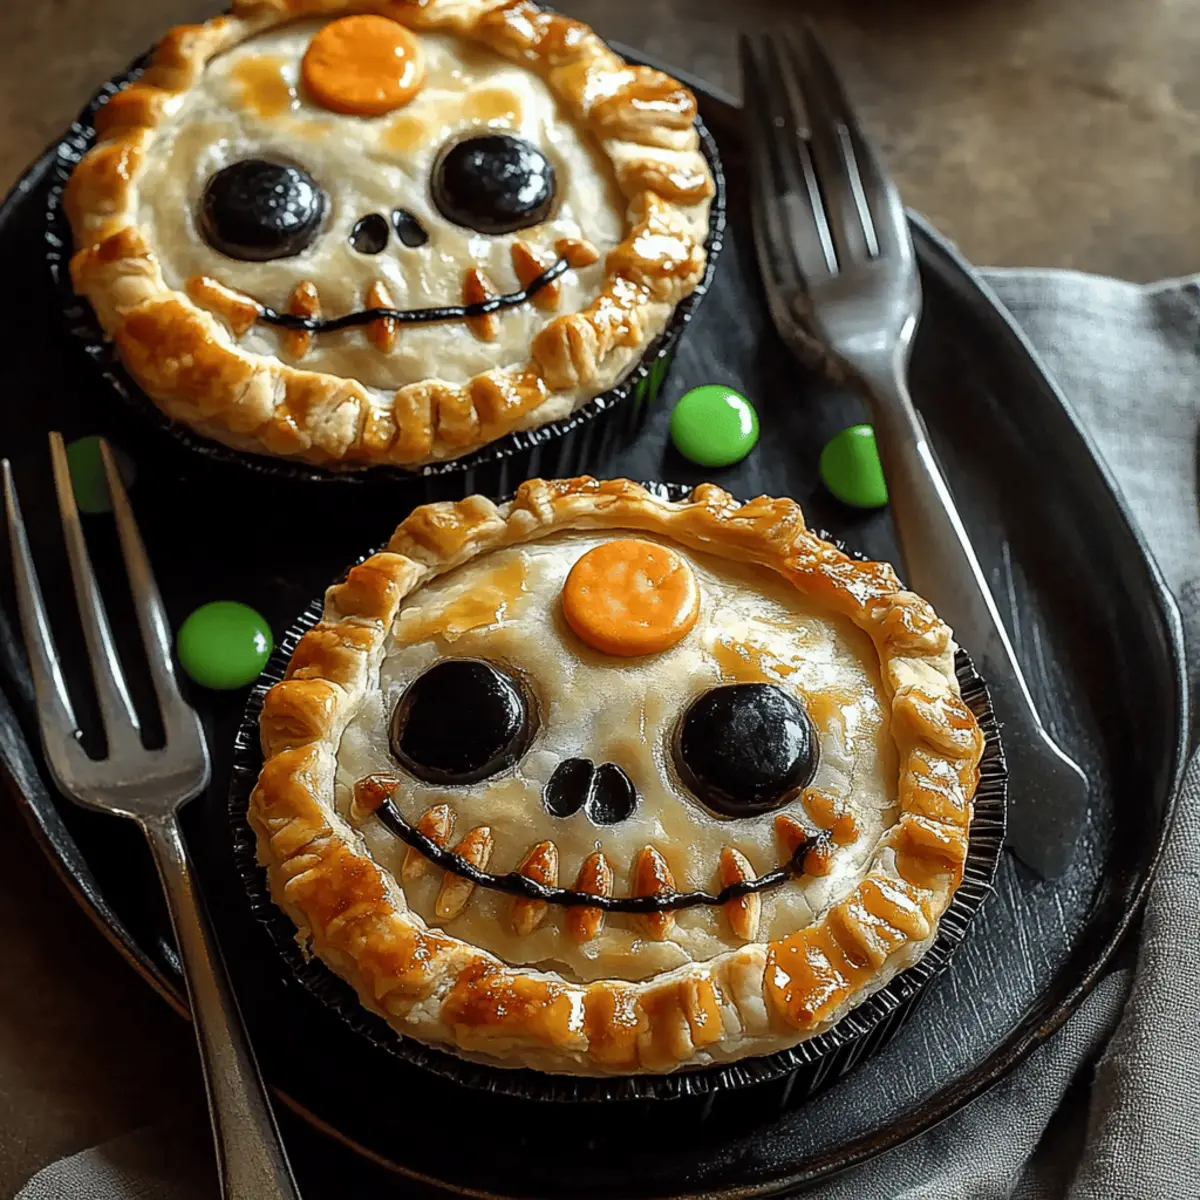
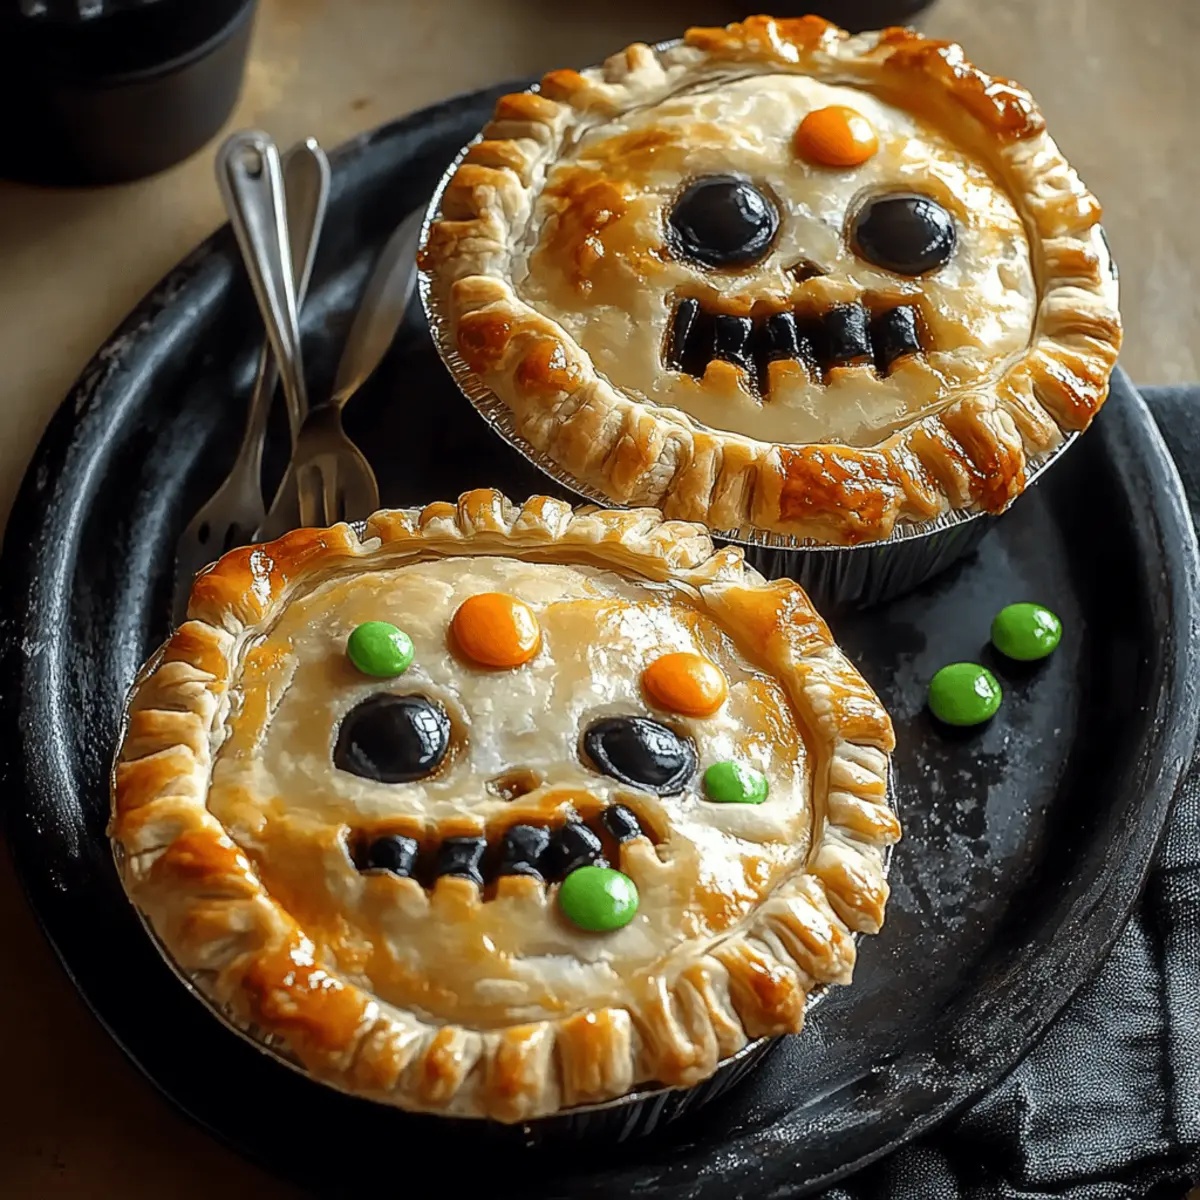
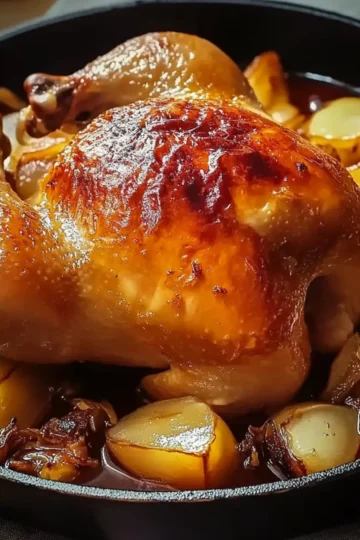
“Eww, what is that?” I heard my niece exclaim, peering into the bubbling pot. With a cheeky grin, I unveiled my latest creation: Zombie Pot Pies! These delightfully creepy treats are a playful twist on the classic comfort food and are sure to be a hit at any Halloween gathering. Filled with a creamy chicken mixture and cloaked in flaky golden puff pastry, they capture the festive spirit while providing a simple, kid-friendly option that even adults will love. Plus, they’re quick to prepare and perfect for make-ahead meal planning, making your spooky celebrations even easier. Are you ready to conjure up some fun with these ghoulish delights? Let’s dive into the recipe!
Why Are Zombie Pot Pies a Must-Try?
Kid-Friendly Fun: These Zombie Pot Pies are not just delicious; they add an element of excitement to mealtime that kids will adore. Quick and Easy: With straightforward instructions, you’ll have these delightful pies ready in no time, perfect for busy Halloween nights. Versatile Filling: Feel free to customize the filling to suit your family's preferences, whether you stick with chicken or try a vegan option. Make-Ahead Magic: Bake them up to two months in advance and pop them in the oven when ready for a spooky surprise. Finally, Crowd-Pleasing Appeal: These whimsical pot pies are bound to steal the show, whether you serve them at a kids' party or an adult gathering. Don't forget to check out our tips on make-ahead meals for more festive ideas!
Zombie Pot Pie Ingredients
Get ready to whip up some deliciously spooky treats that will have everyone asking for seconds!
For the Filling
- Cooked, shredded chicken – Main protein for a hearty filling; you can use rotisserie chicken for a quick option.
- Frozen peas and carrots – Adds vibrant color and sweetness; substitute with mixed frozen vegetables if desired.
- Corn (optional) – Enhances sweetness and texture; feel free to omit it if that’s not your style.
- Butter – Forms the base of the creamy sauce; margarine or oil works as alternatives.
- Flour – Helps thicken the filling; cornstarch can be substituted for a gluten-free version.
- Chicken broth – Adds rich flavor; vegetable broth is a great option for a vegetarian twist.
- Milk – Creates a creamy texture; try almond or oat milk for a dairy-free version.
- Salt and pepper – Essential for seasoning; adjust to your taste preference.
- Garlic powder – Boosts flavor depth; fresh garlic can be used if you prefer a stronger kick.
For the Pastry
- Puff pastry – Provides that flaky crust everyone loves; you can use a pie crust, just be sure to pre-bake it.
- Egg (for egg wash) – Gives a golden-brown finish; omit it for vegan pies or substitute with milk.
Dive into these Zombie Pot Pies and enjoy a whimsical culinary experience for Halloween!
Step‑by‑Step Instructions for Zombie Pot Pies
Step 1: Preheat the Oven
Begin by preheating your oven to 400°F (200°C) to ensure a perfectly crisp crust for your Zombie Pot Pies. This temperature is essential for achieving that golden-brown pastry that everyone loves. While the oven heats up, prepare your workspace and gather all your ingredients, making it easier to whip everything together as you go.
Step 2: Make the Roux
In a medium saucepan over medium heat, melt 3 tablespoons of butter until bubbly. Gradually whisk in ¼ cup of flour, stirring constantly for about one minute until the mixture is smooth. Slowly add 1 cup of chicken broth and ½ cup of milk to the roux, continuing to whisk until thickened, which should take around 3-5 minutes. You’ll know it’s ready when it resembles a creamy sauce.
Step 3: Combine the Filling
Once your roux is thickened, it's time to make the filling for your Zombie Pot Pies. Stir in 2 cups of cooked, shredded chicken, along with 1 cup of frozen peas and carrots, ensuring an even mix. Season the filling with salt, pepper, and 1 teaspoon of garlic powder for added flavor. Cook for another 3 minutes while stirring to combine everything nicely, creating a comforting, hearty filling.
Step 4: Prepare the Pastry
Roll out your puff pastry on a lightly floured surface. Use a knife to cut the pastry into shapes slightly larger than your ramekins, which will be used for baking. For added fun, take a small knife and carve spooky zombie faces into the pieces if you're feeling creative! This playful touch will make your Zombie Pot Pies even more delightful for your Halloween gathering.
Step 5: Assemble the Pies
Now it's time to assemble your Zombie Pot Pies! Spoon the delicious filling into each ramekin, filling them about three-quarters full. Place the puff pastry cut-outs on top of the filling, sealing the edges of the pastry down firmly. Gently brush the tops with an egg wash for a golden finish, and use a small knife to create steam slits in the pastry for ventilation during baking.
Step 6: Bake
Carefully place your filled ramekins in the preheated oven and bake for 20-25 minutes. Keep an eye on them as they bake; you want to see the pastry puffing up beautifully and turning a lovely golden-brown. A bubbly filling spilling from the slits is also a sure sign that your Zombie Pot Pies are almost ready to delight everyone at the table.
Step 7: Let Them Rest
Once baked, remove your Zombie Pot Pies from the oven and let them cool for 5-10 minutes. This resting time is crucial; it allows the filling to settle and makes it safe to enjoy without burning your tongue. Meanwhile, take a moment to admire your spooky creations before serving them up to your eager guests!
Expert Tips for Zombie Pot Pies
-
Chill the Filling: Allow the filling to cool before assembling. This prevents the pastry from getting soggy and helps maintain that delightful crispiness.
-
Watch the Bake Time: Keep an eye on your pies in the oven; bake until golden brown. Overbaking can lead to a dry filling, so set a timer!
-
Perfect Pastry: If using store-bought puff pastry, let it thaw slowly overnight in the fridge for better handling and flakiness during baking.
-
Customize Wisely: Feel free to substitute the chicken in these Zombie Pot Pies with turkey or vegetables, but make sure you balance the moisture to avoid a soggy bottom.
-
Test for Doneness: To check if the filling is bubbly and hot throughout, insert a toothpick in the filling area and feel for heat as well as look for bubbling from the slits.
-
Storage Savvy: Leftover Zombie Pot Pies can be refrigerated for up to 3 days or frozen for an easy dinner later. Just reheat thoroughly before serving!
What to Serve with Zombie Pot Pies
Elevate your Halloween dinner with a medley of sides and treats that complement these whimsical pot pies beautifully.
-
Crispy Green Salad: Fresh greens with a tangy vinaigrette add a refreshing crunch, balancing the richness of the creamy filling. Consider adding colorful veggies for vibrancy.
-
Garlic Breadsticks: Soft, buttery breadsticks with a hint of garlic make for a delightful comfort food pairing. Their warmth harmonizes perfectly with the hot, bubbling pies.
-
Pumpkin Soup: A velvety pumpkin soup brings in seasonal flavors, offering a warm and cozy vibe that aligns beautifully with Halloween celebrations.
-
Sweet Potato Fries: These crispy, lightly salted fries contribute a natural sweetness that pairs wonderfully with the savory filling. Their crunch adds a satisfying contrast to the softness of the pot pies.
-
Halloween-themed Fruit Platter: Get creative with a spooky fruit platter using seasonal fruits like oranges, grapes, and bananas cut into fun shapes. This adds whimsy and refreshment to your feast.
-
Spooky Mocktails: Serve up charm with thematic drinks, like a green punch with floating gummy worms. These fun beverages keep the festive spirit alive and make dining exciting.
-
Chocolate Mousse: For dessert, a rich and silky chocolate mousse adds an indulgent finish to the meal. Its creamy texture is a delightful way to end your Halloween evening.
-
Warm Apple Crumble: This classic dessert brings warmth and comfort, with its sweet, cinnamon-scented filling paired with a crispy topping. It's a nostalgic way to echo the flavors of fall.
Make Ahead Options
Preparing these Zombie Pot Pies ahead of time is a breeze and perfect for busy Halloween weeks! You can make the filling up to 3 days in advance and refrigerate it. To keep everything tasting fresh, store it in an airtight container. Alternatively, if you're looking to save even more time, assemble the unbaked pies, wrap them tightly, and freeze for up to 2 months. When you're ready to enjoy, simply bake them directly from the freezer; just add a few extra minutes to the baking time for those deliciously golden results. With this make-ahead strategy, you’ll ensure a delightful treat is always just a short bake away!
How to Store and Freeze Zombie Pot Pies
Fridge: Refrigerate baked Zombie Pot Pies for up to 3 days in an airtight container to maintain freshness and flavor.
Freezer: Unbaked Zombie Pot Pies can be stored in the freezer for up to 2 months. Wrap them tightly in plastic before placing them in a freezer-safe bag. Bake directly from frozen when ready to enjoy.
Reheating: To reheat leftover baked Zombie Pot Pies, place them in a preheated oven at 350°F (175°C) for 15-20 minutes, or until heated through. Alternatively, microwave individual portions for quick snacks, adjusting the time based on the power level.
Assembly Tip: If you pre-make pie fillings, consider storing them separately for easier reheating and fresh assembly with puff pastry later on.
Zombie Pot Pies Variations & Substitutions
Feel free to get creative and adjust the Zombie Pot Pies to suit your taste buds and dietary needs!
-
Protein Swap: Use turkey or beef instead of chicken for a fresh twist. Each protein brings its unique flavor, making the dish versatile and fun to enjoy!
-
Veggie Boost: Integrate mushrooms or diced bell peppers for added texture and flavor. Not only will you enhance the filling's nutrition, but you'll also add a delightful layer of taste!
-
Seasonal Spices: Experiment with ranch seasoning or a pinch of allspice for warming flavors. These spices can elevate your pot pies into a new realm of comfort food bliss.
-
Pastry Fun: Shape puff pastry into Halloween-themed designs like bats or pumpkins for a festive touch. Kids and adults alike will appreciate this playful element at your table!
-
Spicy Version: Add diced jalapeños or red pepper flakes for heat, perfect for those who love a kick. Just be sure to adjust the quantity according to your crowd's spice tolerance!
-
Vegan Option: Substitute chicken with chickpeas or lentils and use plant-based milk and broth for a hearty, vegan-friendly version. Nobody will miss the meat with all that flavor packed in!
-
Mini Pies: Utilize phyllo dough for smaller, bite-sized versions perfect as appetizers. They’re fun to serve at parties and great for dipping into sauces!
-
Cheesy Delight: Add a generous sprinkle of cheese before covering with puff pastry for an extra creamy texture. Options like cheddar or mozzarella melt beautifully and enhance the cheesy goodness.
Create your own spooky masterpiece with these variations, and don’t forget to check out our quirky fun tips on make-ahead meals for even more festive inspiration!

Zombie Pot Pies Recipe FAQs
How do I choose the right chicken for my Zombie Pot Pies?
Absolutely! For the best flavor and convenience, I recommend using cooked, shredded rotisserie chicken. It saves time and adds delicious taste, but you can also use leftover roasted or grilled chicken if you have some on hand.
What’s the best way to store leftover Zombie Pot Pies?
Leftover baked Zombie Pot Pies can be refrigerated for up to 3 days. Be sure to place them in an airtight container to preserve freshness and flavor. If you're planning to keep them longer, freezing is the way to go!
Can I freeze unbaked Zombie Pot Pies? How?
Very much so! You can store unbaked Zombie Pot Pies in the freezer for up to 2 months. First, wrap each pie tightly in plastic wrap and then place them in a freezer-safe bag. When you're ready to bake, there's no need to thaw—pop them directly into a preheated oven and enjoy!
What should I do if my filling seems too thick or too thin?
If your filling is too thick, simply add a splash of chicken broth or milk while stirring until you reach your desired consistency. If it’s too thin, continue cooking it over medium heat for a few minutes to help it thicken, or add a little more flour if necessary. Just whisk it in gradually to avoid lumps!
Are there any dietary considerations for making Zombie Pot Pies?
Absolutely! If you're looking for gluten-free options, substitute the flour in the roux with cornstarch or a gluten-free flour blend. For dairy-free adaptations, almond or oat milk works beautifully in place of regular milk. Always remember to check package labels for allergens, especially in pre-made puff pastry.
How can I make these Zombie Pot Pies vegan?
Great question! To turn your Zombie Pot Pies into a vegan dish, simply swap the chicken with chickpeas or lentils, and use vegetable broth along with plant-based milk. For an ooey-gooey filling, you can stir in some vegan cream cheese as well. Enjoy the spooky fun while keeping it vegan!
Irresistibly Fun Zombie Pot Pies: A Spooky Delight for All
Ingredients
Equipment
Method
- Preheat your oven to 400°F (200°C).
- Melt 3 tablespoons of butter in a medium saucepan. Whisk in ¼ cup of flour for 1 minute.
- Slowly add 1 cup of chicken broth and ½ cup of milk until thickened, about 3-5 minutes.
- Stir in 2 cups of cooked, shredded chicken and 1 cup of frozen peas and carrots. Season with salt, pepper, and garlic powder.
- Roll out puff pastry and cut into shapes larger than ramekins. Optionally, carve spooky faces into pastry pieces.
- Spoon filling into ramekins and cover with pastry, sealing the edges. Brush with egg wash and create steam slits.
- Bake for 20-25 minutes until pastry is golden brown and filling is bubbly.
- Let the pies cool for 5-10 minutes before serving.


Leave a Reply