
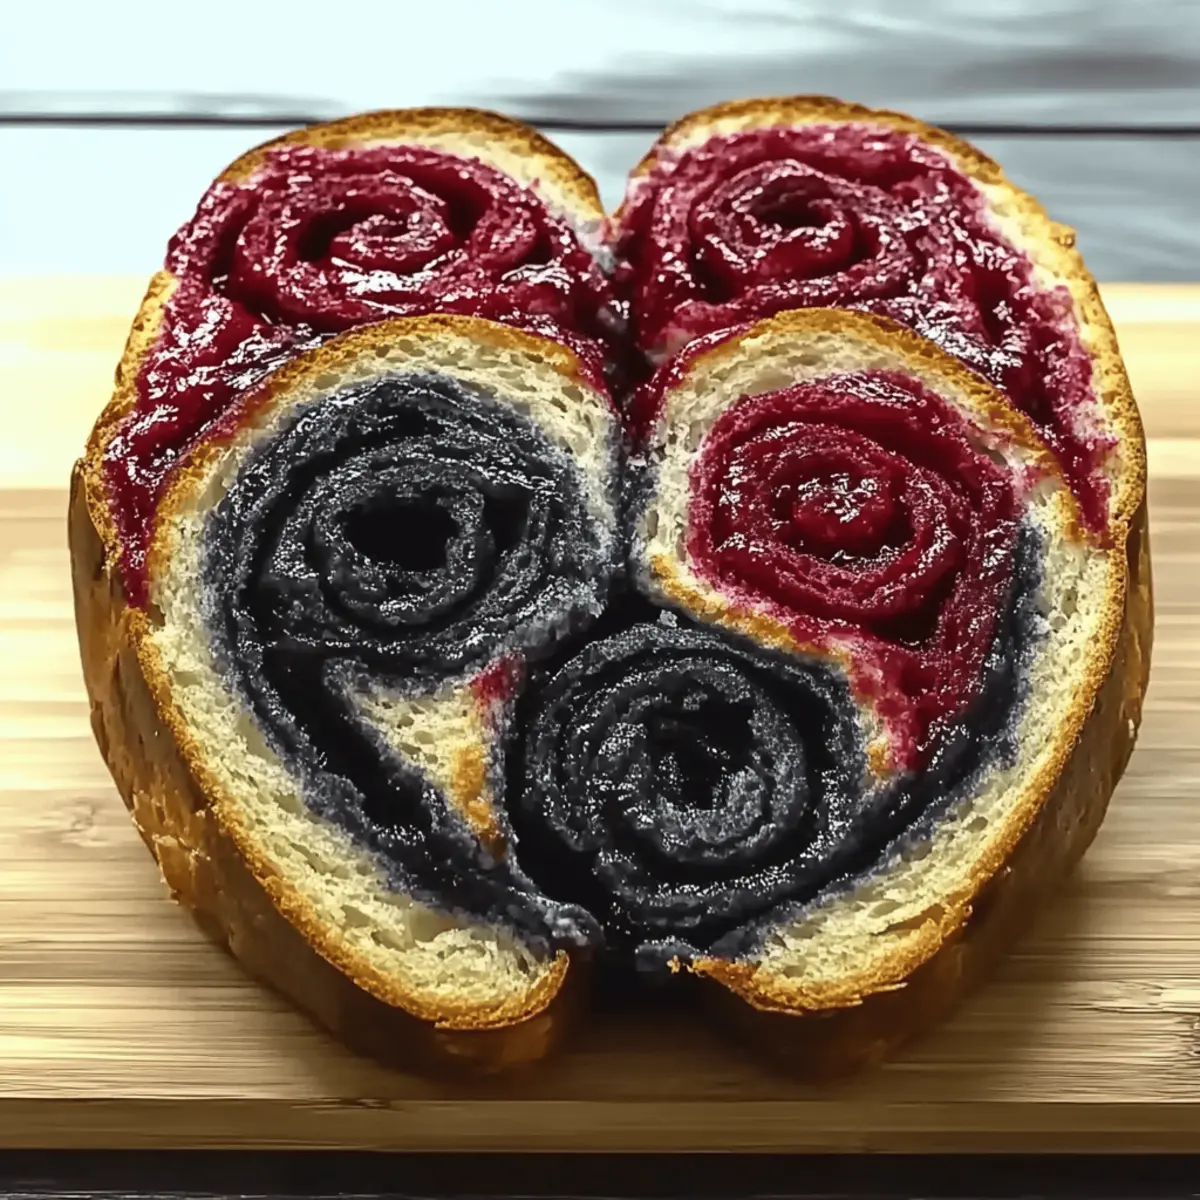
As the leaves turn and the air cools, I can’t help but feel that familiar excitement for Halloween. It’s a time filled with whimsy, creativity, and, of course, delicious treats like my Spooky Vampire Bread! This delightful recipe showcases stunning red and black swirls, making it an eye-catching centerpiece for any festive gathering. Not only is it super fun to make, but it also caters to gluten-free and dairy-free diets, ensuring that everyone can indulge in this spooky delight. The best part? It comes together quickly and fills your home with the warm aroma of fresh-baked bread, perfect for cozy nights in or Halloween parties. Curious about how to bring this festive spirit to your kitchen? Let’s dive into the recipe!

Why is Vampire Bread a Must-Try?
Visual Appeal: The striking red and black swirls of this bread not only capture attention but also spark delicious conversations at any Halloween gathering.
Diet-Friendly: Enjoy gluten-free and dairy-free alternatives, allowing everyone to savor the richness without compromise.
Easy Process: The step-by-step instructions make it accessible for both novice bakers and seasoned chefs alike!
Quick Bake Time: Ready in just about 30 minutes, it fits perfectly into your busy Halloween preparations.
Versatile Treat: Whether served with spooky dips or enjoyed on its own, this bread creates a memorable experience. For even more festive ideas, check out my Serving Suggestions for tasty pairings!
Vampire Bread Ingredients
For the Dough
• All-Purpose Flour – Provides structure for the bread; substitute with gluten-free flour for a gluten-free version.
• Yeast – Activates the dough, creating a light texture; use active dry or fresh yeast for best results.
• Sugar – Adds sweetness and aids yeast activation; can be reduced or substituted with stevia.
• Salt – Enhances flavor; omit for low-sodium diets.
• Warm Water (110°F / 43°C) – Activates the yeast, ensuring proper dough rise.
• Butter (or Oil) – Adds richness; use plant-based butter for a dairy-free option.
For the Coloring
• Food Coloring (Red and Black) – Creates the signature spooky swirls; natural dyes like beet juice can be used for a healthier alternative.
With these basic yet essential ingredients, you're on your way to crafting the perfect Vampire Bread that will steal the show at your Halloween festivities!
Step‑by‑Step Instructions for Vampire Bread
Step 1: Prepare the Dough
In a large mixing bowl, combine the all-purpose flour, sugar, yeast, and salt. Gradually pour in 110°F (43°C) warm water, mixing using a wooden spoon or your hands until a tacky dough forms. Transfer the dough to a floured surface and knead for 8-10 minutes until it is smooth and elastic, achieving a soft texture that springs back when pressed.
Step 2: First Rise
Place the kneaded dough in a lightly greased bowl, covering it with a clean kitchen towel or plastic wrap. Set it in a warm, draft-free area to rise for 1-2 hours, allowing it to double in size. You'll know it's ready when you can poke a finger into the dough and the indentation remains.
Step 3: Color the Dough
After the first rise, punch down the dough to release any trapped air. Divide the dough into two equal portions. In separate bowls, color one portion red and the other black using food dye; knead until the colors are well incorporated, creating vibrant shades that will define your spooky Vampire Bread.
Step 4: Shape the Loaf
On a floured surface, roll out each colored dough into rectangular sheets. Layer the red dough on top of the black dough, then gently twist them together to form a visually striking loaf shape. Be gentle while twisting to maintain the beautiful swirls that will create that eye-catching appearance.
Step 5: Second Rise
Carefully transfer the twisted loaf into a greased loaf pan. Cover it with a kitchen towel and let it rise again for about 30 minutes while you preheat your oven to 350°F (175°C). The dough should expand slightly, developing a fluffy texture in preparation for baking.
Step 6: Bake
Once preheated, place the loaf in the oven and bake for approximately 30 minutes. You'll know the Vampire Bread is done when it turns golden brown and sounds hollow when tapped on the bottom. Enjoy the enticing aroma as it fills your kitchen, signaling a delicious treat is on the way.
Step 7: Cool Down
Remove the loaf from the oven and let it cool in the pan for about 10 minutes. Then, transfer it to a wire rack to cool completely. The cooling process will help maintain its soft, fluffy interior, making every slice a delightful bite of your Halloween masterpiece.

Make Ahead Options
These Spooky Vampire Bread delights are perfect for meal prep and can save you valuable time during your Halloween festivities! You can prepare the dough up to 24 hours in advance. After the first rise, simply refrigerate the dough, ensuring it's covered to prevent drying out. When you're ready to bake, allow it to come to room temperature before shaping and coloring it. This way, you maintain the bread's delightful texture and flavor, and it will be just as delicious! Bake the loaf as instructed, and enjoy the aroma filling your home while saving time for all your other Halloween preparations.
What to Serve with Spooky Vampire Bread
As you gather with friends and family for a memorable Halloween celebration, consider these delightful accompaniments to elevate your mealtime experience.
-
Creamy Pumpkin Soup: This velvety soup adds warmth and seasonal flavors, enhancing the festive vibe of your spooky bread.
-
Garlic Butter Dip: Rich and aromatic, this dip complements the bread’s fluffy texture while delivering a savory kick that everyone will love.
-
Cheese Platter: A selection of your favorite cheeses offers a rich contrast to the Vampire Bread, inviting guests to create whimsical combinations.
-
Roasted Beet Salad: The earthy sweetness of beets paired with fresh greens introduces a vibrant and nutritious element to your dining experience.
-
Fruity Sangria: This refreshing drink infuses fruity flavors with a hint of spice, making it a delightful companion for enjoying slices of Vampire Bread.
-
Halloween Cookie Treats: Light, sweet, and festive cookies round out your dessert spread, providing a fun contrast to the savory bread.
Consider these suggestions to create a delightful festive feast that pairs perfectly with your Spooky Vampire Bread!
Expert Tips for Vampire Bread
-
Fresh Yeast Matters: Ensure your yeast is fresh and bubbly to avoid dense Vampire Bread. Old yeast can lead to a disappointing loaf.
-
Knead with Care: Knead until the dough is smooth; over-kneading can lead to tough bread. Aim for a soft, elastic texture.
-
Warm Rising Spot: Allow for proper dough rising in a warm, draft-free space. This is essential for achieving a light and fluffy loaf.
-
Hollow Sound Test: Check for doneness by tapping the top of your bread; it should sound hollow when fully baked, indicating it’s ready to enjoy.
-
Avoiding Color Clarity: When coloring dough, ensure the food coloring is evenly distributed to achieve vivid red and black swirls in your Vampire Bread.
Variations & Substitutions for Vampire Bread
Customize this delightful blood-red and midnight-black bread to suit your tastes or dietary needs. The aroma of fresh-baked bread combined with hints of creativity makes your kitchen the perfect Halloween haven!
-
Gluten-Free: Use a gluten-free flour blend that includes xanthan gum for a perfect texture without the gluten.
-
Dairy-Free: Swap butter for coconut oil or any plant-based butter, keeping it rich and creamy without any dairy.
-
Sugar-Free: Reduce sugar by using a stevia substitute to enjoy a lower-calorie, guilt-free indulgence that tastes just as good.
-
Color Variety: Experiment with natural food coloring, like spirulina powder for green swirls or activated charcoal for an eerie black, to get even more creative.
-
Herb-Infused: Add dried herbs like rosemary or basil to the dough for an unexpected flavor twist that pairs beautifully with party dips.
-
Cheese-Stuffed: Before shaping your loaf, roll some shredded dairy-free cheese into the dough for a savory surprise that will make your Vampire Bread unforgettable.
-
Spicy Kick: Incorporate a dash of chili powder or cayenne pepper into the dough for a delightful heat that complements the sweet flavors.
-
Nutty Texture: Fold in chopped nuts like walnuts or pecans to add crunch and healthy fats, transforming each bite into a rich delight.
These variations will not only personalize your Vampire Bread but also ensure it's a hit at your Halloween festivities! Feeling inspired? Want to serve it with something sinister? Don’t forget to check out my Serving Suggestions for tasty pairings that complement this spooky treat!
How to Store and Freeze Vampire Bread
Room Temperature: Store Vampire Bread in an airtight container at room temperature for up to 3 days to maintain its freshness.
Fridge: If you want to keep it longer, refrigerate in a well-sealed container for up to one week. This helps with moisture retention but might slightly change the texture.
Freezer: For long-term storage, wrap the bread tightly in plastic wrap and then in aluminum foil. It can be frozen for up to 3 months without losing its delightful flavor.
Reheating: To enjoy, thaw overnight in the fridge, then reheat in a 350°F (175°C) oven for about 10 minutes to restore warmth and crispness.

Spooky Vampire Bread Recipe FAQs
What type of flour should I use for gluten-free Vampire Bread?
Absolutely! For a gluten-free version of the Spooky Vampire Bread, I recommend using a high-quality gluten-free flour blend that includes xanthan gum for the best texture. Look for blends specifically designed for breadmaking to ensure good structure and rise.
How should I store Vampire Bread to keep it fresh?
To maintain freshness, store Vampire Bread in an airtight container at room temperature for up to 3 days. If you plan to enjoy it later, refrigerate it in a sealed container for up to 1 week, although this may alter its texture a bit.
Can I freeze Vampire Bread and how do I do that?
Yes, you can freeze Vampire Bread! Wrap the completely cooled loaf tightly in plastic wrap, followed by aluminum foil to prevent freezer burn. It can be stored in the freezer for up to 3 months. To enjoy, simply thaw it overnight in the refrigerator and reheat in the oven at 350°F (175°C) for about 10 minutes to restore its delicious texture.
What can I do if my dough didn’t rise properly?
If your dough didn't rise, it could be due to inactive yeast. Make sure your yeast is fresh and activate it properly by mixing it with warm water (110°F / 43°C) and a pinch of sugar before incorporating it into your dough. If it doesn’t bubble, it's best to start over. Additionally, if the environment is too cold, find a warm, draft-free area for rising—like the oven with just the light on.
Are there any dietary considerations for Vampire Bread?
For those with dietary restrictions, yes! This recipe can easily accommodate gluten-free and dairy-free diets. You can use gluten-free flour and allow for plant-based butter substitutes, ensuring that everyone can enjoy this spooky treat. Always check labels for any potential allergens or cross-contamination if serving this to others.
Irresistibly Spooky Vampire Bread for Your Halloween Feast
Ingredients
Equipment
Method
- In a large mixing bowl, combine the all-purpose flour, sugar, yeast, and salt. Gradually pour in warm water, mixing using a wooden spoon or your hands until a tacky dough forms.
- Transfer the dough to a floured surface and knead for 8-10 minutes until it is smooth and elastic.
- Place the kneaded dough in a lightly greased bowl, cover it, and let it rise in a warm, draft-free area for 1-2 hours.
- Punch down the dough, divide it into two portions, and color one portion red and the other black using food dye.
- Roll out each colored dough into rectangular sheets, layer them, and gently twist to form a loaf.
- Transfer the twisted loaf into a greased loaf pan, cover it, and let it rise for about 30 minutes while preheating the oven to 350°F.
- Bake for approximately 30 minutes, or until golden brown and sounds hollow when tapped.
- Remove from oven and cool for about 10 minutes in the pan before transferring to a wire rack to cool completely.


Leave a Reply