
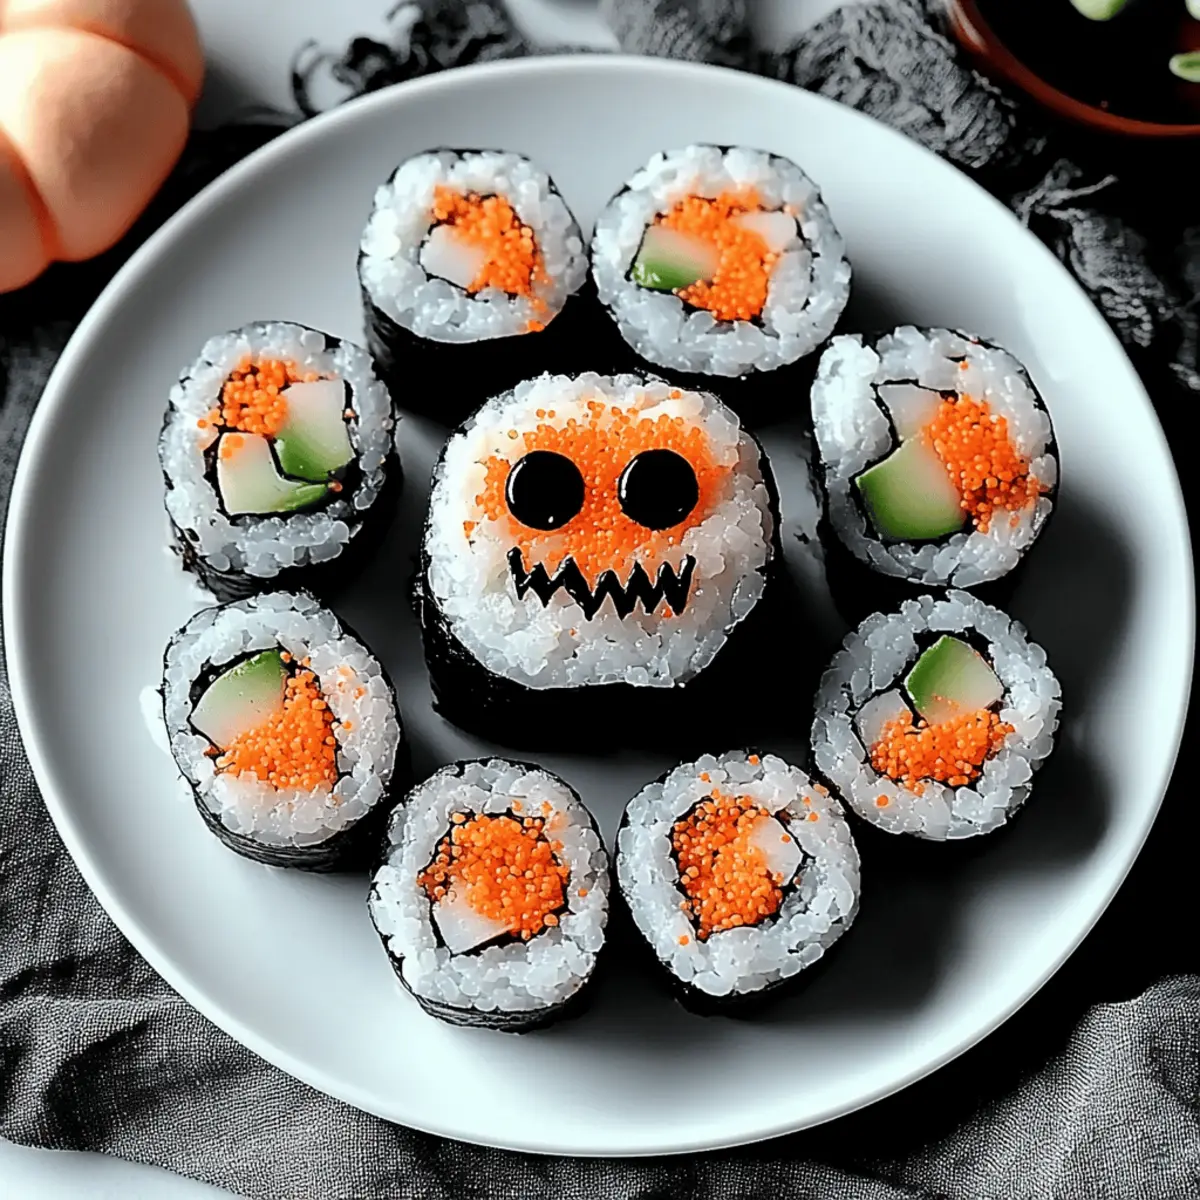
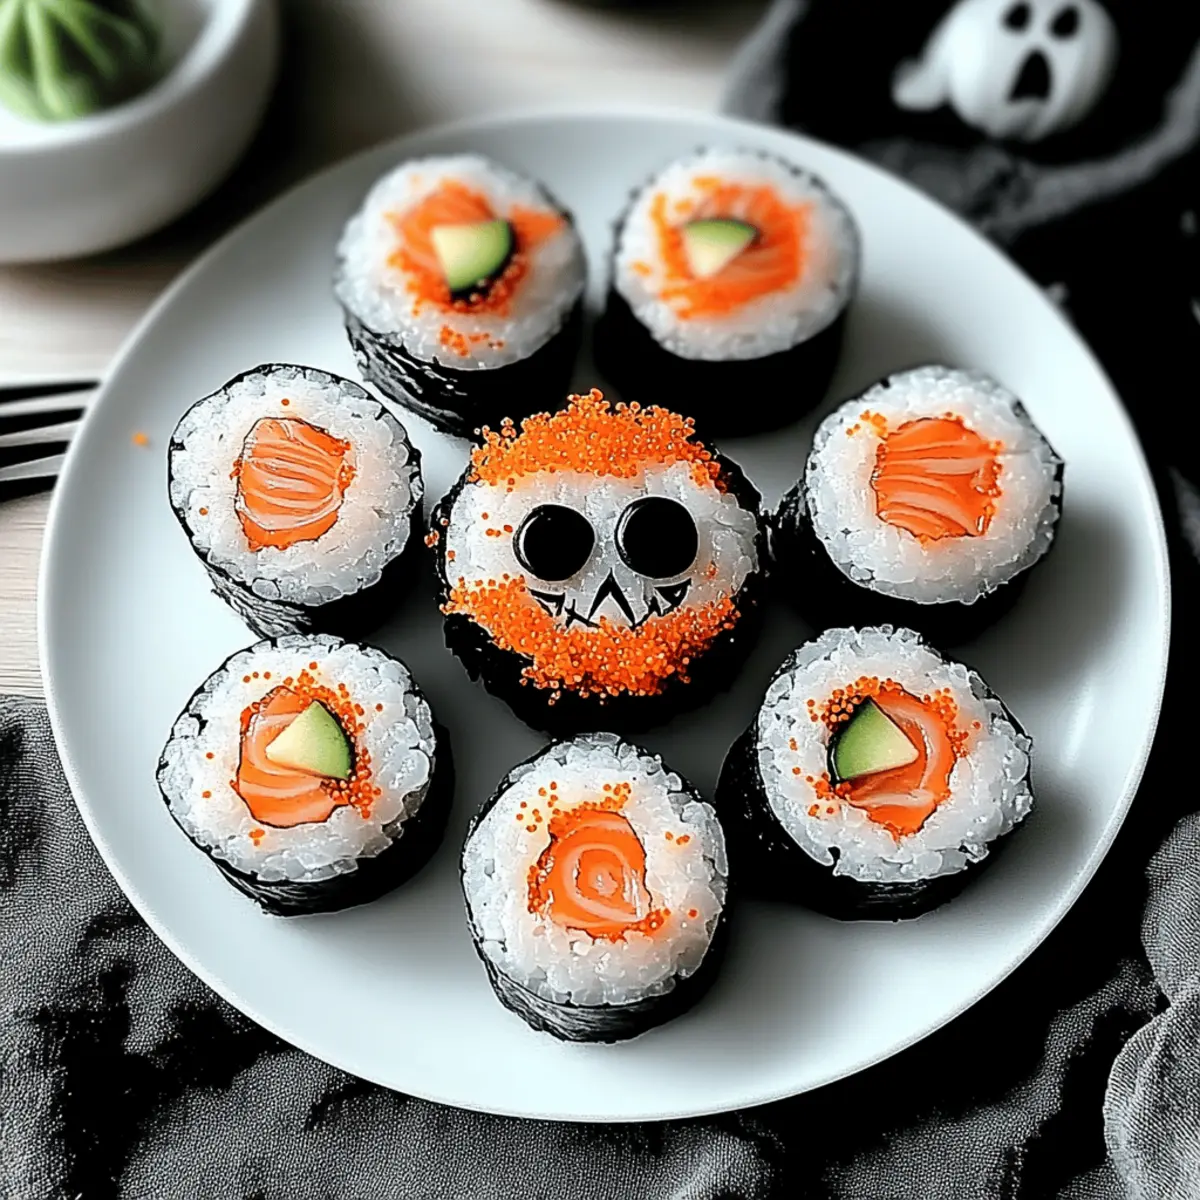
The eerie air of Halloween isn't just for costumes and decorations—it's time to create spooky food that brings joy and excitement to the table! This festive Halloween Sushi is not only a feast for the eyes with its vibrant colors and fun designs, but it's also quick to whip up and endlessly customizable. Imagine gathering around the kitchen with your family, crafting these playful rolls filled with your favorite ingredients, from creamy avocado to spicy tuna. This kid-friendly recipe invites everyone to express their creativity while enjoying a healthier, homemade alternative to takeout. So, are you ready to delight your loved ones with a spooktacular treat that’s sure to impress?

Why is Halloween Sushi a Must-Try?
Spooky Fun: This Halloween Sushi transforms mealtime into a delightful craft project, perfect for the whole family.
Customizable Flavors: Choose from a variety of fillings like creamy avocado, spicy tuna, or tender chicken to suit everyone’s taste.
Quick Assembly: With just a few simple steps, you can create these festive rolls in no time, making it an excellent choice for busy nights or last-minute gatherings.
Kid-Approved: This recipe invites kids to get involved, fostering creativity while they explore new flavors and textures in a fun way.
Healthier Option: Swap out takeout for this homemade sushi; it's an enjoyable, lighter treat loaded with fresh ingredients, perfect for family celebrations.
Halloween Sushi Ingredients
• Delight in crafting your own spooky rolls with the following ingredients!
For the Rice
- Sushi Rice – This provides a sticky base for your rolls; rinse thoroughly until the water runs clear for best texture.
- Water – Essential for cooking the sushi rice, ensuring it reaches the perfect softness.
For the Filling
- Tuna (canned) – Adds an umami punch; feel free to replace with creamy avocado for a vegetarian Halloween Sushi option.
- Mayonnaise – Bind your filling; opt for vegan mayo for a plant-based alternative!
- Sriracha – A touch of heat; adjust to suit your spice tolerance.
- Cucumber – Offers a crisp crunch; julienned carrots can be a delightful substitution if desired.
For Assembly
- Nori (seaweed sheets) – Wraps your sushi tightly; make sure the shiny side faces down as you roll.
- Black Sesame Seeds (optional) – Sprinkle for a spooky aesthetic to enhance your Halloween presentation.
- Edible Ink Markers (optional) – Use these to draw whimsical designs on your sushi, making it even more festive!
Step‑by‑Step Instructions for Halloween Sushi
Step 1: Prep Workspace
Begin by tidying your kitchen and gathering all ingredients and tools you'll need, including a bamboo sushi mat, sharp knife, and a bowl of water for sealing. Lay out your sushi rice, nori sheets, filling ingredients, and optional black sesame seeds or edible ink markers. This organized setup will streamline your process as you dive into making your delightful Halloween Sushi.
Step 2: Cook Sushi Rice
Rinse your sushi rice under cold water until the water runs clear to remove excess starch. Combine the rinsed rice with 1.5 cups of water in a medium saucepan over high heat. Once it reaches a boil, reduce the heat to low, cover, and let it simmer for 20 minutes until the water is absorbed. Allow the rice to cool for 10 minutes before handling, ensuring it's sticky and perfect for rolling.
Step 3: Prepare Filling
While the rice is cooling, drain the canned tuna and place it in a mixing bowl. Add mayonnaise and sriracha to the tuna, stirring until you achieve a creamy, smooth consistency. Feel free to adjust the sriracha to your taste—this mixture will provide a flavorful kick to your Halloween Sushi. If you prefer a vegetarian option, simply swap in creamy mashed avocado for a different thrill!
Step 4: Assemble the Sushi
Lay a sheet of nori, shiny side down, on the bamboo mat. With wet fingers, spread an even layer of sushi rice across the nori, leaving about 1 inch of space at the top edge for sealing later. Press the rice down gently, ensuring an even surface that will hold your Halloween Sushi together beautifully.
Step 5: Add Filling
In the center of the rice-covered nori, place a generous line of your prepared tuna mixture, followed by strips of cucumber or your chosen fillings. Be creative; you can mix and match with julienned carrots or whatever veggies your family enjoys! Avoid overstuffing to keep your sushi rolls intact.
Step 6: Roll Sushi
Starting from the bottom edge of the bamboo mat, carefully roll the sushi away from you, applying gentle pressure to keep it tight. As you approach the bare edge of the nori, wet it with water to help seal the roll. Continue rolling until the entire sushi is tightly wrapped, forming a log shape that looks as festive as it is delicious.
Step 7: Slice
With your sharp knife dipped in water to prevent sticking, cut the roll into 6-8 equal pieces. Ensure your knife is clean between cuts to maintain neat edges on each sushi piece. The vibrant colors and shapes of your Halloween Sushi will make each slice a visual delight ready for serving.
Step 8: Decorate
For an extra touch of fun, use edible ink markers to draw spooky designs on each sushi piece after slicing. This playful decoration adds a festive flair that will captivate kids and adults alike, enhancing the Halloween atmosphere around your table.
Step 9: Serve
Arrange your completed Halloween Sushi on a platter, showcasing the colorful and creatively decorated rolls. Serve alongside soy sauce or your favorite dipping sauces for added flavor. Gather your friends and family around to share in this fun, festive treat that’s sure to be the highlight of your Halloween festivities!
How to Store and Freeze Halloween Sushi
Fridge: Store leftover Halloween Sushi in an airtight container in the fridge for up to 1-2 days. Consuming it fresh is best for optimal flavor and texture.
Freezer: If you'd like to freeze it, wrap the sushi tightly in plastic wrap and place it in a freezer-safe bag. Consume within 1 month for the best quality.
Thawing: To enjoy frozen Halloween Sushi, thaw it overnight in the fridge before eating. Avoid refreezing once thawed to maintain texture.
Reheating: If desired, you can briefly microwave individual pieces for about 10-15 seconds to enjoy them warm, though fresh is always recommended for flavor.
Expert Tips for Halloween Sushi
Rolling Technique: Ensure you roll the sushi tightly to avoid collapsing; a loose roll can lead to messy slicing later.
Filling Moderation: Use moderate amounts of filling to prevent overstuffing. This makes for easier rolls and neater cuts in your Halloween Sushi.
Knife Care: Keep your knife clean and dipped in water between cuts to maintain sharp edges, resulting in beautiful, even slices.
Freshness Matters: Enjoy your Halloween Sushi fresh! If you have leftovers, store them in an airtight container for 1-2 days to maintain quality.
Creative Decorations: Have fun with edible ink markers! This is a great way to involve the kids in decorating their own spooky sushi designs, adding an extra layer of engagement.
Make Ahead Options
These Spooktacular Halloween Sushi rolls are perfect for meal prep, making busy weeknights a breeze! You can prepare the sushi rice and store it in an airtight container in the refrigerator for up to 3 days. Additionally, you can mix your filling (tuna, mayonnaise, sriracha) up to 24 hours in advance; just keep it covered to maintain freshness. When you're ready to assemble, simply spread the rice on nori, add your fillings, and roll them up! To ensure your Halloween Sushi stays just as delicious, try to complete the rolling process the day you plan to serve. Your family will love this easy, fun treat, and you’ll appreciate the time saved!
What to Serve with Spooktacular Halloween Sushi
Elevate your Halloween meal by pairing this festive sushi with delightful sides and drinks that enhance the spooky experience.
-
Crispy Tempura Veggies: The light, airy texture of tempura complements the chewiness of sushi, while adding a satisfying crunch to your meal. These golden bites are perfect for adding variety and a touch of indulgence.
-
Pumpkin Soup: This warm, creamy soup offers a comforting contrast to the cool sushi. Its rich flavors celebrate the fall season beautifully, making it an ideal starter for your Halloween feast.
-
Fried Rice: A savory fried rice packed with peas, carrots, and scrambled eggs adds hearty texture and flavors that balance the lightness of sushi. This versatile dish is perfect for using up leftover veggies!
-
Seaweed Salad: The umami flavors and slight crunch of seaweed salad align perfectly with sushi. It's refreshing and offers a lovely oceanic twist that will transport you straight to the coast.
-
Mini Halloween Cupcakes: Delightful sweet treats, these spooky cupcakes bring festive cheer to your table. Their whimsical designs and rich flavors make them a hit for both kids and adults alike.
-
Ginger Ale Spritzers: Refreshing and bubbly, these spritzers serve as the perfect drink pairing. With a hint of ginger and sweetness, they cleanse the palate between bites of sushi while heightening the festive atmosphere.
-
Roasted Pumpkin Seeds: Crunchy, salty, and slightly earthy, these seeds provide a healthy snack option. Their nutty flavor adds a wonderful contrast to the sweet and savory elements of sushi.
-
Apple Cinnamon Cider: Serve warm and fragrant, this cider is a cozy beverage for your gathering. The spiced warmth will cuddle you as the coolness of the sushi gives a delightful divergence.
-
Chocolate Dipped Fruit: Dazzle your guests with beautifully dipped strawberries and bananas. The natural sweetness of the fruit paired with decadent chocolate creates a perfect dessert to end your spooky sushi night.
Halloween Sushi Variations & Substitutions
Get ready to unleash your culinary creativity and customize this festive sushi to suit your taste buds!
-
Dairy-Free: Swap traditional mayonnaise for a creamy vegan alternative to keep your sushi free from dairy while maintaining that delightful flavor.
-
Heat Level: Adjust the spiciness by using mild aioli instead of sriracha, making it perfect for young palates. A splash of lime juice can also elevate the taste!
-
Vegetarian Delight: Replace tuna with a mix of creamy avocado and roasted bell peppers for a vibrant vegetarian option everyone will love.
-
Protein Power: Use shredded chicken, crab meat, or even tempeh if you want to experiment with different proteins! Each choice offers a unique twist in flavor and texture.
-
Crunchy Twist: Instead of cucumber, try adding crispy tempura veggies or pickled radish for an exciting texture contrast. You'll love the delightful crunch they add!
-
Flavor Boost: Drizzle some sesame oil over your filling for a nutty flavor that enhances the overall taste and brings a lovely fragrance to your sushi.
-
Fun Shapes: Get creative by using cookie cutters to shape your nori into spooky Halloween figures—think bats or pumpkins! This fun presentation is guaranteed to wow everyone.
-
Garnish Glam: Sprinkle some chopped chives or cilantro on top of your sushi before serving for an added touch of color and freshness! This tiny detail makes a big visual impact.
Feel free to mix and match these variations, and don’t forget to explore more sushi options like Maki Rolls or Sushi Bowls to keep mealtime exciting!
Halloween Sushi Recipe FAQs
How do I choose the right sushi rice?
Absolutely! Look for short-grain sushi rice, which is stickier and helps keep the rolls together. Rinse it thoroughly until the water runs clear to remove excess starch, ensuring the best texture for your Halloween Sushi.
What is the best way to store leftover Halloween Sushi?
Leftover Halloween Sushi should be stored in an airtight container in the fridge, where it will keep for about 1-2 days. If you plan to enjoy your sushi fresh, try to consume it within this timeframe for optimal flavor and texture.
Can I freeze Halloween Sushi for later use?
Yes! To freeze your Halloween Sushi, wrap each roll tightly in plastic wrap and then place them in a freezer-safe bag. They can be kept in the freezer for up to 1 month. When you’re ready to eat, thaw the rolls overnight in the fridge. Avoid refreezing them after thawing to maintain the best quality.
How can I troubleshoot if my sushi rolls keep falling apart?
Very! Make sure you're rolling the sushi tightly, as a loose roll will collapse while slicing. Also, avoid overstuffing with fillings to ensure the rolls stay intact. Finally, ensure your sushi rice is appropriately sticky; rinse it well and let it cool slightly before assembly.
Are there any dietary considerations I should keep in mind?
Yes, definitely! If you're serving children or guests with allergies, be cautious with ingredients like tuna and sriracha. Consider using creamy avocado instead for a vegetarian option. Always check for potential allergens in your fillings, and don't hesitate to get creative with your choices!

Spooktacular Halloween Sushi: Easy and Fun Family Treat
Ingredients
Equipment
Method
- Begin by tidying your kitchen and gathering all ingredients and tools you'll need, including a bamboo sushi mat, sharp knife, and a bowl of water for sealing.
- Rinse your sushi rice under cold water until the water runs clear. Combine the rinsed rice with 1.5 cups of water in a medium saucepan over high heat. Once it reaches a boil, reduce the heat to low, cover, and let it simmer for 20 minutes until the water is absorbed. Allow the rice to cool for 10 minutes.
- While the rice is cooling, drain the canned tuna and place it in a mixing bowl. Add mayonnaise and sriracha to the tuna, stirring until you achieve a creamy consistency.
- Lay a sheet of nori, shiny side down, on the bamboo mat. With wet fingers, spread an even layer of sushi rice across the nori, leaving about 1 inch of space at the top edge for sealing later.
- In the center of the rice-covered nori, place a generous line of your prepared tuna mixture, followed by strips of cucumber or other fillings.
- Starting from the bottom edge of the bamboo mat, carefully roll the sushi away from you, applying gentle pressure. Wet the bare edge with water to help seal the roll.
- With your knife dipped in water, cut the roll into 6-8 equal pieces. Keep your knife clean between cuts.
- Use edible ink markers to draw spooky designs on each sushi piece after slicing for added festive flair.
- Arrange your completed Halloween Sushi on a platter, serving with soy sauce or your favorite dipping sauces.


Leave a Reply