
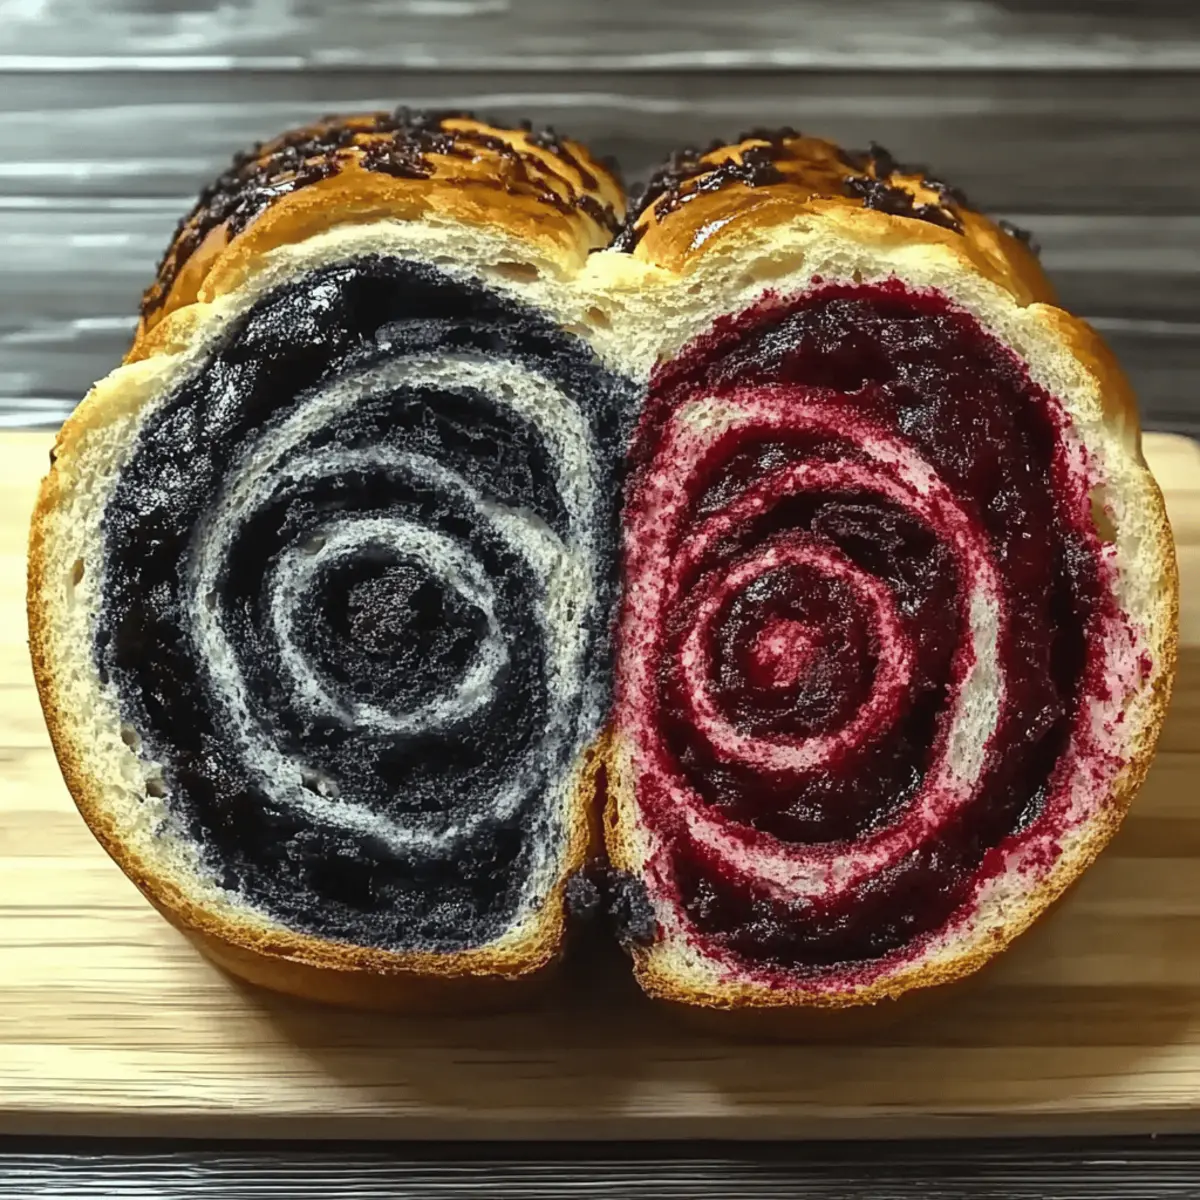
As autumn leaves begin to fall and the air turns crisp, my kitchen transforms into a cauldron of creativity. This year, I’m conjuring a delightful treat that’s sure to captivate friends and family at any Halloween gathering: Spooky Vampire Bread. With its eye-catching red and black swirls, this visually stunning loaf isn’t just a feast for the eyes; it’s also a friendly option for those on gluten-free and dairy-free diets. Imagine serving up a low-fat delight that doubles as a conversation starter, perfect for breakfast or as a spooktacular addition to your holiday spread. Are you ready to embark on this whimsical baking adventure? Let’s rise to the occasion!

Why is Vampire Bread a Must-Try?
Visually Stunning: The striking red and black swirls make this bread a showstopper that will impress guests at any gathering.
Inclusive and Friendly: Perfect for those on gluten-free and dairy-free diets, everyone can enjoy this festive treat without compromise.
Low-Fat Delight: At approximately 150 calories per slice, it’s a guilt-free indulgence that doesn’t skimp on flavor.
Easy and Fun: With simple steps and kid-friendly coloring, this recipe makes for a delightful family activity, perfect for sparking creativity during Halloween.
Versatile Serve: Whether at a brunch, party, or as a spooky breakfast, this bread is sure to be a crowd favorite! Try also pairing it with your favorite spreads for an extra touch.
Vampire Bread Ingredients
• Create your spooky masterpiece with these easy-to-find ingredients!
For the Dough
- All-Purpose Flour – Provides structure and delicious texture; for gluten-free, substitute with gluten-free flour.
- Yeast – Lights up the texture by making the dough rise; ensure it's fresh and bubbly for best results.
- Sugar – Adds a hint of sweetness and helps activate the yeast; can be replaced with stevia if desired.
- Salt – Enhances flavors beautifully; simply omit for low-sodium diets.
- Warm Water – Activates the yeast and hydrates the dough; warm it to about 110°F (43°C) for optimal results.
- Butter (or Oil) – Adds that lovely moisture and richness; opt for plant-based butter for a dairy-free option.
For the Coloring
- Food Coloring (Red & Black) – Creates that eye-catching visual appeal; natural dyes like beet juice can be a fun substitute.
Step‑by‑Step Instructions for Spooky Vampire Bread
Step 1: Prepare the Dough
In a large mixing bowl, combine the all-purpose flour, yeast, sugar, and salt. Gradually pour in warm water heated to about 110°F (43°C), mixing until a dough forms. Begin kneading the dough on a floured surface for 8-10 minutes, until it becomes smooth and elastic. This initial step is crucial for the texture of your delightful Vampire Bread.
Step 2: First Rise
Once kneaded, shape the dough into a ball and place it in a lightly greased bowl. Cover it with a clean kitchen towel or plastic wrap, allowing it to rise in a warm, draft-free area for 1-2 hours. You'll know it’s ready when it has doubled in size, creating that perfect airy base for your Spooky Vampire Bread.
Step 3: Color the Dough
After the first rise, gently punch down the dough to release the air, then divide it into two equal portions. Choose your food coloring—red and black—and knead each color into its respective dough until the colors are vibrant and evenly distributed. This step adds the enchanting swirl effect that makes Vampire Bread so visually striking.
Step 4: Shape the Loaf
Roll each colored dough portion into rectangles roughly ¼ inch thick. Layer the red on top of the black, then carefully twist the two layers together to form a loaf shape. Pinch the ends to seal them tightly; this prevents any unwanted opening during baking, ensuring that your Vampire Bread maintains its charming form.
Step 5: Second Rise
Transfer the twisted loaf into a greased baking pan, covering it lightly again with a towel. Let it rise for another 30 minutes while preheating your oven to 350°F (175°C). You’ll want to see the dough puffing up slightly during this rise, which will give it a delightful fluffiness when baked.
Step 6: Bake
Place the prepared loaf in the preheated oven and bake for about 30 minutes. You’ll know it’s done when the top is golden brown and sounds hollow when tapped gently. This aroma will fill your kitchen, making the anticipation for your Spooky Vampire Bread even more exciting!
Step 7: Cool Down
Once baked, remove the loaf from the oven and let it cool in the pan for 10 minutes. Afterward, carefully transfer it to a wire rack and allow it to cool completely. This final cooling stage helps set the texture, ensuring that each slice of your hauntingly beautiful Vampire Bread is soft and delicious.

Make Ahead Options
These Spooky Vampire Bread are perfect for meal prep enthusiasts! You can prepare the dough up to 24 hours in advance. Simply follow the instructions up to the first rise, then cover and refrigerate the dough after kneading. This allows the flavors to develop while maintaining its quality. When you're ready to continue, let the dough come to room temperature (about 30 minutes) before punching it down, dividing, and coloring. Additionally, you can color and shape the loaf up to 3 days ahead; just refrigerate the unbaked loaf, covered with plastic wrap. When ready to bake, let it rise on the counter for 30 minutes before baking for a soft and fluffy result, just as delicious as if made fresh!
What to Serve with Spooky Vampire Bread?
Indulge your guests with delightful pairings that elevate your Halloween gathering with every bite.
-
Pumpkin Soup: This creamy, spiced soup adds warmth and an earthy flavor that complements the sweet twist of the Vampire Bread.
-
Roasted Garlic Spread: A smooth, savory spread that enhances the bread's charm while inviting everyone back for more delicious slices.
-
Herbed Cream Cheese: The tanginess of the cream cheese paired with fresh herbs provides a refreshing contrast, making every bite a new experience.
-
Baked Apple Slices: Sweet, slightly caramelized apple slices add autumnal flair, balancing the savory notes in the bread beautifully while keeping things festive.
-
Hot Apple Cider: The warm, spiced drink envelops your taste buds in cozy flavors that are perfect for a crisp fall evening.
-
Chocolate Mousse: For a touch of indulgence, a creamy chocolate mousse offers a delightful contrast to the bread's fluffy texture and spooky theme.
-
Roasted Vegetable Medley: Colorful, roasted veggies bring a hearty, nutritious element to the table while harmonizing with the bread’s playful spirit.
-
Festive Fruit Salad: Fresh, vibrant fruits add a refreshing crunch that brightens the meal, keeping the energy high and the festivities lively.
-
Mulled Wine: This aromatic drink brings warmth and a hint of spice to enhance flavors, making it a perfect sipper to accompany your Halloween feast.
Storage Tips for Vampire Bread
Room Temperature: Store your Vampire Bread in an airtight container at room temperature for up to 3 days to maintain its soft texture and freshness.
Fridge: If you need to keep it longer, refrigerate the bread for up to a week. Make sure it’s wrapped well to prevent it from drying out.
Freezer: For long-term storage, wrap Vampire Bread tightly in plastic wrap or aluminum foil, then place it in a resealable freezer bag. It will last up to 3 months in the freezer.
Reheating: To enjoy your Vampire Bread again, simply thaw it in the fridge overnight, then reheat in a 350°F (175°C) oven for about 10 minutes to bring back its fluffy goodness.
Expert Tips for Spooky Vampire Bread
- Yeast Check: Ensure your yeast is fresh and bubbly before starting. This prevents dense Vampire Bread and guarantees a lovely rise.
- Kneading Technique: Knead the dough just until smooth; over-kneading can make the bread tough. Remember, it should be soft and elastic!
- Warm Environment: Find a warm, draft-free space for both rises. A cozy environment is crucial for achieving that airy texture we all love.
- Color Gradually: Add food coloring gradually to achieve the perfect vibrant swirls. Avoid oversaturation for a cleaner, striking appearance in your bread.
- Tap for Doneness: Bake until the top is golden and sounds hollow when tapped. Trust your senses for a perfectly baked loaf every time!
Vampire Bread Variations & Substitutions
Feel free to unleash your creativity in the kitchen with these delightful twists on Vampire Bread!
- Gluten-Free: Substitute all-purpose flour with a certified gluten-free flour blend for a safe and delicious option.
- Dairy-Free: Use plant-based butter or coconut oil instead of regular butter to keep it dairy-free while retaining moisture.
- Sweet Spice: Sprinkle in some cinnamon or nutmeg to the dough for a warming, festive flavor that perfectly complements the season.
- Color Options: Experiment with different coloring combinations like orange and black or purple and green to add a fun twist for various occasions.
- Nutty Crunch: Add chopped nuts like walnuts or pecans into the dough for a crunchy texture that contrasts beautifully with the soft bread.
- Herb Infusion: Mix in some finely chopped herbs like rosemary or thyme for a savory version that's perfect for pairing with soups or stews.
- Spicy Kick: Incorporate a bit of cayenne pepper or red chili flakes into the dough for those who love a touch of heat in their treats.
- Fruity Zing: Fold in some dried fruits like cranberries or cherries to enhance both flavor and visual appeal—these pops of color make your Vampire Bread extra special.
These variations ensure that your spooky creation can cater to all preferences and occasions, creating a unique experience for every slice. Whether you're serving at a Halloween party or a cozy family brunch, the options are endless! If you’re looking for more fun baking ideas, check out my Homemade Pumpkin Bread or Cinnamon Swirl Bread. Enjoy your baking adventure!
Spooky Vampire Bread Recipe FAQs
How do I select the right flour for my Vampire Bread?
Absolutely! For the best texture, I recommend using all-purpose flour. However, if you're looking for a gluten-free option, be sure to choose a gluten-free flour blend that contains xanthan gum for similar results.
How long can I store my Vampire Bread?
Store your Spooky Vampire Bread in an airtight container at room temperature for up to 3 days. If you would like to keep it longer, you can refrigerate it for up to a week. Just make sure it’s well-wrapped to maintain its freshness!
Can I freeze my Vampire Bread?
Very good question! To freeze your Vampire Bread, wrap it tightly in plastic wrap or aluminum foil and then place it in a resealable freezer bag. It will stay good for up to 3 months. When you're ready to enjoy it again, simply thaw in the fridge overnight and reheat in a 350°F (175°C) oven for about 10 minutes to restore its delicious texture.
What should I do if my dough doesn’t rise?
If your dough isn’t rising, it may be due to inactive yeast. Always check the freshness of your yeast by sprinkling it in warm water with a bit of sugar; it should bubble and froth within 5-10 minutes. If it doesn't, you may need to start again with new yeast. Additionally, ensure your rising environment is warm and draft-free.
Is this recipe suitable for those with allergies?
Absolutely! This Spooky Vampire Bread can be modified to cater to various dietary needs. To make it dairy-free, simply use plant-based butter. Always check labels for any specific allergens in the ingredients, especially if you're serving others.

Spooky Vampire Bread - The Best Halloween Treat Ever
Ingredients
Equipment
Method
- In a large mixing bowl, combine the all-purpose flour, yeast, sugar, and salt. Gradually pour in warm water heated to about 110°F (43°C), mixing until a dough forms. Knead the dough on a floured surface for 8-10 minutes until smooth and elastic.
- Shape the dough into a ball and place it in a lightly greased bowl. Cover with a towel or plastic wrap and let it rise in a warm place for 1-2 hours until doubled in size.
- Gently punch down the dough, divide it into two portions, and knead red and black food coloring into each until vibrant.
- Roll each colored dough into ¼ inch thick rectangles. Layer the red on top of the black, and twist the two layers together to form a loaf. Pinch the ends to seal.
- Transfer the twisted loaf into a greased baking pan, cover with a towel, and let it rise for another 30 minutes while preheating the oven to 350°F (175°C).
- Bake the loaf for about 30 minutes until golden brown and hollow when tapped.
- Remove the loaf from the oven, cool in the pan for 10 minutes, then transfer it to a wire rack to cool completely.


Leave a Reply