
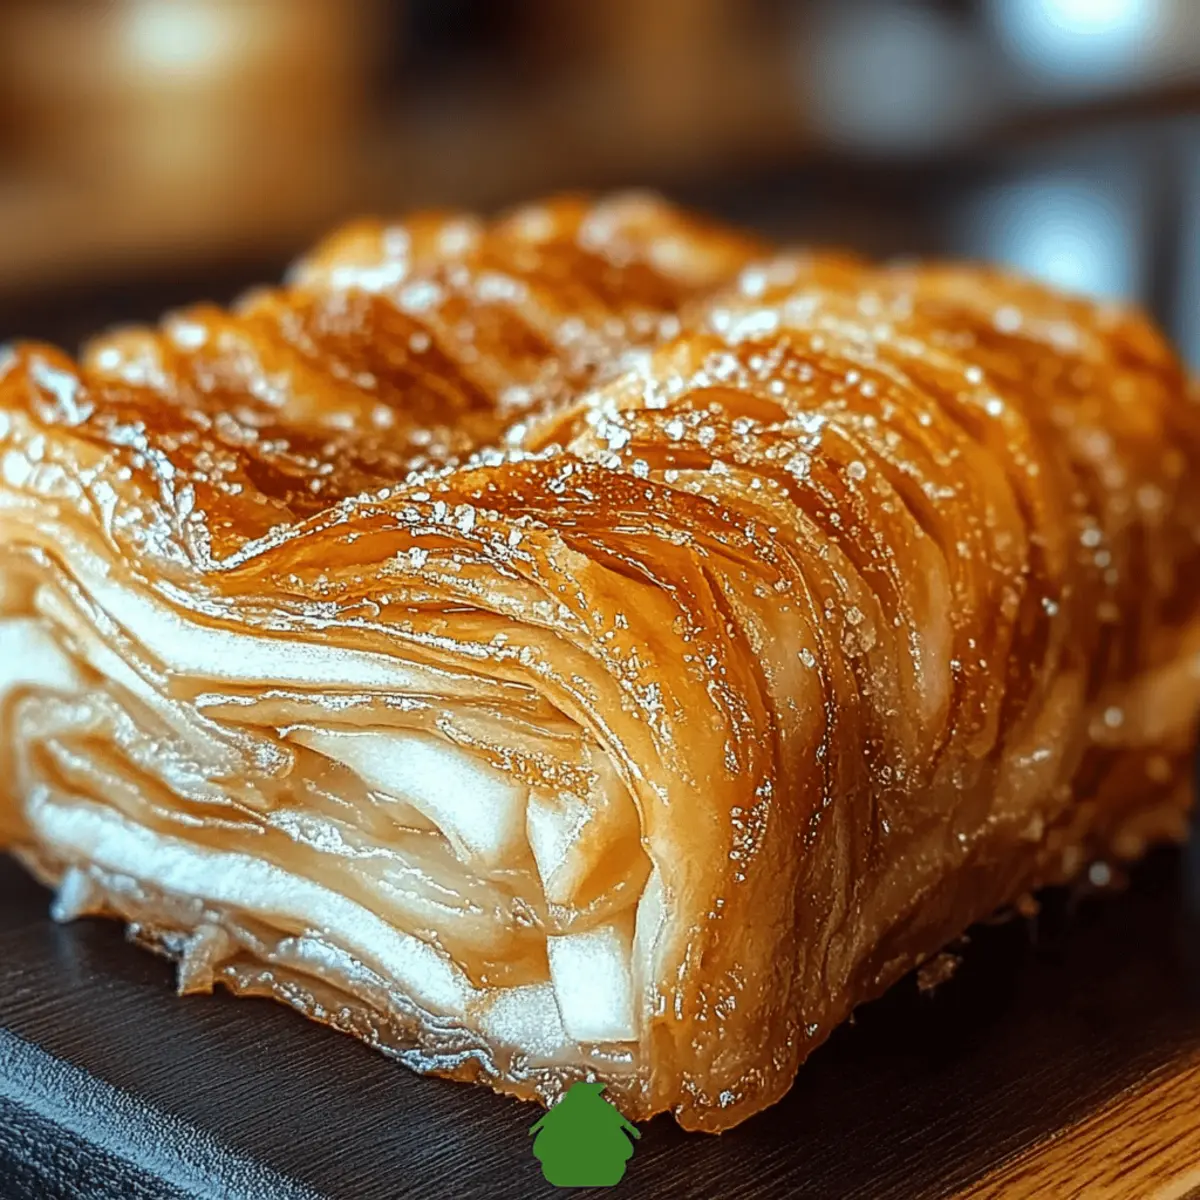
As the crisp autumn air beckons, there’s nothing quite like the scent of freshly baked Wisconsin Apple Kringle wafting through the house. This delightful pastry is not just a treat; it’s an experience that combines flaky layers with a luscious spiced apple filling, topped off with a sweet vanilla glaze. What I love most about this Wisconsin Apple Kringle is its effortless preparation, making it a perfect choice for both breakfast gatherings and cozy dessert occasions. Plus, with the option for gluten-free and dairy-free adaptations, this irresistible dessert caters to everyone at the table. Ready to create a cozy kitchen moment that will have your loved ones coming back for seconds? Let's dive in!
Why Is Wisconsin Apple Kringle So Irresistible?
Cozy indulgence: This Wisconsin Apple Kringle wraps you in warmth, making it the ultimate comfort food for chilly days. Effortless preparation: With easy steps, you’re just over an hour away from savoring this delightful treat, leaving you time to enjoy with loved ones. Personalize your filling: Feel free to experiment with different fruit fillings to create your unique version — the possibilities are endless! Diet-friendly options: Whether gluten-free or dairy-free, you can adapt this recipe to suit your dietary needs without compromising on taste. Crowd-pleaser: Serve it at brunch or as a showstopper dessert, and watch everyone come back for more!
Wisconsin Apple Kringle Ingredients
• Let’s gather what you need to create this cozy delight!
For the Dough
- All-Purpose Flour – Provides structure; substitute with a gluten-free blend for a dietary-friendly version.
- Granulated Sugar – Adds sweetness; consider using brown sugar for a richer flavor.
- Salt – Enhances flavor and balances the sweetness.
- Cold Butter – Essential for creating those flaky layers we love.
- Active Dry Yeast – Leavens the dough; make sure it’s fresh for the best rise.
- Warm Milk – Hydrates the dough and activates the yeast; almond milk works for a dairy-free option.
- Egg – Binds the ingredients together; for an egg-free alternative, use flaxseed or aquafaba.
For the Filling
- Apple Pie Filling – The star of the show; feel free to use store-bought for convenience.
- Ground Cinnamon – Adds warmth and depth; nutmeg can be used as a delightful substitute.
For the Glaze
- Vanilla Extract – Imparts a lovely flavor to the glaze; almond extract could make a fabulous alternative.
- Powdered Sugar – Creates that smooth, delicious glaze we drizzle on top.
Now you're all set to start your cozy baking adventure with this Wisconsin Apple Kringle!
Step‑by‑Step Instructions for Wisconsin Apple Kringle
Step 1: Prepare the Dough
In a large mixing bowl, whisk together all-purpose flour, granulated sugar, and salt. Cut in cold butter using a pastry cutter or your fingers until the mixture resembles coarse crumbs. In a separate bowl, combine warm milk with active dry yeast and allow it to sit for about 5 minutes or until foamy. Stir this yeast mixture along with an egg into the flour mixture until a dough forms. Chill the dough in the refrigerator for 1 hour.
Step 2: Shape the Kringle
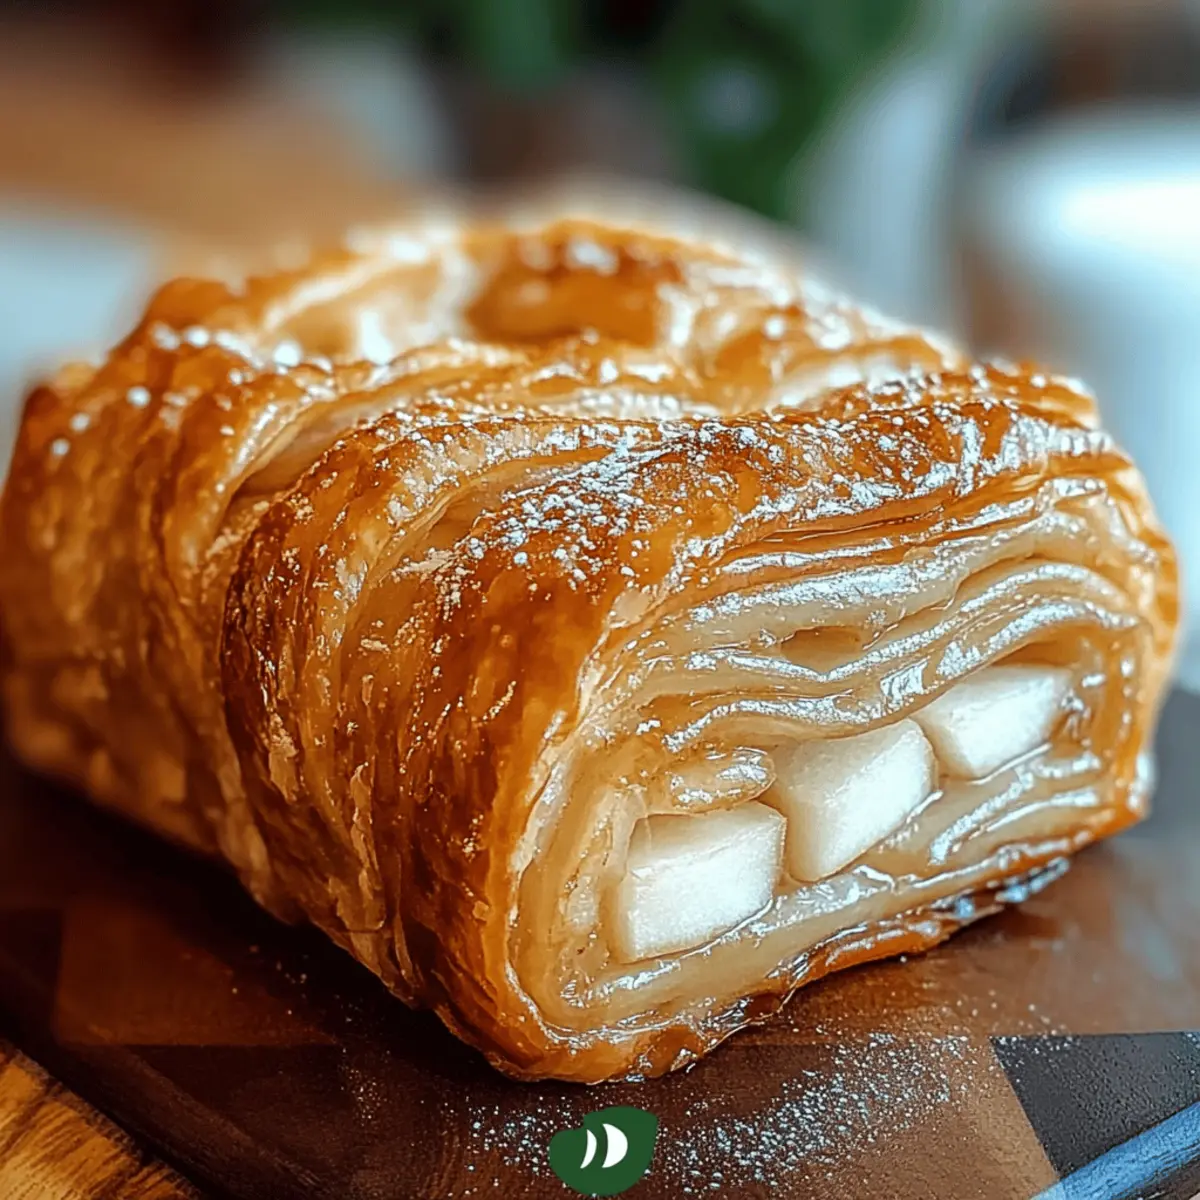
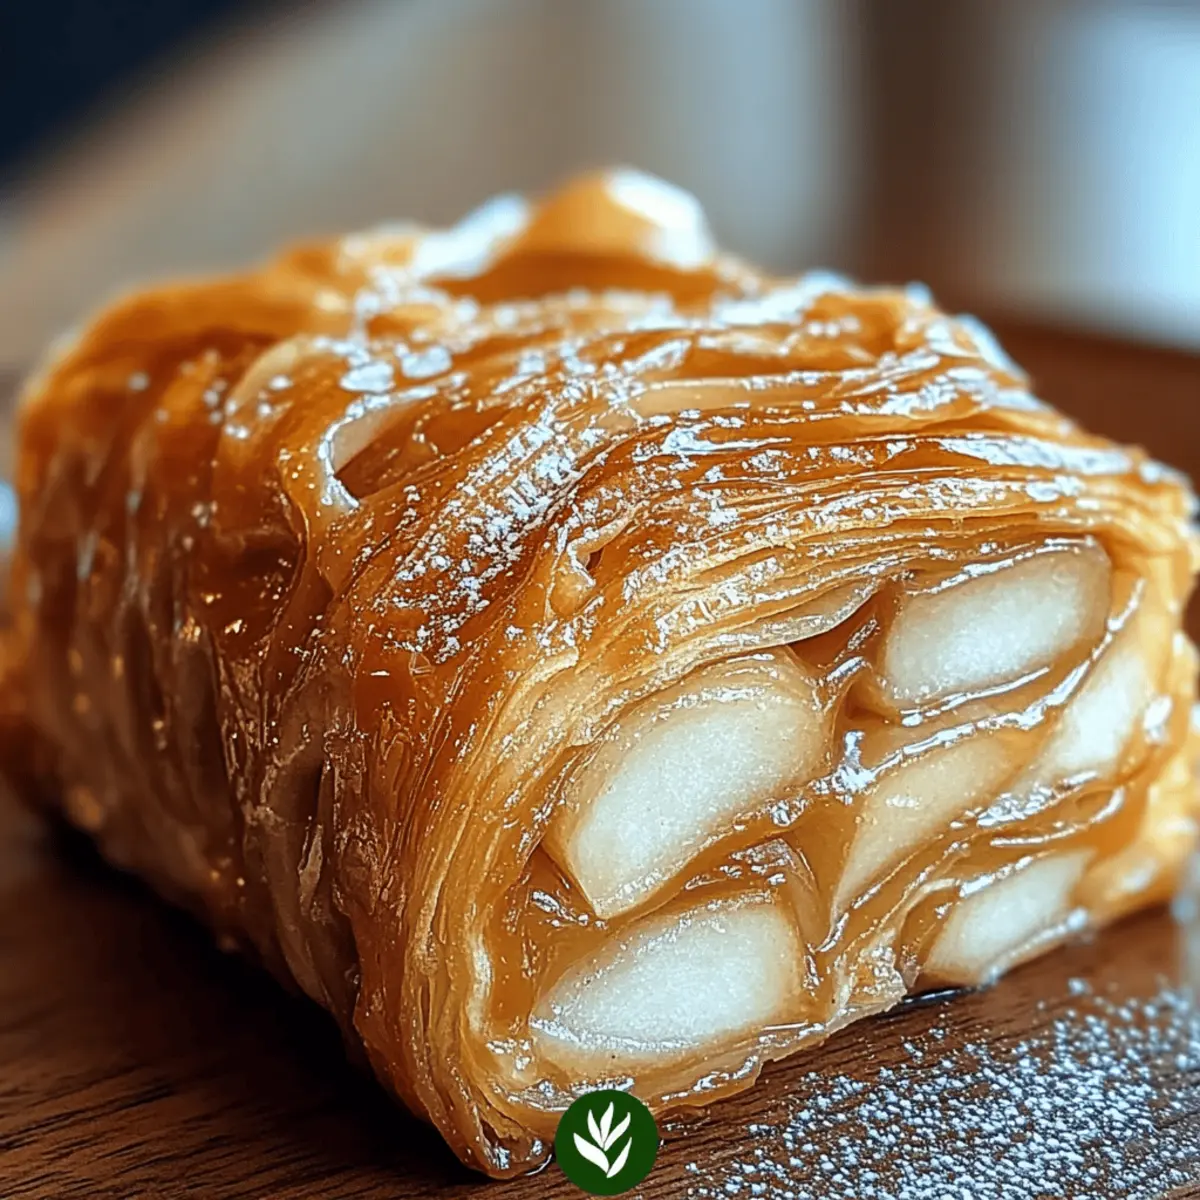
Once your dough is chilled, lightly flour your countertop and roll it out into a large rectangle, approximately 12x18 inches. Place your apple pie filling down the center of the dough, leaving about 2 inches of space on each side. Fold the edges over the filling and pinch to seal securely, creating a log shape. Place the shaped kringle on a parchment-lined baking sheet and allow it to rest for 15 minutes.
Step 3: Bake the Kringle
Preheat your oven to 350°F (175°C) while the kringle rests. Once the oven is ready, brush the top of the dough lightly with an egg wash for a golden finish. Bake the Wisconsin Apple Kringle in the preheated oven for about 25 minutes, or until it turns golden brown and is puffed up. Keep an eye on it during the last few minutes to ensure it doesn’t over-brown.
Step 4: Add Glaze
After baking, let the kringle cool on the baking sheet for about 10 minutes. In a small bowl, whisk together powdered sugar, vanilla extract, and enough water to achieve a drizzling consistency. Once the kringle has cooled slightly, drizzle your sweet glaze generously over the top, allowing it to cascade over the sides.
Step 5: Serve and Enjoy
Slice your beautiful Wisconsin Apple Kringle into generous pieces and serve warm or at room temperature. It's perfect with a cup of coffee or tea. Bring this delightful treat to your next gathering or enjoy it slowly at home for a cozy morning moment.
Expert Tips for Wisconsin Apple Kringle
-
Cold Butter is Key: Using cold butter ensures your kringle has those coveted flaky layers. Don’t skip this crucial step!
-
Perfect Filling Amount: Be careful not to overfill the dough. This can lead to leaks during baking, making a mess and ruining the aesthetic of your Wisconsin Apple Kringle.
-
Use an Egg Wash: Brush the dough with an egg wash for a beautiful golden finish that enhances its appeal.
-
Chill for Flavor: Allowing the dough to chill not only improves the texture but also enhances the flavor as it develops.
-
Sealing Edges: Make sure to seal the edges of the dough properly to ensure your filling stays contained during baking. This ensures your kringle looks and tastes its best!
Make Ahead Options
These Wisconsin Apple Kringle are perfect for busy home cooks looking to save time without sacrificing flavor. You can prepare the dough and shape the kringle up to 24 hours in advance. Simply follow the shaping instructions, wrap the dough tightly in plastic wrap, and refrigerate until you're ready to bake. This not only preserves quality but also enhances the flavors as they meld together overnight. When you’re ready to serve, just preheat your oven and bake as directed. You'll have a freshly baked, cozy kringle ready to impress your family or guests, making your mornings or gatherings oh-so-easy!
How to Store and Freeze Wisconsin Apple Kringle
Room Temperature: Store your Wisconsin Apple Kringle in an airtight container at room temperature for up to 3 days to maintain freshness and flavor.
Fridge: If you plan to keep it longer, refrigerate the kringle in an airtight container for up to a week. Just be aware it may lose some of its flakiness.
Freezer: For extended storage, wrap the kringle tightly in plastic wrap and then aluminum foil, freezing it for up to 2 months. Thaw in the fridge before reheating.
Reheating: To enjoy your kringle warm, reheat individual slices in a toaster oven or conventional oven at 350°F (175°C) for about 10 minutes, ensuring it’s heated through and the glaze doesn’t burn.
Wisconsin Apple Kringle Variations
Feel free to explore these delightful twists on the classic Wisconsin Apple Kringle to enhance your baking experience!
- Gluten-Free: Substitute all-purpose flour with a gluten-free blend to make this treat accessible for those with dietary restrictions.
- Dairy-Free: Use plant-based butter and almond milk instead of regular butter and milk for a creamy yet dairy-free delight.
- Spiced Pear Filling: Swap apple pie filling for spiced pear filling for a unique and cozy flavor that’s just as enticing!
- Nutty Crunch: Add chopped walnuts or pecans to the apple filling for an extra layer of texture and flavor. A delightful surprise awaits each bite!
- Cinnamon Sugar Topping: Before baking, sprinkle a mixture of cinnamon and sugar on top of the kringle for a sweet, caramelized crust.
- Heat It Up: Add a pinch of cayenne pepper or finely chopped jalapeños to the apple filling for a spicy kick that beautifully contrasts with the sweetness.
- Zesty Lemon Glaze: Instead of vanilla, whisk fresh lemon juice and zest into the powdered sugar glaze for a refreshing citrus twist.
- Chocolatey Indulgence: Drizzle melted chocolate over the kringle instead of glaze for a richer, decadent finish that chocolate lovers will adore!
Each variation opens a door to a new flavor journey — experiment and create your perfect Wisconsin Apple Kringle!
What to Serve with Wisconsin Apple Kringle
As you savor the cozy warmth of this delightful pastry, consider these mouthwatering accompaniments to elevate your experience.
- Freshly Brewed Coffee: The bold, rich flavor of coffee perfectly complements the sweet apple filling, creating a harmonious breakfast moment.
- Vanilla Ice Cream: A scoop of vanilla ice cream adds creamy indulgence that melts against the warm kringle, creating a delightful contrast.
- Fruit Salad: A refreshing, vibrant fruit salad balances the sweetness of the kringle and adds a burst of freshness to your plate.
- Spiced Chai Tea: A warm cup of spiced chai tea brings cozy spices that mirror the flavors in your kringle—ideal for autumn gatherings!
- Whipped Cream: Light and airy whipped cream provides an extra creamy topping, making every bite feel indulgent and rich.
- Maple Syrup Drizzle: A drizzle of maple syrup enhances the flavor profile with its subtle sweetness, making every bite even more irresistible.
- Caramel Sauce: Drizzling warm caramel over your kringle adds a decadent touch, enhancing its sweet, spiced apple filling with buttery richness.
- Cheese Platter: Serve with a selection of creamy cheeses for a delightful contrast of flavors and textures that enhances this sweet treat.

Wisconsin Apple Kringle Recipe FAQs
What type of apples should I use for the filling?
For the best flavor, I recommend using tart apples like Granny Smith or Honeycrisp. These varieties provide a nice balance of sweetness and acidity, enhancing the overall taste of your Wisconsin Apple Kringle. You can also mix different types of apples for a more complex flavor!
How should I store my Wisconsin Apple Kringle?
To keep your kringle fresh, store it in an airtight container at room temperature for up to 3 days. If you want to enjoy it for longer, you can refrigerate it in a sealed container for up to a week, but be mindful that refrigeration might slightly reduce its flakiness.
Can I freeze the Wisconsin Apple Kringle?
Absolutely! To freeze, wrap the cooled kringle tightly in plastic wrap, then in aluminum foil to prevent freezer burn. It can stay fresh in the freezer for up to 2 months. When ready to enjoy, thaw it in the refrigerator overnight and reheat it gently in the oven at 350°F (175°C) for about 10 minutes.
What if my dough is too sticky?
If your dough turns out too sticky, don’t worry! Simply add a little extra flour, one tablespoon at a time, until the dough is manageable. Make sure to knead it gently after adding flour, being careful not to overwork the dough, which could affect its flakiness.
Are there any dietary substitutions I can make?
Yes, you can easily adapt this recipe to fit dietary needs. For a gluten-free version, substitute all-purpose flour with a gluten-free flour blend. For a dairy-free option, use plant-based butter and almond milk. If you're avoiding eggs, try using 1 tablespoon of flaxseed meal mixed with 2.5 tablespoons of water for each egg in the recipe.
How do I know when the kringle is fully baked?
A perfectly baked Wisconsin Apple Kringle will be golden brown and puffed up. You can lightly tap the bottom of the kringle; if it sounds hollow, that’s a great indicator it's done! Keep an eye during the last few minutes of baking to avoid over-browning.
Delicious Wisconsin Apple Kringle for Cozy Fall Mornings
Ingredients
Equipment
Method
- In a large mixing bowl, whisk together all-purpose flour, granulated sugar, and salt. Cut in cold butter until the mixture resembles coarse crumbs.
- In a separate bowl, combine warm milk with active dry yeast and allow to sit for about 5 minutes or until foamy. Stir this yeast mixture along with an egg into the flour mixture until a dough forms. Chill the dough in the refrigerator for 1 hour.
- Once your dough is chilled, lightly flour your countertop and roll it out into a large rectangle, approximately 12x18 inches. Place your apple pie filling down the center, leaving about 2 inches of space on each side. Fold the edges over the filling and pinch to seal securely.
- Place the shaped kringle on a parchment-lined baking sheet and allow it to rest for 15 minutes.
- Preheat your oven to 350°F (175°C) while the kringle rests. Brush the top of the dough lightly with an egg wash for a golden finish.
- Bake the Wisconsin Apple Kringle in the preheated oven for about 25 minutes, or until golden brown and puffed up.
- Let the kringle cool on the baking sheet for about 10 minutes. In a small bowl, whisk together powdered sugar, vanilla extract, and enough water to achieve a drizzling consistency.
- Drizzle the sweet glaze generously over the top, allowing it to cascade over the sides.
- Slice into generous pieces and serve warm or at room temperature.


Leave a Reply