
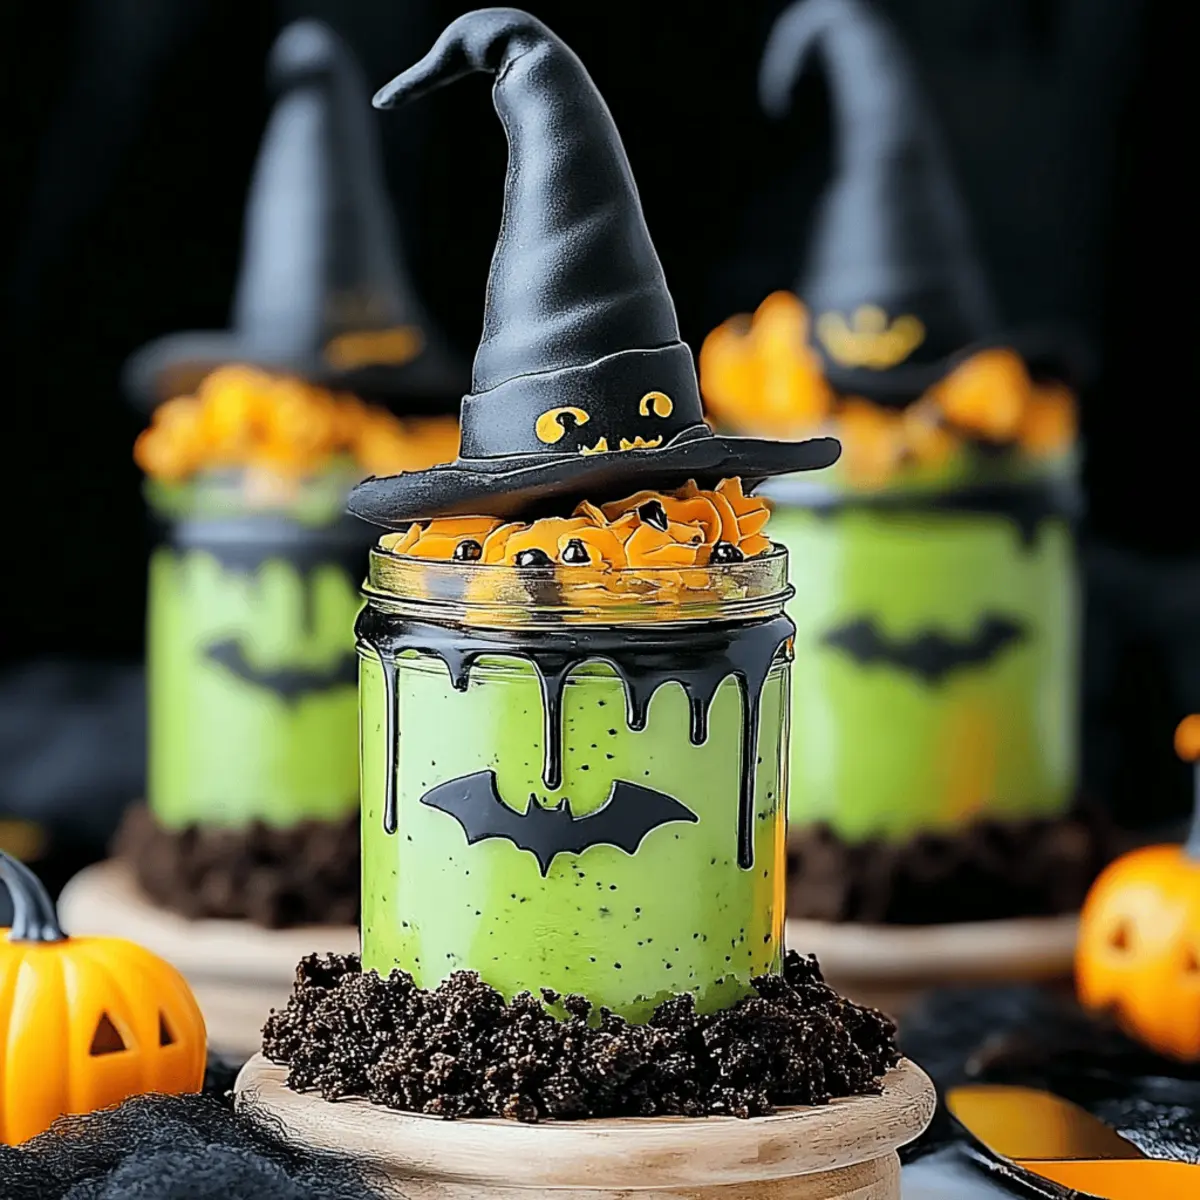
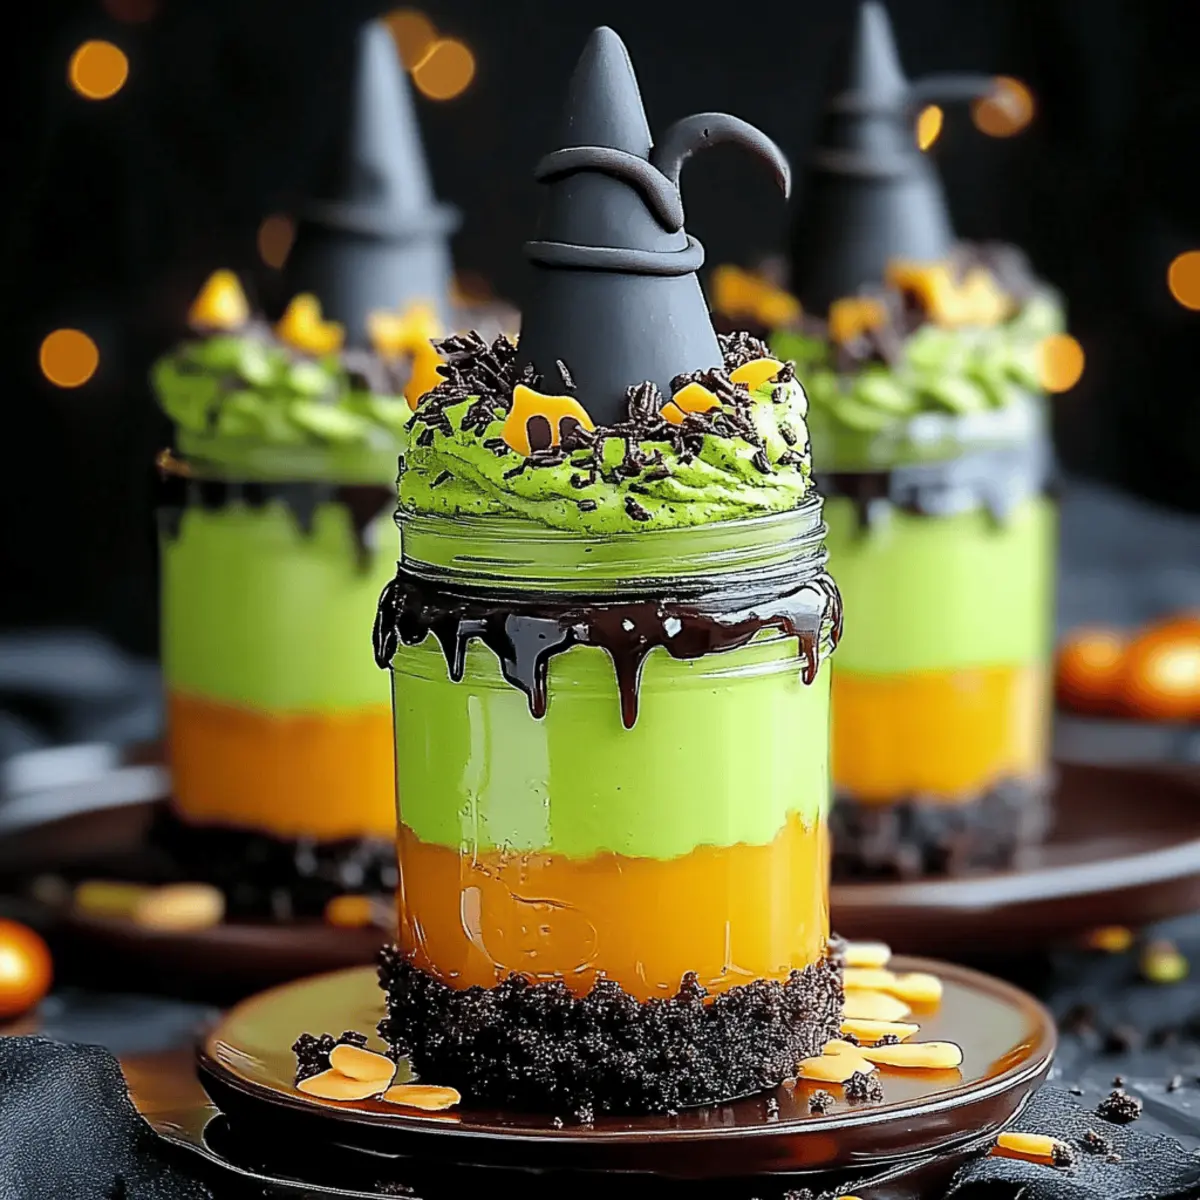
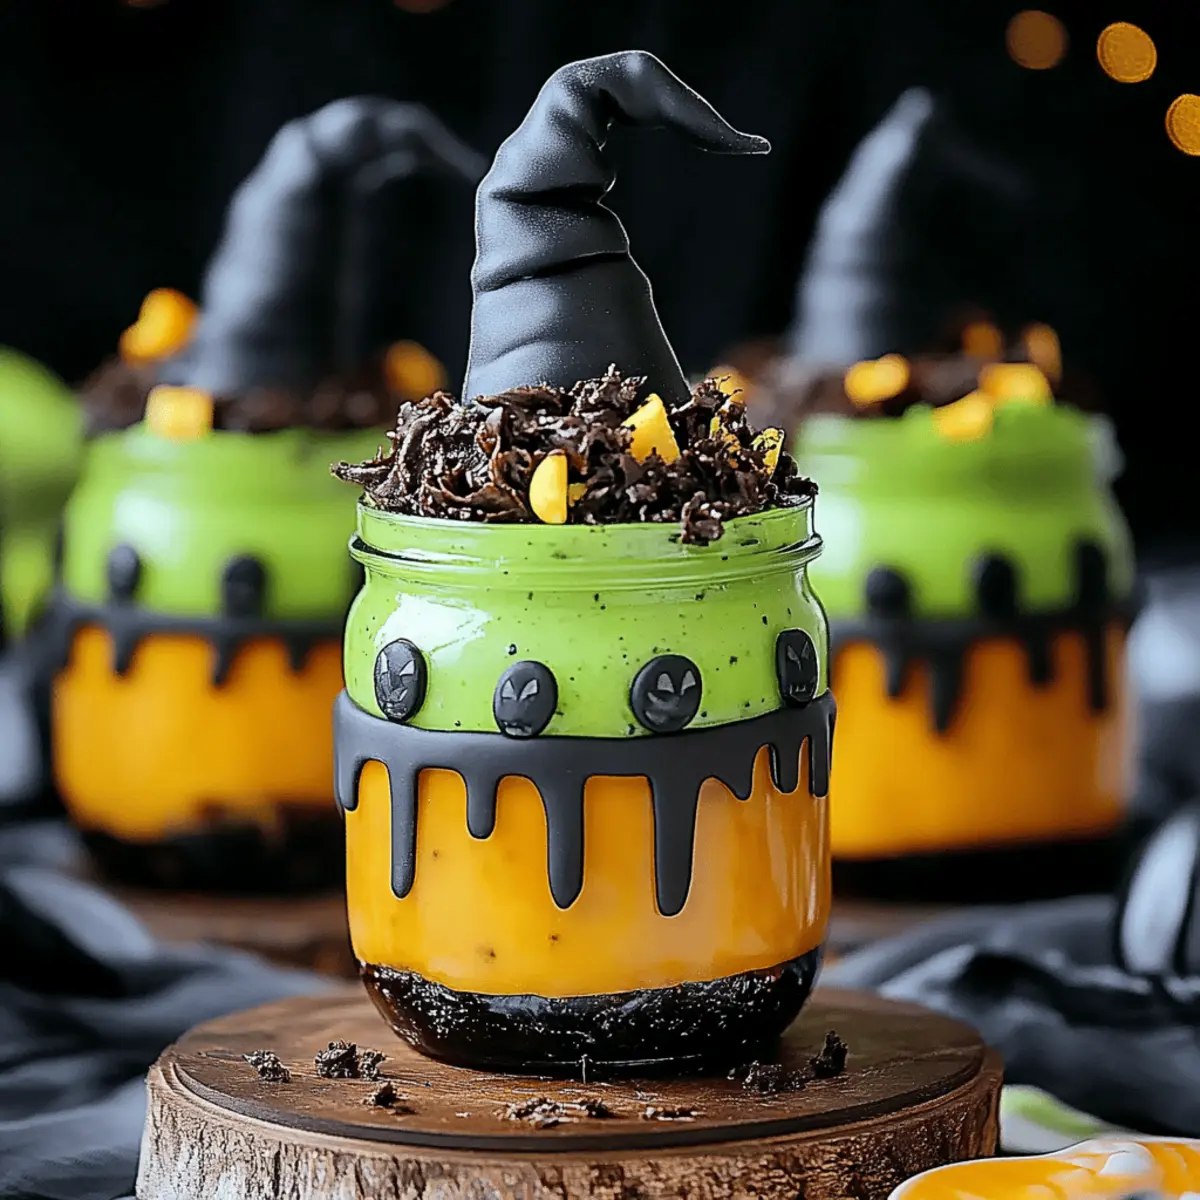
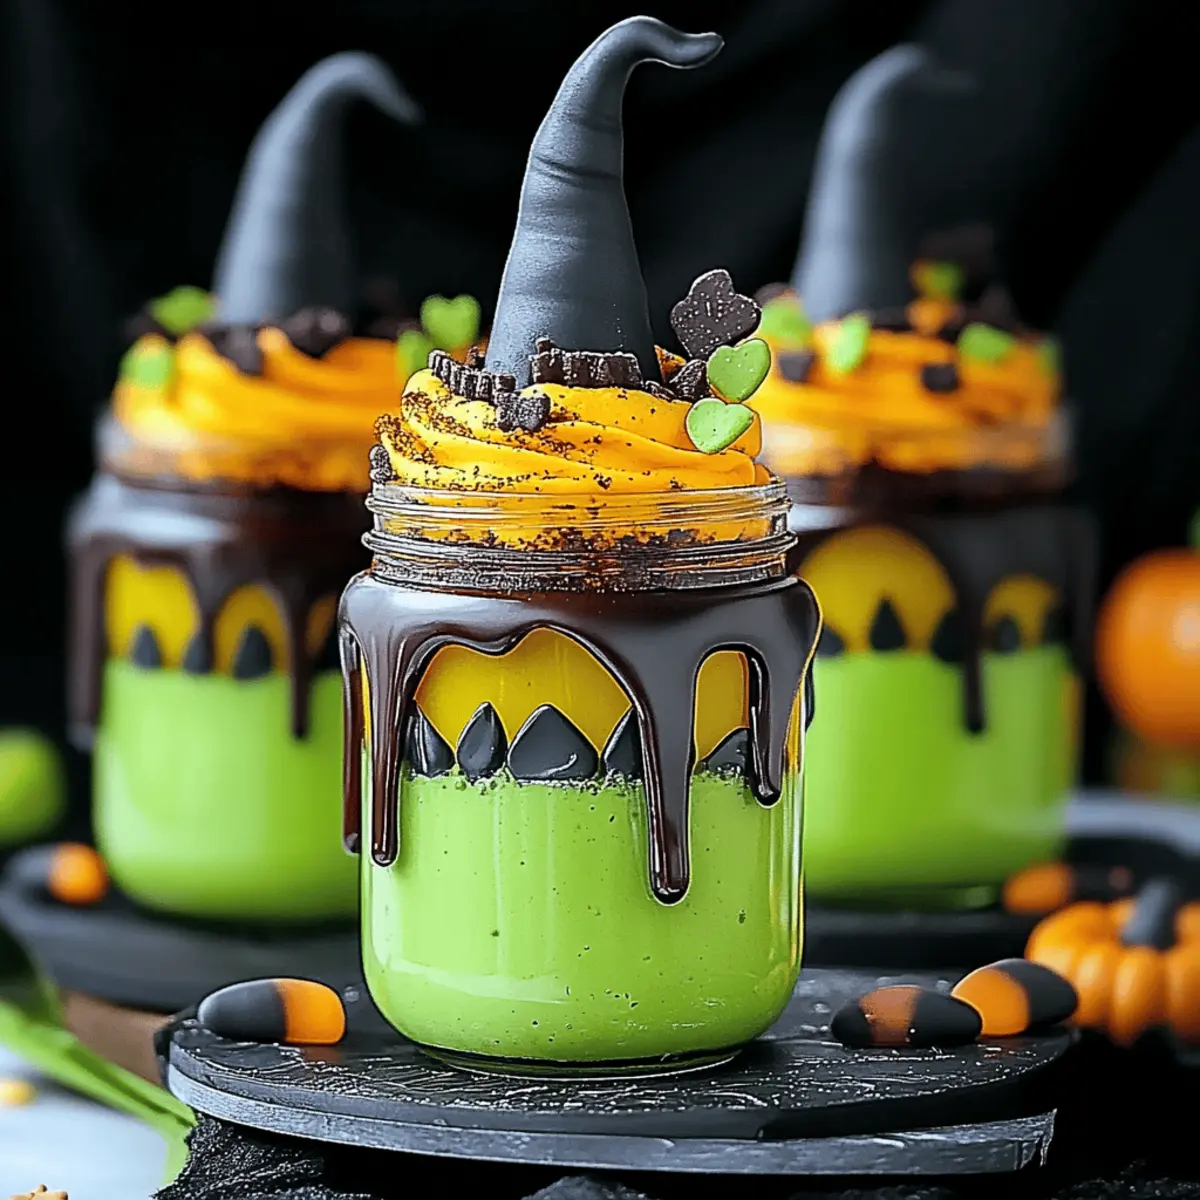
As I turned the corner of my kitchen, the scent of warm chocolate cake filled the air, instantly igniting my excitement for the upcoming Halloween celebration. I couldn't resist creating these festive Witches' Brew Halloween Cake Jars—an enchanting twist on dessert that promises to thrill both kids and adults alike. Layers of rich chocolate cake combined with vibrant green buttercream and playful fondant witch legs make for an irresistible portable treat that’s perfect for spooky festivities. Best of all, these jars are easy to prepare, allowing you to focus on having fun rather than stressing in the kitchen. Whether you're vegan, gluten-free, or a lover of traditional flavors, there’s a version just for you. So, are you ready to channel your inner witch and whip up these charming delights? Let’s stir up some magic!
Why are Witches' Brew Cake Jars irresistible?
Enchanting presentation: These layered cake jars are not just a treat; they’re a visual delight that brings the spirit of Halloween to life. Versatile options: Whether you prefer vegan or gluten-free, this recipe easily adapts to suit your dietary needs without sacrificing flavor. Easy preparation: With straightforward steps, you can whip up these jars without any kitchen stress—perfect for busy schedules or unexpected guests. Playful appeal: The whimsical fondant witch legs are a fun touch that will impress guests of all ages. Portable perfection: These jars make for easy serving and sharing, ensuring everyone at your gathering enjoys a piece of spooky magic!
Witches' Brew Halloween Cake Jars Ingredients
For the Chocolate Cake
- Granulated Sugar – Adds sweetness and moisture retention; note: brown sugar can lend a caramel flavor.
- Salted Butter – Provides richness and moisture; note: use unsalted butter if preferred.
- Eggs – Binds ingredients and contributes to the cake's structure; note: consider flaxseed for a vegan option.
- Self-Raising Flour – Gives structure and rise to the cake; note: all-purpose flour mixed with baking powder works as a substitute.
- Unsweetened Cocoa Powder – Introduces rich chocolate flavor; note: carob powder can add a unique twist.
- Baking Powder – Provides leavening for the cake; note: baking soda can be a viable alternative.
- Salt – Enhances overall flavor; note: omit for dietary restrictions.
- Milk – Adds moisture and tenderness; note: plant-based milk can easily replace it.
- Vanilla Extract – Elevates flavor; note: almond extract is a lovely alternative.
For the Buttercream Frosting
- Butter – Creamy base for frosting; note: use margarine for a dairy-free option.
- Powdered Sugar – Essential for sweetness and texture; note: consider coconut sugar for a healthier swap.
- Gel Food Coloring – Adds vibrant color to the frosting; note: omit if using natural coloring alternatives.
For Decoration
- Orange Fondant – For crafting whimsical witch legs.
- Black Fondant – Create the shoes for the witch legs.
- Sprinkles – Adds decorative flair; note: opt for Halloween-themed sprinkles for that extra festive touch.
Step‑by‑Step Instructions for Witches' Brew Halloween Cake Jars
Step 1: Prepare Fondant Legs
Begin by kneading CMC into the orange fondant until it’s pliable. Shape the fondant into long strips for the witch legs, adding black stripes and small black shoes for detail. Let these whimsical legs set overnight to firm up, making sure they are the perfect spooky addition for your Witches' Brew Halloween Cake Jars.
Step 2: Bake the Cake
Preheat your oven to 350°F (175°C) and prepare a greased cake tin. In a mixing bowl, cream together the salted butter and granulated sugar until fluffy, about 2-3 minutes. Then, beat in the eggs one by one. In another bowl, whisk together the self-raising flour, unsweetened cocoa powder, and baking powder. Gradually mix dry ingredients into the wet mixture while alternating with milk until combined. Bake for 45-50 minutes, or until a toothpick inserted comes out clean. Allow the cake to cool completely.
Step 3: Make the Buttercream
While the cake cools, beat the softened butter in a bowl until creamy and smooth. Gradually sift in the powdered sugar, mixing until fluffy—a process that usually takes about 4-5 minutes. Then, stir in vanilla extract and your desired amount of gel food coloring to achieve a vibrant green hue, perfect for frosting the Witches' Brew Halloween Cake Jars.
Step 4: Assemble Cake Jars
Once the cake has cooled, cut it into uniform circles, using a cookie cutter or the top of a jar as a guide. Start layering in your jars by placing a piece of cake at the bottom, followed by a generous dollop of the green buttercream. Repeat the layering until you reach the top, finishing with a swirl of buttercream.
Step 5: Decorate with a Spooky Touch
To finalize your Witches' Brew Halloween Cake Jars, add colorful Halloween-themed sprinkles atop the buttercream for extra flair. Carefully insert the fondant witch legs into the frosting, letting them stand upright for a festive look. This playful presentation will surely delight everyone at your Halloween gathering.
Step 6: Display and Serve
Arrange the finished cake jars on a decorative platter, showcasing the spooky layers and whimsical toppings. These Witches' Brew Halloween Cake Jars are now ready to be served. Enjoy the vibrant flavors and festive appeal as they become the highlight of your Halloween festivities!
Make Ahead Options
These Witches’ Brew Halloween Cake Jars are perfect for meal prep enthusiasts! You can bake the chocolate cake up to 3 days in advance and store it in an airtight container at room temperature to maintain its moist texture. The buttercream can also be made 1 day ahead and kept refrigerated; just bring it to room temperature and rewhip before frosting the jars. For the whimsical fondant legs, prepare them 24 hours before serving to ensure they set properly. When ready to assemble, layer the cooled cake and buttercream in jars, top with sprinkles, and carefully insert the fondant legs. This way, you’ll have delightful portable treats that maintain their irresistible charm with minimal last-minute effort!
What to Serve with Witches' Brew Halloween Cake Jars
Transport your Halloween festivities to a whole new level with delightful pairings that complement your enchanting cake jars.
-
Chilled Apple Cider: The crisp, refreshing taste of apple cider balances out the rich chocolate and sweet buttercream, making for a perfect fall pairing.
-
Pumpkin Spice Cookies: Soft and spiced, these cookies echo the warmth of autumn flavors, offering a delightful texture contrast to the creamy cake jars.
-
Spooky Cheese Platter: A Halloween-themed cheese board featuring Halloween-shaped cheeses and dried fruits provides a savory balance, charmingly offsetting the sweet cake jars.
-
Candied Hazelnuts: Their crunchy texture and nutty sweetness enhance the flavor profile, giving an unexpected twist that guests will love.
-
Chocolate Dipped Pretzels: Combining sweet and salty, these make for easy finger food that keeps with the fun Halloween theme.
-
Ghostly Marshmallow Pops: Vanilla marshmallows dressed up as ghosts add a playful touch, echoing the whimsical spirit of your dessert.
-
Vanilla Ice Cream: Creamy vanilla ice cream served alongside warm jars creates a delightful temperature contrast, enhancing each sweet bite.
-
Festive Fruit Salad: A medley of vibrant, seasonal fruits lends a refreshing and light contrast to the rich flavors of the Witches' Brew Halloween Cake Jars, making your spread feel complete.
Expert Tips for Witches' Brew Halloween Cake Jars
- Room Temperature Ingredients: Ensure all ingredients are at room temperature for optimal mixing; this helps create a smooth batter and fluffy buttercream.
- Precise Measurements: Use a digital scale for ingredients like flour and sugar to guarantee you're measuring accurately, preventing dry or overly dense cake.
- Fluffy Buttercream: Avoid over-mixing the buttercream; stop once it's creamy and light to maintain the perfect fluffy texture for your Witches' Brew Halloween Cake Jars.
- Level Cake Layers: Level the cake before cutting into circles, ensuring neat layers for your jars and a more visually appealing presentation.
- Customize for Dietary Needs: Easily make these jars gluten-free or vegan by using the suggested substitutions, such as flaxseed for eggs and gluten-free flour.
- Chill Before Assembling: Consider chilling the cake before cutting to make layered assembly smoother and to prevent crumbling when handling the cake.
Storage Tips for Witches' Brew Halloween Cake Jars
- Room Temperature: Keep the jars at room temperature for up to 2-3 days. Ensure they're covered to maintain freshness while keeping that delightful chocolate flavor intact.
- Fridge: For a longer shelf life, refrigerate jars tightly covered for up to a week. This helps preserve the vibrant green buttercream and moist cake layers.
- Freezer: You can freeze unadorned Witches' Brew Halloween Cake Jars for up to 3 months. Just make sure to thaw them in the fridge before serving to maintain optimal taste and texture.
- Reheating: If you prefer your cake warm, gently microwave a jar for about 10-15 seconds. This gives the cake a freshly baked feel without compromising the delicious decorations!
Witches' Brew Halloween Cake Jars Variations
Customize away, and let your creativity shine through in each delicious layer!
- Vegan: Swap eggs with flaxseed meal mixed with water for a plant-based delight. It adds a lovely nuttiness that complements chocolate perfectly.
- Gluten-Free: Use gluten-free flour and add xanthan gum for structure. This allows everyone to enjoy the magic without worries!
- Flavor Twist: Change the chocolate cake to a spiced pumpkin version to evoke autumn flavors. You could serve these with a dollop of whipped coconut cream for an extra fall touch.
- Hearty Addition: Gleam up your layers by adding crushed nuts or chocolate chips between the cake and buttercream for delightful texture. A crunch element offers a surprise in every bite!
- Swirl It Out: Try mixing your buttercream with peanut butter or Nutella for a delicious flavor boost that drapes decadently on top.
- Natural Coloring: Use beet juice or matcha powder instead of gel food coloring to tint your icing. This way, you incorporate wholesome ingredients while adding a playful aesthetic.
- Festive Decorations: Instead of fondant legs, embellish with gummy worms or candy corn for a playful take on Halloween. These touches can ignite the kids' imaginations!
- Cinnamon Spice: Add a pinch of cinnamon to the buttercream for cozy warmth in each morsel. It pairs beautifully with chocolate and evokes feelings of comfort.
No matter how you choose to personalize, these variations ensure you’ll create Witches' Brew Halloween Cake Jars that are uniquely yours! Create festive memories with recipes like these and consider pairing with a delicious homemade pumpkin soup for a complete autumn feast! Explore other diets with options like a rich chocolate lava cake, perfect for those indulgent cravings!
Witches' Brew Halloween Cake Jars Recipe FAQs
What ingredients should I look for in perfect ripeness?
Absolutely! For the best results, ensure your eggs are fresh, as they bind the cake effectively. When selecting butter, choose one that is soft but not melted. If you're using milk, opt for one that's not close to its expiration date.
How should I store Witches' Brew Halloween Cake Jars after making them?
You can keep your cake jars at room temperature for about 2-3 days. Just make sure they are tightly covered to retain that delightful chocolate flavor. For longer storage, place them in the refrigerator, where they'll stay fresh for up to a week.
Can I freeze Witches' Brew Halloween Cake Jars?
Certainly! Remove any decorations, like fondant legs, before freezing. Place the unadorned jars in an airtight container or freezer bag and freeze them for up to 3 months. When you’re ready to enjoy, simply thaw them in the refrigerator overnight for the best texture.
What if my cake turns out too dry?
Very! If you find your cake is too dry, it might be due to overbaking or incorrect ingredient measurements. Always check your cake a few minutes before the suggested baking time by inserting a toothpick. For future batches, consider reducing the baking time or adding a splash more milk to keep it moist.
Are there dietary considerations for Witches' Brew Halloween Cake Jars?
Definitely! This recipe is versatile and can easily accommodate dietary needs. To make them gluten-free, use a gluten-free flour blend with xanthan gum. For a vegan option, substitute the eggs with flaxseed meal (1 tablespoon flaxseed meal mixed with 2.5 tablespoons water = 1 egg) and use plant-based milk. Always check for allergies with the sprinkles and fondant if others will be enjoying them!
Spooky Witches' Brew Halloween Cake Jars
Ingredients
Equipment
Method
- Prepare Fondant Legs: Knead CMC into the orange fondant until pliable. Shape into long strips for witch legs, adding black stripes and shoes. Let set overnight to firm up.
- Bake the Cake: Preheat oven to 350°F (175°C). Cream together the salted butter and sugar until fluffy. Beat in eggs, then mix dry ingredients and alternate with milk. Bake for 45-50 minutes until a toothpick comes out clean. Cool completely.
- Make the Buttercream: Beat softened butter until creamy. Gradually sift powdered sugar in and mix until fluffy. Stir in vanilla and gel food coloring for a vibrant green hue.
- Assemble Cake Jars: Cut cooled cake into uniform circles. Layer in jars with cake and buttercream, finishing with a swirl of buttercream.
- Decorate with a Spooky Touch: Add Halloween-themed sprinkles to the buttercream and insert fondant witch legs upright for a festive look.
- Display and Serve: Arrange finished jars on a platter and serve, enjoying the vibrant flavors and festive appeal.


Leave a Reply