
As the leaves turn and the air crisps, a hint of magic beckons from the kitchen. Enter the realm of Easy Cauldron Cookies, where whimsy meets deliciousness! These adorable mini chocolate cookie cups, brimming with vibrant green buttercream that looks just like bubbling potions, are not only a delight to the eyes but also incredibly simple to whip up. The best part? They’re perfect for engaging your little helpers, making baking a festive family activity. Plus, their customizable nature means you can cater to every taste, whether it's with a creamy frosting or a fudge brownie base. Ready to stir up some Halloween fun with these enchanting treats? Let’s dive into the recipe!
Why are Cauldron Cookies a Must-Try?
Kid-Friendly Fun: These Easy Cauldron Cookies are the perfect solution for getting kids excited about baking. Engaging them with decorating adds a magical touch to your kitchen time!
Customizable Delight: Whether you want to stick with traditional buttercream or explore variations like cream cheese frosting or even brownie bases, the options are limitless.
Quick and Simple: With just a few ingredients and effortless steps, these cookies ensure minimal fuss in the kitchen, making them a great choice for busy parents or last-minute party prep.
Festively Creative: They make a stunning centerpiece for Halloween parties, visually enchanting guests with their bubbling cauldron appearance. Check out decorating ideas for added inspiration!
Crowd-Pleasing Taste: The rich chocolatey flavor combined with delightful frosting is guaranteed to satisfy sweet cravings, making these cookies a hit with both kids and adults alike.
Cauldron Cookies Ingredients
• The essential components for your fun baking adventure!
For the Cookie Base
- Devil’s Food Cake Mix – Provides a rich chocolatey flavor; can be switched up with any chocolate cake mix if desired.
- Eggs – Essential for moisture and binding, ensuring that the cookies hold their shape well.
- Canola or Vegetable Oil – Ensures the cookies remain tender; feel free to substitute with coconut or olive oil for a different flavor.
- Black Food Coloring (optional) – Enhances the darkness of the cookies; you may omit if you prefer a lighter look.
For the Buttercream Frosting
- Unsalted Butter – Adds a creamy richness to the frosting; using salted butter can elevate the flavor profiles.
- Powdered Sugar – Sweetens the buttercream and helps achieve that smooth texture; avoid granulated sugar for best results.
- Vanilla Extract – Infuses the frosting with wonderful aromatic flavor; pure vanilla is ideal over artificial versions.
- Salt – Balances sweetness and elevates overall flavor in the buttercream.
- Milk – Adjusts the frosting consistency; feel free to choose any milk, whether dairy or plant-based.
- Green Food Coloring – Colors your frosting to magical potion-like shades; opt for gel for vibrant results.
For the Decorations
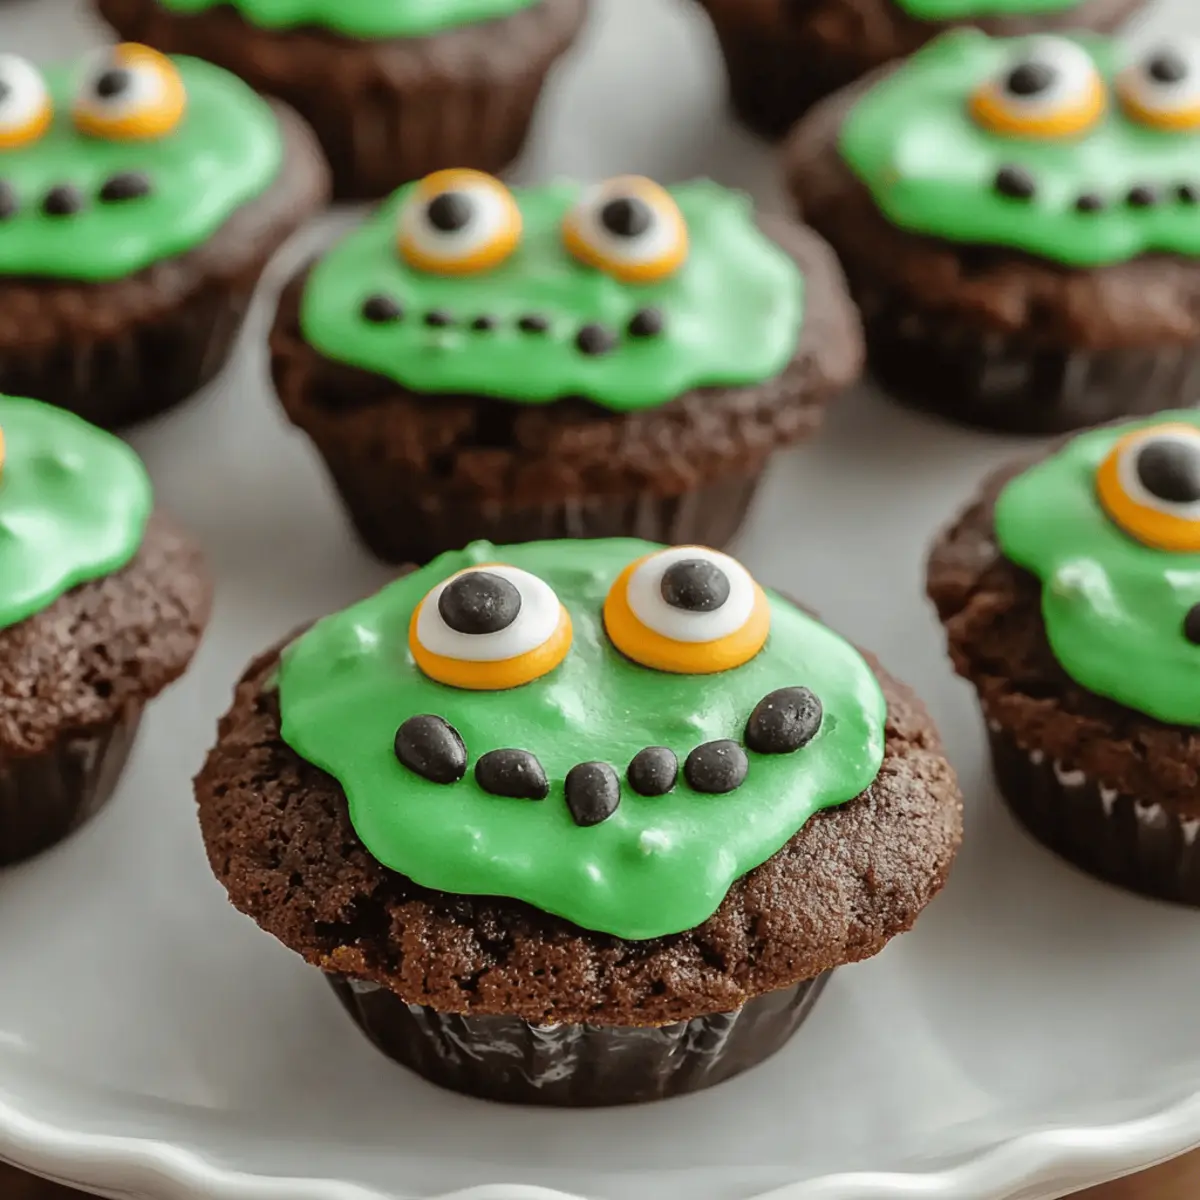
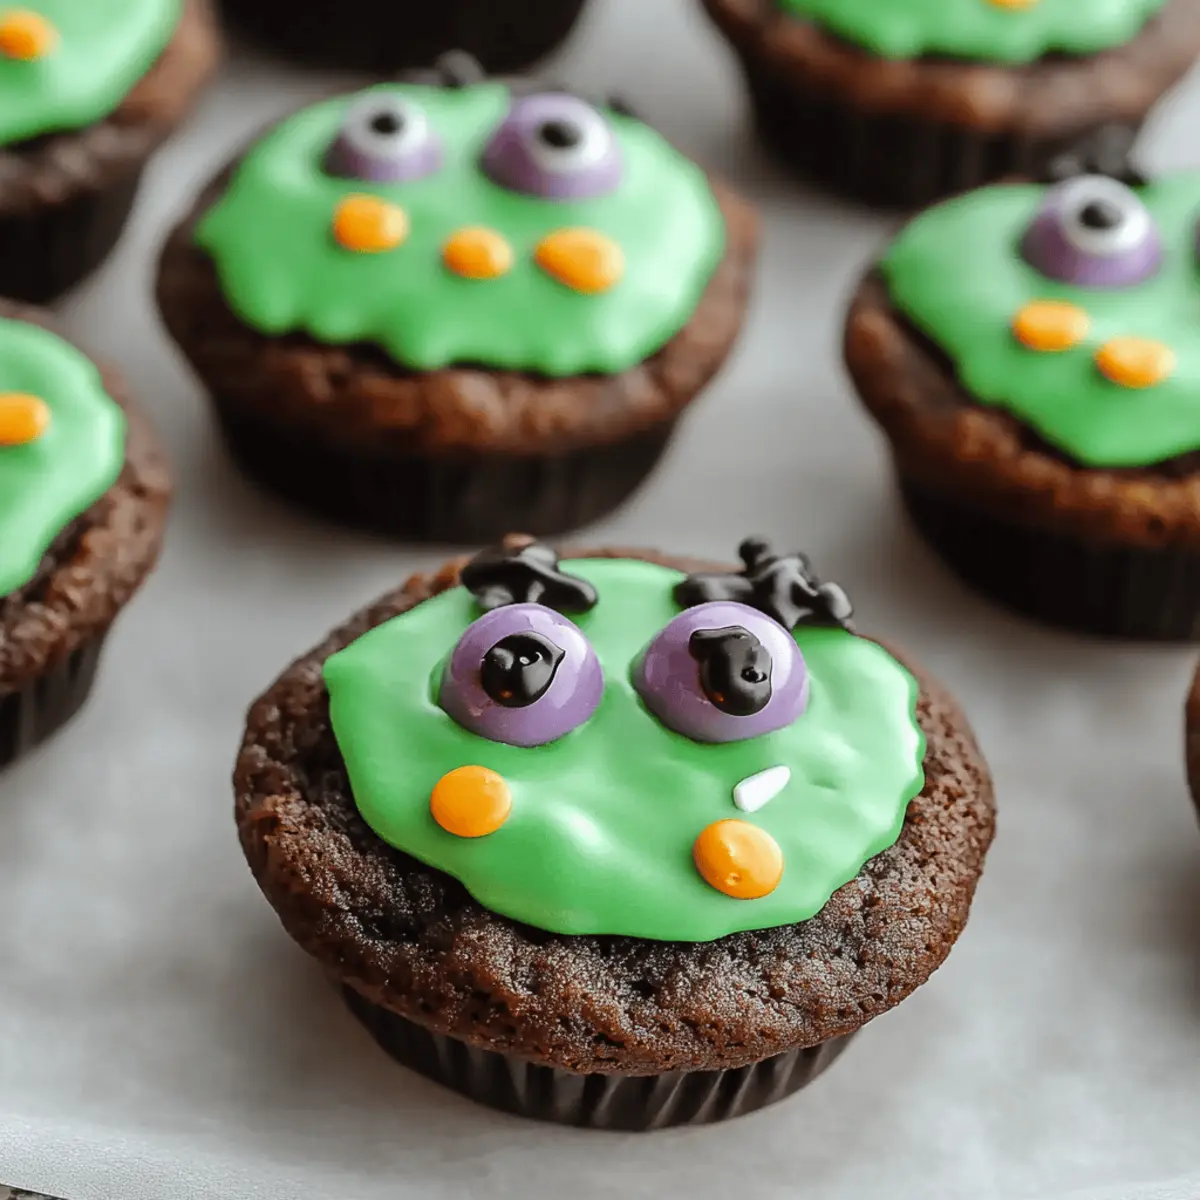
- Green Sprinkles, Halloween Sprinkles, Candy Eyeballs, Pretzel Sticks – These fun decorations enhance festive presentation and make your Cauldron Cookies even more enchanting!
Now that you have all the ingredients laid out, it’s time to conjure up some delicious fun in your kitchen!
Step‑by‑Step Instructions for Easy Cauldron Cookies
Step 1: Preheat the Oven
Begin by preheating your oven to 350°F (175°C). While the oven warms, grease three mini muffin pans to ensure the cookies release easily once baked. This step is crucial for achieving the perfect shape for your Cauldron Cookies, so don’t skip it!
Step 2: Mix the Cookie Batter
In a large mixing bowl, combine the Devil’s Food Cake Mix, eggs, canola oil, and optional black food coloring. Using a whisk or a hand mixer, stir until the mixture is smooth and well combined, which should take about 2-3 minutes. This rich batter will form the delightful base of your Cauldron Cookies.
Step 3: Prepare the Cookie Cups
Using a tablespoon or cookie scoop, place about ½ tablespoon of cookie dough into each greased muffin cup. Gently flatten the dough with your fingers to ensure even baking. This will help create the perfect cups to hold the vibrant frosting later!
Step 4: Bake the Cookies
Carefully transfer the filled muffin pans to your preheated oven and bake for 8-10 minutes. Keep an eye on them; the edges should be set while the centers remain soft. As soon as you remove them from the oven, use a measuring spoon to create an indentation in the center of each warm cookie.
Step 5: Cool the Cookies
Allow the cookies to cool in the pans for about 5 minutes. This brief cooling period helps them firm up while still warm, making them easier to transfer. Afterward, gently move the cookies to a wire rack to cool completely; this will give them the right texture for filling.
Step 6: Make the Buttercream Frosting
In a mixing bowl, beat the unsalted butter until it becomes creamy, typically taking about 2 minutes. Gradually mix in the powdered sugar, vanilla extract, and salt until the frosting is fluffy and smooth. This delightful frosting will crown your Cauldron Cookies perfectly!
Step 7: Adjust Frosting Consistency
To achieve your desired frosting consistency, slowly add milk a little at a time, mixing well after each addition. Once smooth, incorporate the green food coloring into your buttercream, creating a vibrant, potion-like appearance that beautifully contrasts with the chocolate cookies.
Step 8: Pipe the Frosting
Fill a piping bag with the green buttercream frosting and pipe it into the cooled cookie cups, filling them generously. This adds a whimsical touch, transforming them into enchanting Cauldron Cookies, ready for decoration!
Step 9: Decorate Your Cookies
To finish off your Cauldron Cookies, sprinkle them with green or Halloween-themed sprinkles, and add candy eyeballs or pretzel sticks for an extra fun and spooky appeal. Let your creativity shine—these decorations will make your treats irresistible for any Halloween gathering!

How to Store and Freeze Cauldron Cookies
- Room Temperature: Store decorated cauldron cookies in an airtight container for up to 3 days to maintain their freshness and enchanting appearance.
- Fridge: Keep unadorned cookies in an airtight container in the refrigerator for up to 1 week, ensuring they're ready for a quick treat or last-minute party prep.
- Freezer: Freeze undecorated cookie cups for up to 3 months. When you're ready to enjoy, simply thaw them at room temperature before piping in the colorful buttercream.
- Reheating: If you prefer warm cookies, gently reheat them in the microwave for about 10-15 seconds, avoiding overdoing it to preserve their soft texture.
What to Serve with Easy Cauldron Cookies
Indulging in these whimsical treats is only the beginning of your Halloween festivities! Let’s explore delightful pairings that will create a memorable experience.
- Spooky Punch: A fizzy, colorful drink that captures the Halloween spirit. Pairing it with the cookies adds a refreshing counterpoint to their sweetness.
- Crispy Apple Slices: Lightly dipped in caramel or chocolate, these crunchy delights balance the rich chocolate taste of the cookies perfectly. The freshness of the apples also offers a delightful contrast to the sweet frosting.
- Gummy Worms: A fun and playful treat, they can be scattered around your cookie display, enhancing the Halloween theme and making your dessert table even more festive!
- Chocolate Milk: A classic pairing that kids love! The creaminess of the milk complements the chocolatey goodness of the cookies, making every bite even more satisfying.
- Pumpkin Spice Cupcakes: Extend the fall flavors with warm, spiced cupcakes. Their moist texture and rich frosting harmonize beautifully, creating a nostalgic atmosphere.
- Ghostly Meringues: Light and airy, these treats are not only adorable but also perfect for balancing the dense cookies. Their delicate sweetness creates an exciting contrast for your taste buds.
- Spiced Chai Latte: Warm up with a cozy latte infused with warming spices that echo the seasonal flavors of fall. It creates a comforting blend that pairs wonderfully with the chocolate cookies.
- Chocolate-Covered Pretzels: The combination of salty and sweet adds a delightful twist, enhancing the overall flavor experience while providing additional texture.
- Haunted Cheese Platter: Incorporating a mix of creamy cheeses with crackers and seasonal fruits brings a savory touch to your Halloween spread, balancing the sweet treats.
Cauldron Cookies Variations & Substitutions
Feel free to explore creative twists on these delightful cookies, enhancing flavors and textures to suit your family's preferences!
- Brownie Base: Substitute the cookie base with brownie batter for a fudgier, richer taste that chocolate lovers will adore.
- Cream Cheese Frosting: Use cream cheese frosting instead of the buttercream for a delightful tang that adds depth to each bite.
- Nutty Crunch: Incorporate crushed nuts like pecans or walnuts into the cookie batter for an added layer of crunch and flavor.
- Spice It Up: Add a hint of cayenne or cinnamon to the cookie or frosting for a warm, spicy kick that surprises the taste buds!
- Plant-Based Option: Use a plant-based cake mix, dairy-free butter, and almond milk to create a vegan-friendly version that still tastes magical.
- Colorful Frostings: Swap out the green food coloring for various shades to match any theme—think red for Valentine's or pastel colors for springtime!
- Mini or Jumbo Treats: Shape the cookies into mini bites for bite-sized fun or the jumbo size for a showstopping dessert.
- Seasonal Sprinkles: Customize your decorations with seasonal sprinkles, such as pastel confetti for spring or darker hues for other holidays—let creativity be your guide!
Whatever variations you choose, these Cauldron Cookies promise to be a delicious canvas for your baking adventures! If you're looking for more tips to get started, check out our customizable delight suggestions for even more flavor inspiration.
Make Ahead Options
These Easy Cauldron Cookies are perfect for busy home cooks looking to save time! You can make the cookie cups up to 24 hours in advance by baking them and allowing them to cool completely (this is crucial to prevent sogginess). Store the undecorated cookie cups in an airtight container at room temperature. The buttercream frosting can also be prepared ahead; simply refrigerate it for up to 3 days in an airtight container. When you're ready to enjoy, just allow the frosting to come to room temperature before piping it onto the cookie cups. This way, you’ll have delicious, festive treats with minimal last-minute effort, just so you can focus on the fun of the holiday!
Expert Tips for the Best Cauldron Cookies
Bake Time Watch: Always keep an eye on your cookies while baking. They should look set around the edges but remain soft in the center for that perfect texture.
Cool Completely: Let the cookies cool fully before filling them with frosting. This prevents the buttercream from melting and running over the edges, keeping the cauldron shape intact.
Indentation Technique: Use a measuring spoon to gently create a cup shape right after removing the cookies from the oven. This step is crucial for ensuring they hold enough frosting!
Color Smart: If using black food coloring, start with a small amount; it’s potent and can easily overpower the chocolate flavor of your cauldron cookies.
Mixing Tips: When preparing your buttercream, ensure the butter is at room temperature for easy blending and a fluffy texture. Avoid granulated sugar for a smoother frosting finish.
Customizable Magic: Don't hesitate to get creative! Use different flavors of frosting or even experiment with brownie batter for a unique take on your Cauldron Cookies.

Easy Cauldron Cookies Recipe FAQs
What type of cake mix should I use for Cauldron Cookies?
You can use any chocolate cake mix, but I recommend Devil’s Food Cake Mix for its rich flavor. If you’re looking for a lighter option, a vanilla cake mix can also work, but your cookies will be less chocolaty.
How should I store decorated Cauldron Cookies?
Store your decorated cookies in an airtight container at room temperature for up to 3 days. This keeps them fresh and maintains that delightful frosting. If you want to extend their shelf life, consider refrigerating them for up to a week in an airtight container.
Can I freeze Cauldron Cookies?
Absolutely! To freeze your Cauldron Cookies, I recommend freezing the undecorated cookie cups. Place them in an airtight container or freezer bag for up to 3 months. When you're ready to indulge, simply thaw them at room temperature, and then pipe in the vibrant buttercream.
What should I do if my cookie cups don’t hold their shape?
If your cookies spread during baking and don’t hold their shape, it might be due to too much mixing or overbaking. Ensure you mix just until ingredients combine and check your baking time—8-10 minutes should keep them soft in the center. If they need more shape, create the indentations quickly after pulling them from the oven.
Are Cauldron Cookies safe for pets?
These cookies contain ingredients like chocolate and sugar, which are not safe for pets. Always keep the treats out of your furry friends' reach. If you’re looking for pet-friendly treats, consider making a separate recipe specifically designed for them!
Can I use alternative ingredients for allergies?
Yes! For gluten-free options, substitute the cake mix with a gluten-free chocolate cake mix. For dairy-free options, use plant-based milk and a dairy-free butter substitute in the frosting. Always check labels to ensure all ingredients align with your dietary needs.
Easy Cauldron Cookies for Spooky Sweet Moments
Ingredients
Equipment
Method
- Preheat your oven to 350°F (175°C) and grease three mini muffin pans.
- In a large mixing bowl, combine the Devil's Food Cake Mix, eggs, canola oil, and optional black food coloring until smooth.
- Place about ½ tablespoon of cookie dough into each greased muffin cup and flatten gently.
- Bake for 8-10 minutes, until edges are set and centers are soft. Create indentations in the center after removing from the oven.
- Allow cookies to cool in pans for about 5 minutes, then transfer to a wire rack to cool completely.
- In a bowl, beat the unsalted butter until creamy, then mix in powdered sugar, vanilla extract, and salt until fluffy.
- Adjust frosting consistency by gradually adding milk, then mix in green food coloring.
- Fill a piping bag with the green buttercream and pipe it into the cooled cookie cups.
- Decorate the cookies with green sprinkles, candy eyeballs, or pretzel sticks.


Leave a Reply