
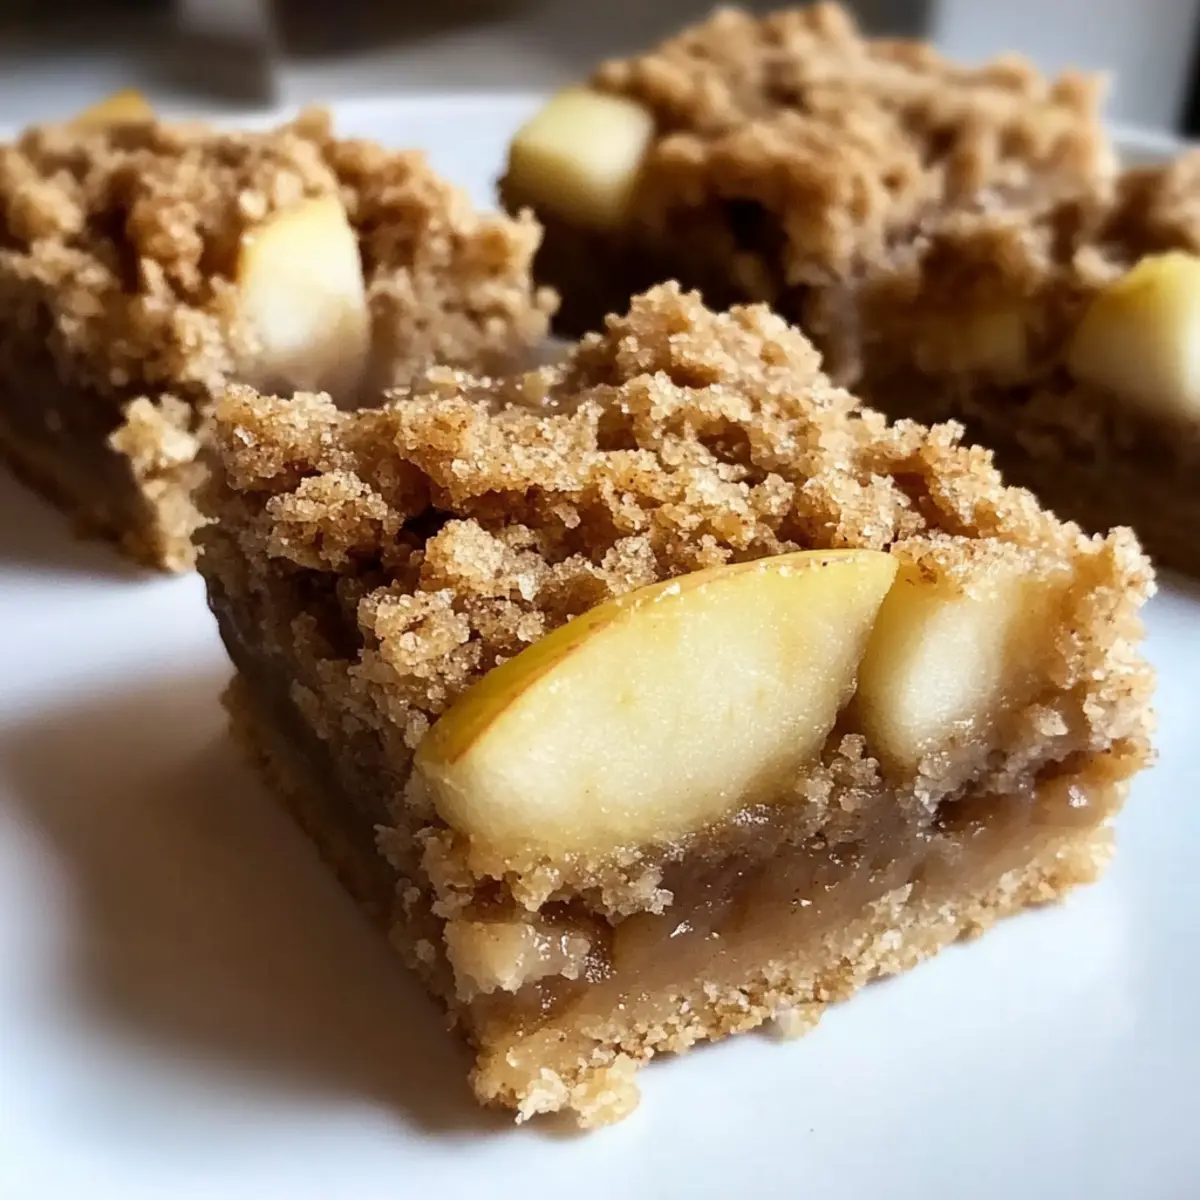
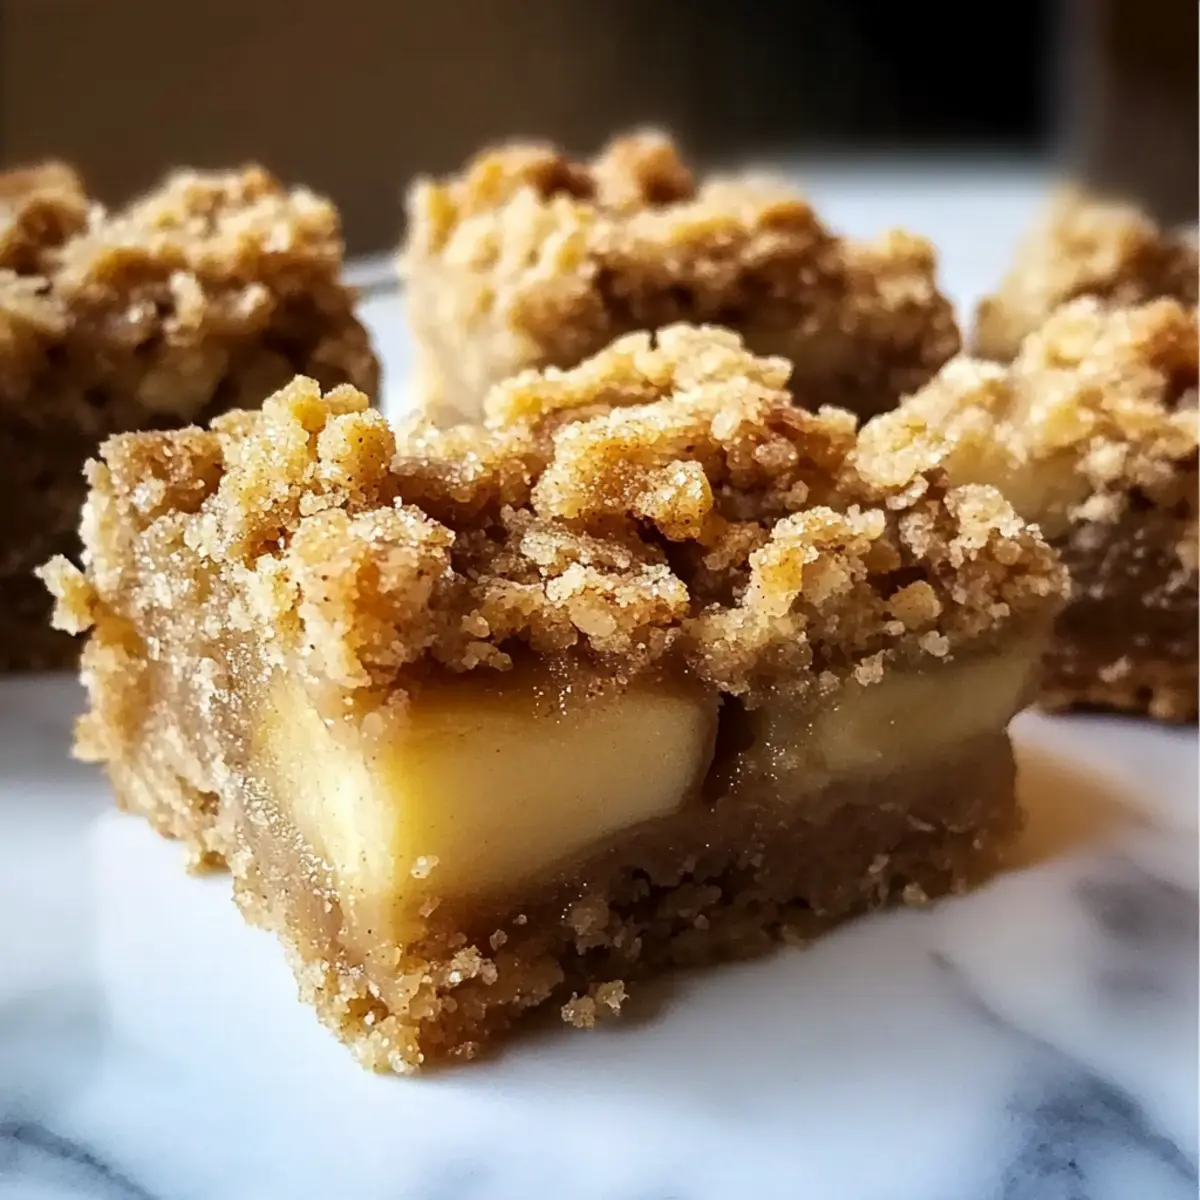
The scent of apple orchards in the fall is something truly magical, and it’s that warmth I’ve captured in these Easy Apple Crisp Bars. Combining the hearty texture of rolled oats with sweet, tender apples and a sprinkle of cinnamon, this recipe is your ticket to a delightful portable dessert. Perfect for family gatherings or simply a cozy night in, these bars are incredibly easy to whip up yet feel like a warm embrace in every bite. Not only do they boast all the comforting flavors of classic apple crisp, but they also lend themselves well to creative variations, making them a versatile favorite! So, are you ready to dive into a treat that brings the comforting tastes of autumn straight to your kitchen?

Why are these Apple Crisp Bars irresistible?
Simplicity: This recipe is quick and easy, perfect for both beginner bakers and seasoned chefs alike.
Generous Flavor: Infused with warm cinnamon and sweet apples, every bite brings a taste of fall.
Versatile: Feel free to experiment! Add nuts for crunch or drizzle caramel on top for a decadent twist.
Portable Treat: Ideal for picnics or school lunches, these bars are easy to pack and share.
Family-Friendly: Made with wholesome ingredients, they are a delightful dessert everyone will love—making them a staple at family gatherings!
Apple Crisp Bars Ingredients
For the Crust and Topping
- All-purpose flour – Provides structure for the bars; gluten-free flour can be used for a lighter option.
- Rolled oats – Adds a chewy texture; for a quicker fix, instant oats can be utilized, though the texture may vary.
- Brown sugar – Contributes sweetness and moisture; you can substitute with light or dark brown sugar depending on your taste.
- Ground cinnamon – Enhances flavor with warmth; consider adding nutmeg for an extra kick of spice.
- Baking soda – Acts as a leavening agent; make sure it's fresh to ensure the best rise.
- Salt – Balances the sweetness; a sprinkle of sea salt can elevate the flavor profile.
- Unsalted butter – Adds richness and moisture; swap it with coconut oil for a dairy-free alternative.
For the Apple Filling
- Peeled and chopped apples (approx. 4 medium) – Provides the primary flavor and moisture; opt for tart varieties like Granny Smith for the best results.
- Granulated sugar – Sweetens the apple filling; feel free to reduce or replace it with honey for a natural touch.
- Lemon juice – Prevents browning of the apples while adding a hint of acidity; vinegar is a good substitute if needed.
Step‑by‑Step Instructions for Easy Apple Crisp Bars
Step 1: Preheat and Prepare
Begin by preheating your oven to 350°F (175°C) while you generously grease a 9x13-inch baking pan with butter or non-stick spray. This ensures that your Easy Apple Crisp Bars will easily release after baking. Reach for a sturdy spatula to make the greasing process quick and easy.
Step 2: Combine Dry Ingredients
In a large mixing bowl, whisk together the all-purpose flour, rolled oats, brown sugar, ground cinnamon, baking soda, and salt. This blend will serve as the base for both the crust and topping, so make sure they are thoroughly mixed. You'll want a cohesive blend that’s slightly chunky to achieve that delightful texture.
Step 3: Add Melted Butter
Once the dry mix is ready, pour in the melted unsalted butter and stir until the mixture becomes crumbly, resembling wet sand. This is a crucial step to infuse your Apple Crisp Bars with that rich, buttery flavor. Set aside about one-third of this mixture to use as the crumbly topping later.
Step 4: Form the Base
Press the two-thirds of the crumb mixture firmly into the bottom of your prepared pan, creating an even and smooth layer. Make sure to compact it well with your hands or the back of a measuring cup; you want this layer to hold together and serve as a solid foundation for the sweet apple filling.
Step 5: Prepare the Apple Filling
In a separate bowl, combine the peeled and chopped apples with granulated sugar and lemon juice. Toss well to coat the apples evenly—this mixture adds sweetness and prevents the apples from browning. Aim for a colorful blend that showcases the vibrant hues of the apples for an appealing presentation.
Step 6: Assemble the Bars
Spread the apple mixture evenly over the crust in the baking pan, ensuring every corner is filled. The apples should be layer upon layer, creating a deliciously moist center. Follow this by sprinkling the reserved crumb mixture over the apples, making sure to cover them completely for that ideal crispy topping.
Step 7: Bake to Perfection
Carefully place the pan into your preheated oven and bake for 40–45 minutes, or until the topping turns golden brown and the apples become tender throughout. You’ll know it's ready when you can smell the delicious aroma of cinnamon and softened apples wafting through your kitchen.
Step 8: Cool and Slice
Once baked, remove the pan from the oven and let the Easy Apple Crisp Bars cool completely in the pan. This cooling period is essential for ensuring that the bars set properly, allowing for clean, even slices. Once cool, cut them into squares and serve to family and friends for a delightful treat.
What to Serve with Easy Apple Crisp Bars
Indulging in a square of these delightful bars evokes heartwarming memories of autumn gatherings and cozy evenings at home.
- Vanilla Ice Cream: A classic pairing, the creamy texture of vanilla ice cream melts into the warm bars, creating blissful harmony in every bite.
- Caramel Sauce: Drizzle warm caramel over the bars for a rich, sweet enhancement that echoes the flavors of fall and elevates your dessert experience.
- Whipped Cream: Light and fluffy, a dollop of whipped cream adds a touch of elegance while balancing the sweet apple flavors perfectly.
- Coffee or Tea: Sipping on a warm cup of coffee or a fragrant tea complements the spices in the bars, making each bite even more comforting.
- Cinnamon Sugar Dusting: A simple sprinkle of cinnamon sugar on top offers an extra layer of flavor, enhancing the homemade vibe of these bars.
- Chopped Nuts: Add a sprinkle of walnuts or pecans for a crunchy texture, providing contrast to the soft, sweet apples beneath.
- Fruit Salad: A fresh fruit salad adds brightness and balance to your dessert table, contrasting the rich flavors with vibrant, zesty bites.
- Cheese Plate: Serve alongside aged cheddar or a creamy brie for a delightful contrast that turns the bars into an elegant dessert experience.
- Apple Cider: A glass of warm or chilled apple cider brings those autumn flavors to life, enhancing the deliciousness of the apple crisp bars.
Expert Tips for Apple Crisp Bars
- Choose Tart Apples: Opt for Granny Smith or similar varieties; they balance sweetness well and enhance the flavors in your Apple Crisp Bars.
- Cool Completely: Allow the bars to cool fully in the pan before slicing; this helps prevent them from falling apart when you cut them.
- Drain Excess Juice: To avoid sogginess, be sure to drain any excess liquid from the apple filling before spreading it on the crust.
- Use Parchment Paper: Line your baking pan with parchment for easy removal and cleanup; it keeps your bars intact and makes serving a breeze.
- Experiment with Spices: Consider adding nutmeg or pumpkin spice for a unique twist that elevates the flavor profile of your Apple Crisp Bars.
Make Ahead Options
These Easy Apple Crisp Bars are a perfect choice for busy home cooks looking to save time during hectic weeks! You can prepare the crumb mixture and store it in the refrigerator for up to 3 days. Simply combine the flour, oats, brown sugar, cinnamon, baking soda, and salt, then mix in the melted butter until crumbly. Additionally, you can chop the apples and toss them with sugar and lemon juice—this mixture can be stored in the refrigerator for up to 24 hours to maintain freshness. When you're ready to bake, just press the crumb base into the pan, layer the apple mixture, sprinkle the topping, and bake as directed. This way, you'll enjoy delicious homemade Apple Crisp Bars with minimal effort!
Apple Crisp Bars Variations
Feel free to mix things up and make these Apple Crisp Bars your own with these delightful customizations!
- Gluten-Free: Substitute all-purpose flour with a gluten-free blend to cater to gluten sensitivities without compromising taste.
- Nutty Crunch: Fold in some chopped pecans or walnuts into the topping for an irresistible crunch that adds depth and flavor.
- Extra Spicy: Swap out the ground cinnamon for a pinch of nutmeg or add pumpkin spice to give your bars a cozy autumn vibe.
- Caramel Drizzle: Just before serving, drizzle warm caramel sauce over the bars for a decadent treat that will elevate each bite.
- Reduced Sugar: Reduce the granulated sugar in the apple filling and replace it with honey or maple syrup for a natural sweetener.
- Fruity Twist: Experiment with different apple varieties or add in some berries for an exciting new flavor profile that everyone will adore.
- Savory Option: Incorporate finely chopped fresh herbs like sage or rosemary into the apple mixture for a surprising savory element.
- Chocolate Lovers: Stir some mini chocolate chips into the crumb topping for a delightful surprise that adds a touch of decadence.
By incorporating these variations, you can create a twist on these classic Apple Crisp Bars that’s uniquely yours! And don't forget to check out my tips for serving suggestions, as they offer great ways to enjoy these bars alongside your favorite flavors.
Storage Tips for Apple Crisp Bars
Room Temperature: Keep your bars at room temperature for up to 2 days, loosely covered to maintain freshness. Enjoy them as a sweet snack anytime!
Fridge: Store the bars in an airtight container in the fridge for up to 5 days. This helps preserve their flavor while keeping them moist.
Freezer: To keep your Apple Crisp Bars longer, freeze them for up to 3 months. Wrap each bar in plastic wrap, then place in a freezer bag for extra protection.
Thawing: When ready to enjoy, simply thaw the bars at room temperature or warm them in the oven for a few minutes—enjoy that fresh-baked taste once again!
Easy Apple Crisp Bars Recipe FAQs
What type of apples should I use for the bars?
Absolutely! For the best results, I recommend using tart apples like Granny Smith. Their natural acidity balances the sweetness of the sugar and enhances the overall flavor of your Easy Apple Crisp Bars, giving you that perfect fall taste.
How should I store the Apple Crisp Bars?
You can keep your bars at room temperature for up to 2 days, but make sure they are loosely covered to maintain freshness. For longer storage, place them in an airtight container in the refrigerator for up to 5 days. This keeps them moist and full of flavor.
Can I freeze the Apple Crisp Bars?
Very! To freeze your bars, wrap each one in plastic wrap then place them in a freezer bag. They can be stored like this for up to 3 months. When you’re ready to enjoy, just thaw them at room temperature or pop them in the oven for a few minutes to bring back that just-baked warmth!
What do I do if my Apple Crisp Bars turn out too soggy?
If your bars end up soft or soggy, it could be due to excess apple juice. To avoid this in the future, make sure to drain any liquid from the apple mixture before spreading it on the crust. If they are already soggy, try letting them sit uncovered for a while; this can help them firm up as they cool.
Are these bars safe for pets or people with allergies?
While these Easy Apple Crisp Bars are delicious for people, they contain ingredients like butter and sugar that are not suitable for pets. Additionally, always be cautious of allergies; if someone has a gluten intolerance, consider using gluten-free flour, and if there's a dairy allergy, coconut oil is a great substitute for butter.

Delicious Apple Crisp Bars That Will Wow Your Family
Ingredients
Equipment
Method
- Preheat your oven to 350°F (175°C) and grease a 9x13-inch baking pan.
- In a mixing bowl, whisk together flour, oats, brown sugar, cinnamon, baking soda, and salt.
- Stir in melted butter until crumbly, then reserve one-third for topping.
- Press the remaining mixture firmly into the bottom of the prepared pan.
- In a separate bowl, mix apples with sugar and lemon juice.
- Spread apple mixture evenly over the crust and sprinkle reserved crumbs on top.
- Bake for 40–45 minutes until topping is golden brown and apples are tender.
- Cool completely in the pan before slicing into squares.


Leave a Reply