
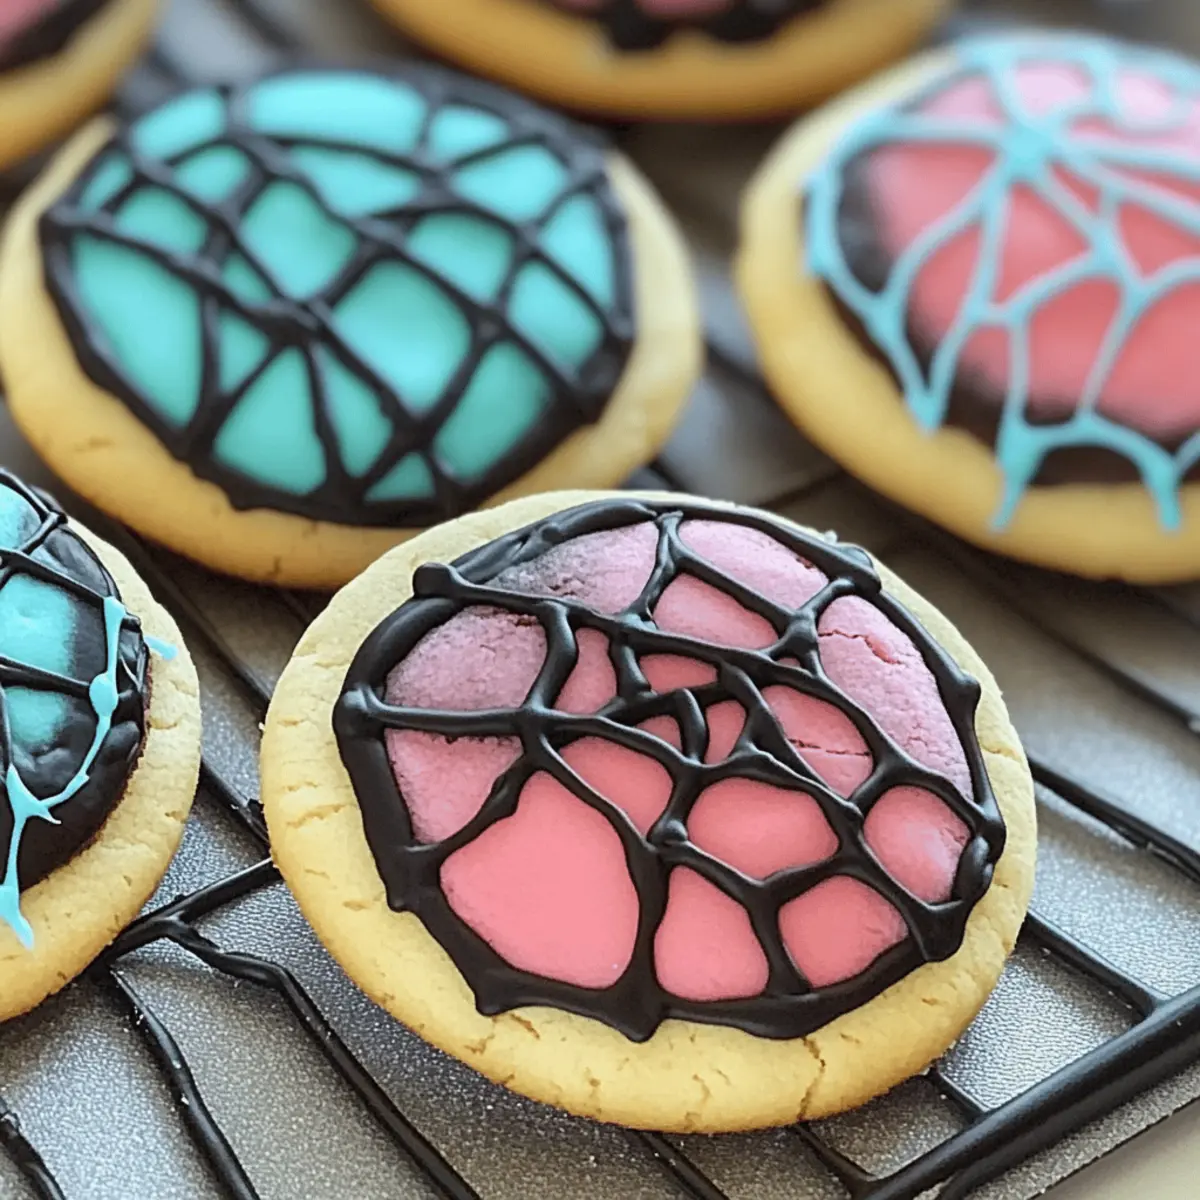
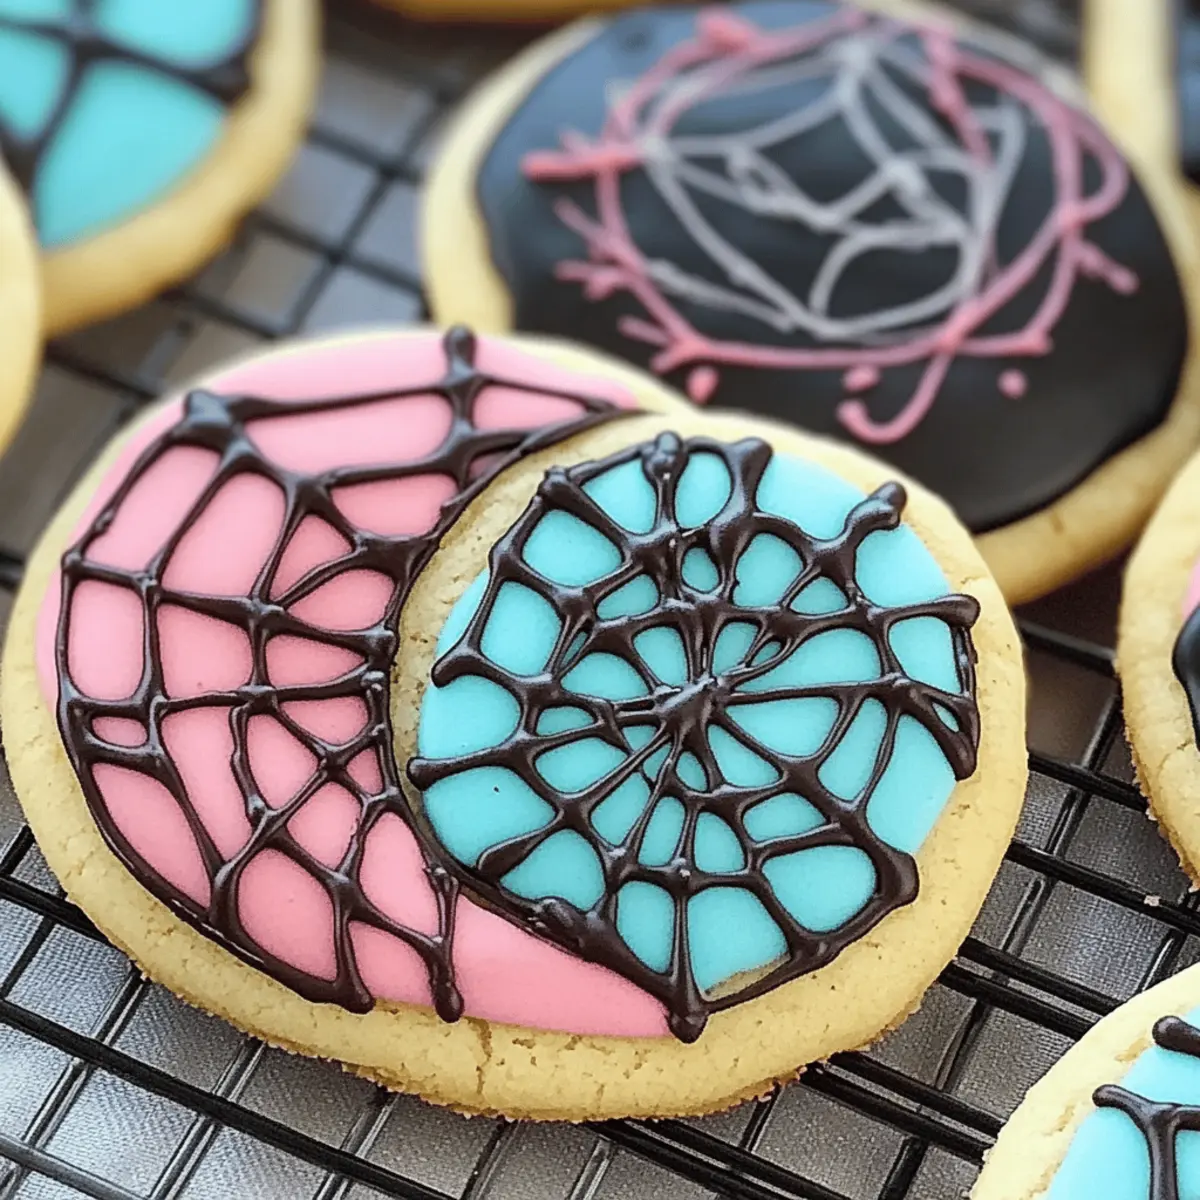
As the autumn leaves begin to swirl and the air turns crisp, I find myself drawn to the delightful chaos of Halloween baking. Enter my Enchanting Enid and Wednesday Addams Cookies—vibrant, whimsical treats that capture the spirit of the season! With a rich chocolate base and a rainbow of colorful dough, these cookies are not only a visual feast but also a joy to make. The best part? They are quick to whip up and incredibly easy to customize for any Halloween gathering, whether it’s a spooky soirée or a cozy night in. Just imagine creating cookies that not only taste fabulous but also become the star of your Halloween table! Curious about how to bring some playful spirit to your kitchen? Let’s dive into making these enchanting treats together!
Why Are These Cookies So Special?
Vibrant Colors: The gorgeous hues of yellow, pink, and blue make these cookies irresistibly fun! Kids and adults alike will be drawn to their bright, lively appearance.
Easy Customization: You can easily change the flavors and colors to match any holiday or theme, ensuring they fit perfectly into your festive traditions!
Quick to Bake: With minimal prep time, you’ll have delicious, fresh cookies in no time—perfect for unexpected guests or last-minute parties.
Rich Chocolate Base: The delicious blend of chocolate and sweetness creates a mouthwatering treat that leaves you craving more.
Fun for Everyone: Whether you’re a boss chef or a kitchen newbie, these cookies are accessible and enjoyable to make together—creating lovely memories while baking!
Pair these delights with a spooky hot chocolate or cool them off by learning about freezing cookie dough for longer storage, so you can have a stash of fun treats ready anytime!
Enchanting Enid and Wednesday Addams Cookies Ingredients
• Gather the essential components to create these whimsical treats!
For the Cookie Dough
- Butter – Provides richness and tenderness; substitute with dairy-free butter for a lactose-free option.
- Granulated Sugar – Sweetens and contributes to the cookie's chewy texture; can be swapped for coconut sugar for a less refined alternative.
- Vanilla Extract – Enhances flavor; consider almond extract for a different aromatic profile.
- Egg – Binds the ingredients; for egg-free options, use flaxseed meal mixed with water (1 tablespoon flaxseed + 2.5 tablespoon water per egg).
- All-Purpose Flour – Forms structure; use gluten-free flour for a gluten-free version.
- Cocoa Powder – Adds a rich chocolate flavor to half of the dough; can be omitted for vanilla-flavored variations.
For the Vibrant Color
- Food Coloring (yellow, pink, and blue) – Provides vibrant, playful colors; gel food coloring is preferred for better color intensity.
For Decoration
- Chocolate Chips – Used for decoration; substitute with white chocolate or colored candy melts for themed designs.
Get ready to dive into a festive baking adventure with these Enchanting Enid and Wednesday Addams Cookies that promise both color and fun!
Step‑by‑Step Instructions for Enchanting Enid and Wednesday Addams Cookies
Step 1: Preheat and Prepare
Begin by preheating your oven to 350°F (175°C). While the oven warms up, line your baking sheets with parchment paper, ensuring a non-stick surface. This setup not only makes for easy cleanup later but also allows the cookies to bake evenly, bringing forth that lovely chewy texture we crave in our Enchanting Enid and Wednesday Addams Cookies.
Step 2: Creaming the Butter and Sugar
In a mixing bowl, combine softened butter and granulated sugar using a hand mixer on medium speed. Cream the mixture for 3-5 minutes until it turns light and fluffy, creating air pockets that are essential for the cookies' texture. Once fluffy, add in the vanilla extract and egg, mixing until fully incorporated, which enriches the flavor profile of your enchanting cookies.
Step 3: Forming the Dough
Gradually add the all-purpose flour to the butter-sugar mixture on low speed, mixing until a soft dough forms, typically taking 2-3 minutes. Check the consistency—you want a cohesive dough that isn’t sticky. This step is essential for the structure of the Enid and Wednesday Addams Cookies, so ensure everything is well-blended before moving on to the next step.
Step 4: Dividing and Adding Color
Carefully divide the dough into two equal halves. To one half, fold in the cocoa powder, which gives it that lush chocolate flavor. With the other half, use gel food coloring to make vibrant hues of yellow, pink, and blue. Knead the colors into the dough until the shades are uniform, creating a rainbow of colors for your cookies.
Step 5: Shaping the Cookies
Roll the colored dough into logs or shapes of your choice. Take the cocoa dough and surround the colored logs, gently combining them to create unique cookie shapes. This playful blending of colors and textures makes the Enchanting Enid and Wednesday Addams Cookies visually striking and exciting, adding to the Halloween spirit.
Step 6: Slicing and Spacing
With a sharp knife, slice the logs into ¼ inch thick pieces. If necessary, reshape the edges for a more polished look. Place the cookie slices on your prepared baking sheets with about 2 inches of space between each piece, which allows them to spread during baking without merging into one another.
Step 7: Baking the Cookies
Bake your Enchanting Enid and Wednesday Addams Cookies in the preheated oven for 10-12 minutes. Keep an eye on them; the edges should be set while the centers remain slightly soft. This will ensure a delightful chewy texture that one looks forward to in a good cookie.
Step 8: Cooling Before Decorating
Once baked, remove the cookies from the oven and let them cool on the sheets for a few minutes. Use this time wisely; while they rest, prepare your decorating setup. After a brief cooling, transfer them to a wire rack to cool completely, which is crucial to prevent the chocolate from melting during decoration.
Step 9: Decorating the Cookies
Now comes the fun part! Melt your chocolate chips and transfer them into a piping bag or a small zip-top bag with a corner snipped off. Use this to pipe whimsical designs on your cooled cookies. This creative finishing touch showcases your culinary artistry and enhances the enchanting appeal of your Halloween treats.

What to Serve with Enchanting Enid and Wednesday Addams Cookies?
If you're looking to create a spooktacular Halloween gathering, pairing these whimsical cookies with delightful accompaniments will elevate your festive experience.
-
Rich Chocolate Milkshake: The creamy, indulgent taste of a thick chocolate milkshake harmonizes beautifully with the rich chocolate base of the cookies. This combination will have everyone feeling nostalgic and satisfied.
-
Spiced Pumpkin Hot Chocolate: Embrace the flavors of fall with a warm mug of pumpkin hot chocolate. The spices and sweetness meld perfectly with the cookies’ vibrant flavors, creating a cozy atmosphere on chilly nights.
-
Caramel Apple Slices: Crisp apple slices drizzled with caramel offer a refreshing crunch that contrasts with the soft, chewy texture of the cookies. This combo adds a fun, festive flair to your treat table.
-
Peanut Butter Treats: Pairing with peanut butter cookies or bars introduces a delightful saltiness that balances the sweetness of the Enid and Wednesday Addams cookies, keeping each bite exciting.
-
Ghostly Fruit Cups: Assemble cute fruit cups with ghostly toppings to add a fresh, light note between bites of cookie sweetness. These healthy treats are perfect for kids and adults alike and brighten up the dessert table.
-
Colorful Spritzers: Refreshing lemon-lime spritzers with a splash of fruit juice bring a fizzy kick to your gathering while complementing the colorful fun of your Halloween cookie spread!
-
Chocolate-Covered Pretzels: The sweet and salty combo of chocolate-covered pretzels provides a satisfying crunch that contrasts well with the chewy cookies, adding an extra layer of texture to your dessert menu.
These pairings not only enhance the enjoyment of your Enchanting Enid and Wednesday Addams Cookies but also make your Halloween celebration delightful and memorable!
Enchanting Enid and Wednesday Addams Cookies Variations
Feel free to unleash your creativity and customize these delightful cookies with these fun twists!
- Dairy-Free: Swap regular butter with dairy-free butter for a lactose-free treat everyone can enjoy.
- Sugar Alternatives: Try coconut sugar instead of granulated sugar for a deeper, caramel-like flavor.
- Flavored Extracts: Add in peppermint or hazelnut extracts for a festive twist that will surprise your taste buds.
- Gluten-Free: Use gluten-free flour blends to cater to gluten sensitivities while keeping the cookie fluffy and delicious.
- Seasonal Colors: Adapt colors for upcoming holidays—think red and green for Christmas or soft pastels for Easter.
- Fun Textures: Incorporate nuts or bits of toffee for an added crunch and a delightful contrast to the soft cookie.
- Extra Sweetness: Top cookies with festive sprinkles or edible glitter before baking to make them sparkle for your Halloween parties.
- Chili Heat: If you’re feeling adventurous, add a dash of cayenne or chili powder to the chocolate dough for an unexpected kick!
To keep your festive baking going, you might find joy in pairing these cookies with a cozy pumpkin spice hot chocolate or even learning about freezing cookie dough for quick, delightful treats ready at a moment’s notice!
Expert Tips for Enchanting Enid and Wednesday Addams Cookies
Baking Time: Keep a close eye on your cookies as they bake; removing them when the centers are still soft ensures that perfect chewy texture everyone loves.
Cooling Strategy: Always allow your cookies to cool completely before decorating. This prevents the chocolate from melting and helps maintain the beautiful designs.
Use Gel Food Coloring: For vibrant cookie colors that pop, opt for gel food coloring. It provides intensity without altering the dough consistency, making your Enchanting Enid and Wednesday Addams Cookies visually striking.
Flour Measurement: Properly measure your flour; too much can lead to dry cookies. Using a kitchen scale helps maintain the perfect balance for a delightful outcome.
Creative Shapes: Don’t be afraid to experiment with different shapes and sizes when rolling and slicing your cookie dough. This adds personal flair to your creations!
How to Store and Freeze Enchanting Enid and Wednesday Addams Cookies
Airtight Container: Store cookies in an airtight container at room temperature for up to 1 week to maintain their soft texture.
Refrigeration: If keeping for longer, these cookies can be refrigerated for up to 2 weeks without losing their enchanting flavor.
Freezing: For ultimate storage, freeze the cookies in a single layer, then transfer to a freezer-safe bag or container for up to 3 months.
Dough Storage: If you want to prep ahead, the cookie dough can be refrigerated for up to 3 days or frozen for up to 3 months, making it easy to whip up fresh Enchanting Enid and Wednesday Addams Cookies whenever you please!
Make Ahead Options
These Enchanting Enid and Wednesday Addams Cookies are perfect for meal prep, allowing you to enjoy more time with your loved ones during the spooky season! You can prepare the cookie dough in advance and refrigerate it for up to 3 days or freeze it for up to 3 months. Simply wrap the rolled cookie logs tightly in plastic wrap and place them in an airtight container to maintain freshness. When you're ready to bake, slice the frozen dough directly and add an extra minute or two to the baking time for delicious, freshly baked cookies just as enticing as those made the same day!
Enchanting Enid and Wednesday Addams Cookies Recipe FAQs
How do I choose the right butter for these cookies?
Absolutely! For the best flavor and texture, I recommend using unsalted butter to control the saltiness in your cookies. If you're looking for a lactose-free option, dairy-free butter works wonderfully as a substitute without compromising the deliciousness.
What’s the best way to store these cookies?
Very simple! Store the Enchanting Enid and Wednesday Addams Cookies in an airtight container at room temperature for up to 1 week. For longer freshness, you can refrigerate them for up to 2 weeks—just make sure they are well-sealed to prevent drying.
Can I freeze the cookie dough for later use?
Of course! To freeze the dough, shape it into logs, wrap them tightly in plastic wrap, and place them in a freezer-safe bag or container. This method allows the dough to be frozen for up to 3 months. When you’re ready to bake, simply thaw in the refrigerator overnight, then slice and bake as directed!
What should I do if my cookies spread too much while baking?
If your cookies spread too much, it could be due to warmed dough. Make sure the dough is adequately chilled before baking; about 30 minutes in the fridge can help them hold their shape better. Additionally, using the correct flour measurement is vital for maintaining the perfect consistency during baking.
Are these cookies suitable for those with allergies?
Great question! The Enchanting Enid and Wednesday Addams Cookies can be easily adapted for dietary needs. For those with egg allergies, using flaxseed meal (1 tablespoon mixed with 2.5 tablespoon water per egg) is an excellent substitute. If gluten-free is required, simply substitute the all-purpose flour with a gluten-free blend, and they’ll still be just as enchanting!

Enchanting Enid and Wednesday Addams Cookies: Spookily Delicious!
Ingredients
Equipment
Method
- Preheat your oven to 350°F (175°C) and line your baking sheets with parchment paper.
- Cream softened butter and granulated sugar for 3-5 minutes until light and fluffy in a mixing bowl, then add vanilla extract and egg.
- Gradually add all-purpose flour to the mixture on low speed until a soft dough forms, typically taking 2-3 minutes.
- Divide the dough into two equal halves. Fold in cocoa powder into one half and use gel food coloring in the other half, kneading until colors are uniform.
- Roll the colored dough into logs/shapes and surround the cocoa dough around them.
- Slice the logs into ¼ inch thick pieces and place them on the prepared baking sheets with space between.
- Bake in the preheated oven for 10-12 minutes, ensuring the edges are set while the centers remain slightly soft.
- Let cookies cool for a few minutes on the sheets before transferring them to a wire rack to cool completely.
- Melt chocolate chips and pipe whimsical designs on your cooled cookies.


Leave a Reply