
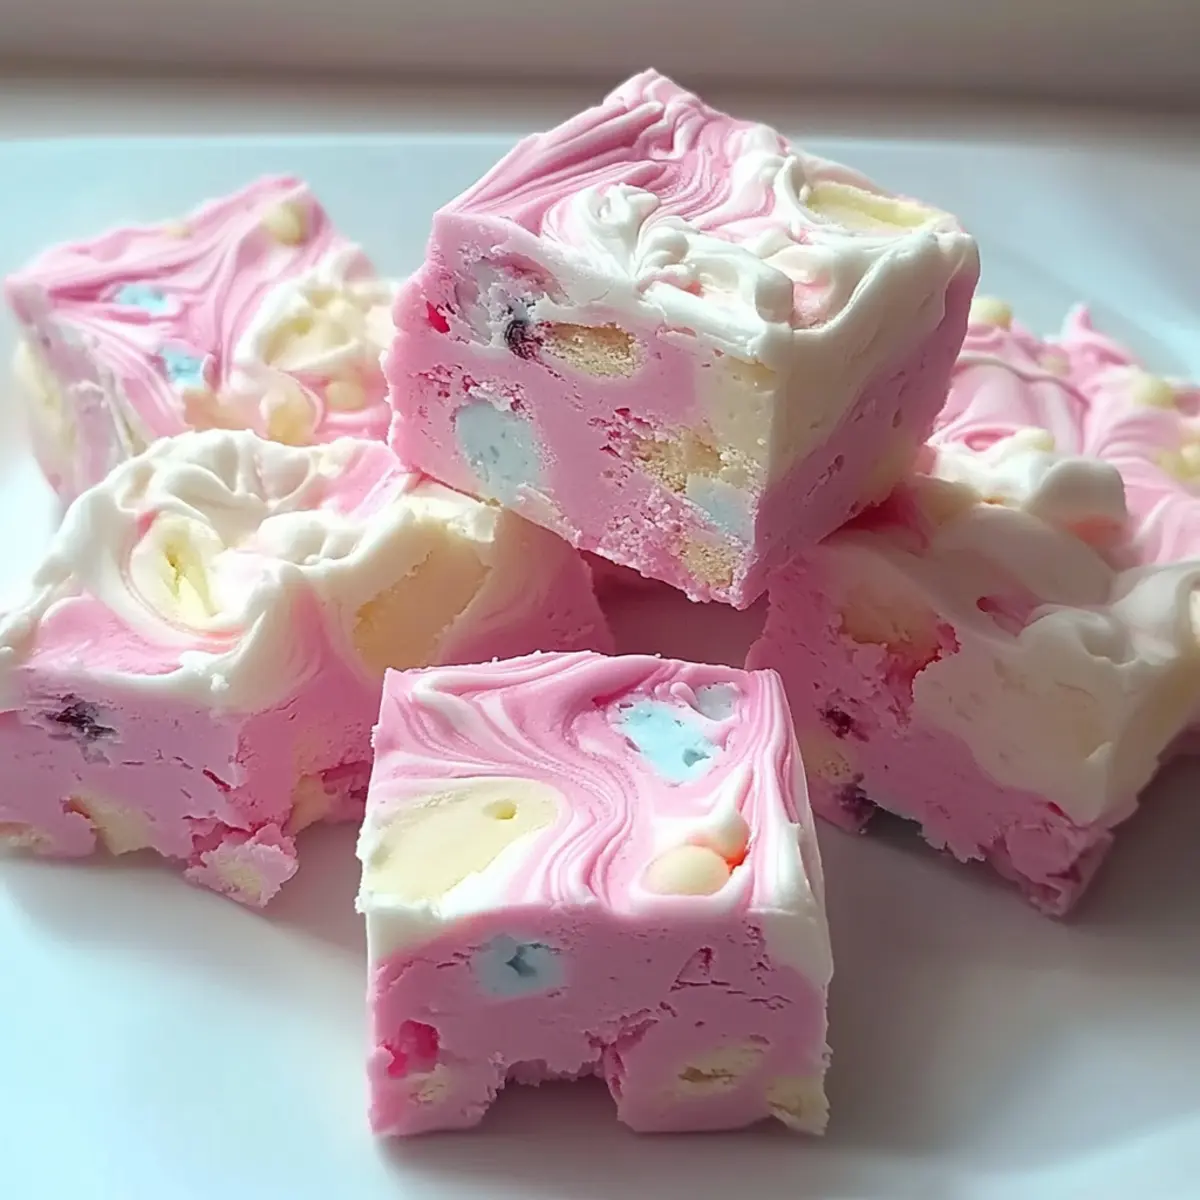
Walking through the local fair, the sweet scent of cotton candy brings me back to childhood memories of laughter and joy. That nostalgic flavor inspired my latest creation: Bubblegum Cloud Fudge. This whimsical dessert is not only a vibrant feast for the eyes with its fluffy pink swirls and colorful sprinkles but also a crowd-pleaser perfect for parties and celebrations. With quick prep and a delightful flavor that enchants both kids and adults alike, this fudge can brighten any day. Get ready to evoke smiles and fond memories—why settle for fast food when you can whip up this playful treat at home? Let’s dive into the magic of making your very own Bubblegum Cloud Fudge!

Why is Bubblegum Cloud Fudge Unforgettable?
Whimsical Appeal: This treat brings a burst of color and excitement to any dessert table. Kids and adults alike will be enchanted!
Easy to Make: With just a few simple steps, you’ll have this delicious fudge ready to impress. Even novice cooks can create something magical!
Versatile Flavors: Feel free to experiment by swapping the bubblegum flavor for other fun options like cotton candy or strawberry. A twist for every occasion!
Crowd-Pleasing Delight: Perfect for parties or as a thoughtful gift, this fudge will definitely earn you rave reviews. Who can resist a nostalgic treat?
Lasting Freshness: Make it ahead and store it easily; enjoy the sweets over multiple days or share like an enchanting surprise for friends. Don’t forget to check our tips on serving suggestions for ideas!
Bubblegum Cloud Fudge Ingredients
For the Fudge
• White Chocolate Chips – Provides creaminess and sweetness; substitute with chopped white chocolate if necessary.
• Sweetened Condensed Milk – Adds richness and moisture; use evaporated milk mixed with sugar as a lighter alternative.
• Unsalted Butter – Enhances creaminess and helps melt the chocolate smoothly; opt for coconut oil for a dairy-free version.
• Bubblegum Flavoring – Imparts the signature bubblegum taste; can be swapped for cotton candy, strawberry, or peppermint for different themes.
• Vanilla Extract – Adds depth to the flavor profile; use pure vanilla for a stronger taste.
For Coloring
• White Food Gel (optional) – Used to enhance the white color; omit if not available.
• Pink Food Gel (optional) – Used to tint one portion of fudge pink; omit if not available.
For Mix-Ins
• Mini Marshmallows – Provides lightness and a fun texture; substitute with foam candy or omit for a denser fudge.
• Confetti Rainbow Sprinkles – Adds a festive look and fun crunch; use themed sprinkles to match occasion colors.
Step‑by‑Step Instructions for Bubblegum Cloud Fudge
Step 1: Prepare the Baking Pan
Begin by lining an 8x8-inch baking pan with parchment paper, ensuring that it overhangs on the sides for easy removal later. This is an essential step that will prevent the Bubblegum Cloud Fudge from sticking, making it much easier to lift out once it's set.
Step 2: Melt the Fudge Base
In a medium saucepan, combine the white chocolate chips, sweetened condensed milk, and unsalted butter over low heat. Stir the mixture gently and consistently for about 5 minutes, or until everything is fully melted and smoothly blended together. Watch for a glossy finish, indicating it’s ready to be removed from heat.
Step 3: Flavor the Mixture
Once the fudge base is melted, remove it from the heat and stir in the bubblegum flavoring and vanilla extract. Mix well to ensure that these delightful flavors are evenly distributed throughout the creamy mixture. The sweet, nostalgic aroma should fill your kitchen as you do this!
Step 4: Divide and Color the Fudge
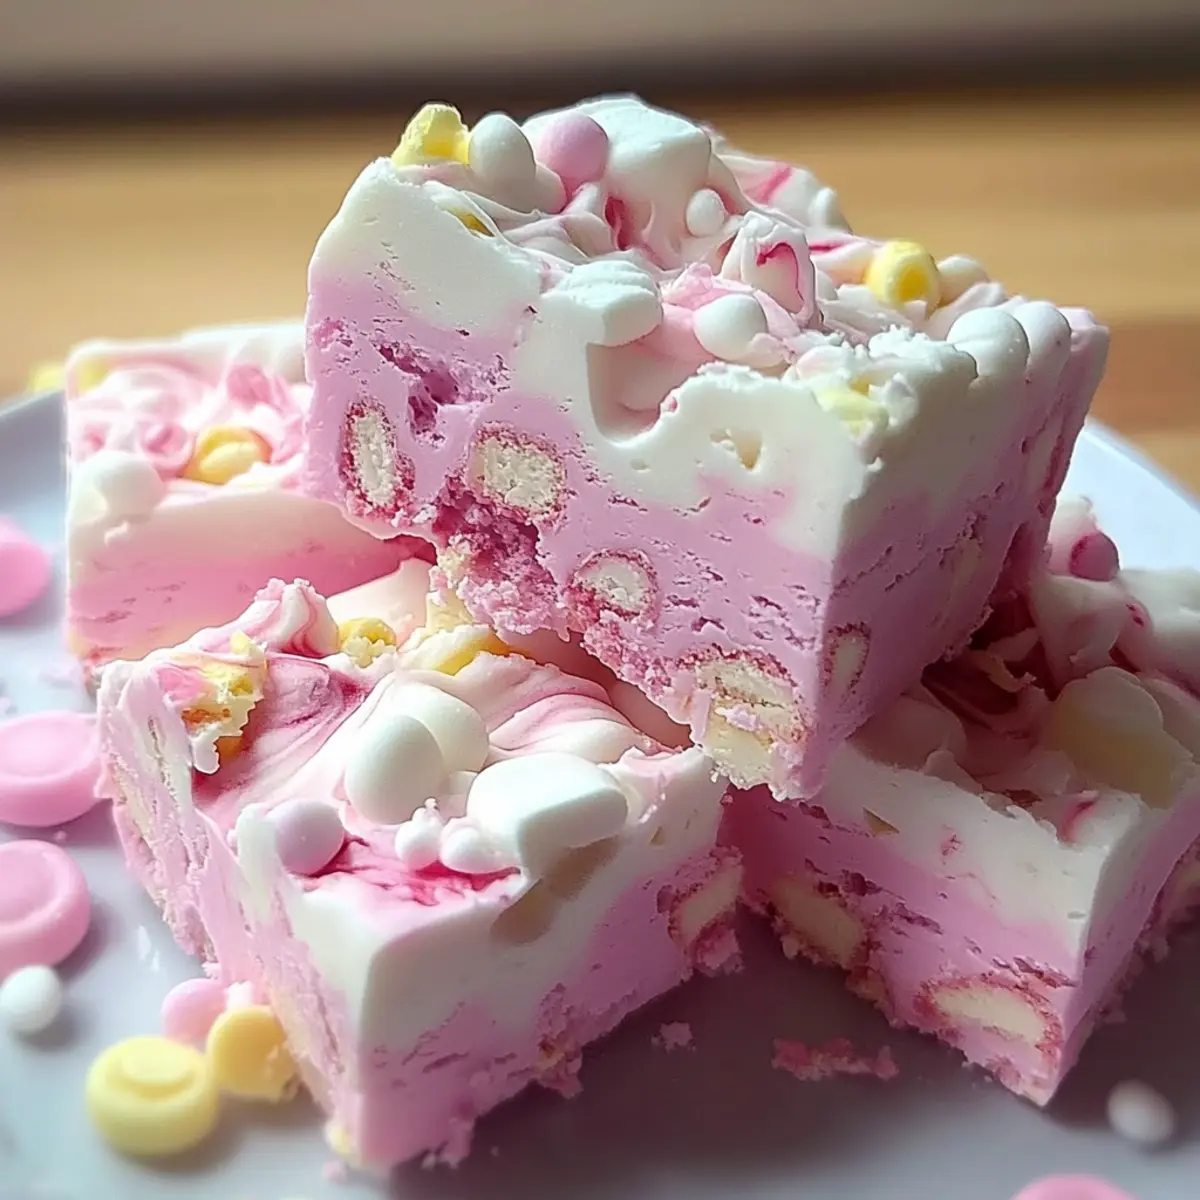
Next, divide the fudge mixture equally into two bowls. In one bowl, keep the mixture white, and in the other, add pink food gel to create that whimsical hue. Stir well until the colors are fully incorporated. This step brings the visual charm to your Bubblegum Cloud Fudge!
Step 5: Assemble the Fudge in the Pan
Spread the white fudge mixture evenly into the prepared baking pan, smoothing the top with a spatula. After that, dollop spoonfuls of the pink mixture on top of the white layer. Be creative as you do this, as you’ll be swirling the two colors together shortly for that marbled effect.
Step 6: Create the Swirl Effect
Using a toothpick or a skewer, gently swirl the pink fudge into the white, creating a marbled pattern. Take care to avoid overmixing, as you want to preserve distinct swirls of color. This step ensures your finished Bubblegum Cloud Fudge looks as good as it tastes!
Step 7: Add Fun Toppings
Sprinkle mini marshmallows and confetti rainbow sprinkles over the top of the fudge mixture in the pan. Lightly press them into the surface to ensure they adhere well during the chilling process. This colorful topping adds a festive touch and a delightful texture to your fudge.
Step 8: Chill the Fudge
Place the pan in the refrigerator and chill for at least 3 hours, or until the Bubblegum Cloud Fudge is firm to the touch. This refrigeration time is crucial for achieving that perfect melt-in-your-mouth consistency. Patience will yield delicious results!
Step 9: Cut and Serve
Once the fudge has set, carefully lift it out of the pan using the parchment paper overhang. Place it on a cutting board and slice it into squares with a sharp knife. Your beautiful Bubblegum Cloud Fudge is now ready to be enjoyed, bringing smiles and sweetness to everyone's day!
What to Serve with Bubblegum Cloud Fudge
Creating a delightful meal is all about combining flavors, textures, and visual appeal, just like this playful treat!
- Fluffy Cotton Candy: This airy delicacy mirrors the bubblegum flavors and enhances the whimsical dessert theme, creating even more childhood nostalgia.
- Creamy Vanilla Ice Cream: A scoop of vanilla ice cream lends a cool contrast to the smooth fudge, balancing sweetness with creaminess for a delightful experience.
- Rainbow Fruit Skewers: Fresh, colorful fruit adds a refreshing element to your dessert table, making it feel vibrant and fun while offering a touch of healthiness.
- Sparkling Lemonade: The fizzy, citrusy notes in sparkling lemonade create a playful, refreshing drink option that complements the sweetness of the fudge perfectly.
- Chocolate-Dipped Strawberries: These elegant treats add a touch of luxury while pairing well with the bubblegum flavor, enhancing the overall sweetness and richness.
- Popcorn Treats: Fluffy popcorn dressed with drizzle chocolate or sprinkles mirrors the colorful nature of the fudge, providing a playful crunch.
- Confetti Cake: For a complete celebration, a slice of confetti cake adds layers of charm and sweetness, echoing the vibrant colors of the fudge.
- Milkshake: A fun and indulgent milkshake, perhaps flavored with bubblegum or vanilla, can create a whimsical experience that ties in beautifully with your Bubblegum Cloud Fudge!
Expert Tips for Bubblegum Cloud Fudge
- Gentle Swirling: To achieve a beautiful marbled effect, swirl gently with a toothpick. Overmixing can cause the colors to blend too much, losing that vibrant look.
- Sticky Marshmallows: Lightly press the mini marshmallows into the fudge mixture before chilling. This prevents them from floating away and ensures they stay in place.
- Proper Storage: Keep your Bubblegum Cloud Fudge in an airtight container to maintain freshness. At room temperature, it lasts up to 5 days; refrigerate for 2 weeks, or freeze for 3 months.
- Flavor Swaps: Don't hesitate to get creative! Swap out the bubblegum flavoring for cotton candy or peppermint to fit different themes or preferences.
- Chilling Time Matters: Allow sufficient chilling time (at least 3 hours) to ensure that the fudge sets properly. Rushing this step can lead to a gooey texture.
Make Ahead Options
If you're a busy home cook looking to save time, this Bubblegum Cloud Fudge is perfect for meal prep! You can prepare the fudge mixture up to 24 hours ahead, storing it in the refrigerator before swirling and chilling. Simply follow the initial steps of melting the ingredients and flavoring them, then store the mixture in an airtight container. When you're ready to finish, follow steps 4 through 8: color, swirl, and chill. This way, you can enjoy a delightful and whimsical treat without the stress, ensuring that your fudge remains just as delicious and vibrant for your next celebration!
Bubblegum Cloud Fudge Variations
Feel free to get creative and customize your Bubblegum Cloud Fudge for a truly unique experience that captivates the senses!
- Cotton Candy: Swap the bubblegum flavor for cotton candy for a playful twist that evokes classic fairground nostalgia.
- Strawberry Bliss: Use strawberry flavoring to provide a fruity and vibrant take that brings summertime fun to your fudge. Imagine a sunny picnic with this flavor!
- Peppermint Twist: For a refreshing seasonal option, substitute bubblegum with peppermint. Perfect for holiday gatherings, this variation adds a cool zing!
- Dairy-Free Delight: Replace butter with coconut oil for a deliciously dairy-free version. This subtle swap brings a delightful tropical nuance to your fudge.
- Nutty Crunch: Add crushed nuts like macadamias or almonds for an intriguing crunch that contrasts beautifully with the soft, creamy fudge. Just remember to adjust your toppings with care!
- Spicy Kick: Mix in a pinch of cayenne pepper or chili powder for a surprising heat that contrasts wonderfully with the sweetness. This adventurous twist will delight your taste buds!
- Chocolate Drizzle: Top your fudge with a drizzle of melted dark chocolate for luxurious richness. The combination creates an irresistible pairing that chocolate lovers will adore!
- Theme Your Sprinkles: Use festive sprinkles that match your occasion—think red and green for Christmas, or orange and black for Halloween. A dash of creativity makes all the difference!
These variations allow you to explore flavor profiles and cater to different tastes. Why stick with fast food when you can transform simple ingredients into delightful, whimsical desserts? Each idea is a chance to present a unique creation that will wow your friends and family!
How to Store and Freeze Bubblegum Cloud Fudge
Room Temperature: Store in an airtight container for up to 5 days. Keep it in a cool, dry place away from direct sunlight to maintain its delightful flavor and texture.
Fridge: If you prefer longer freshness, refrigerate the fudge in an airtight container for up to 2 weeks. This helps keep it deliciously creamy while retaining its whimsical appeal.
Freezer: For extended storage, freeze the fudge by wrapping it tightly in plastic wrap and placing it in a freezer-safe container. It will stay fresh for up to 3 months—perfect for planning ahead!
Reheating: There's no need to reheat this sweet treat. Simply thaw in the refrigerator overnight before serving, and enjoy the delectable Bubblegum Cloud Fudge as a fun dessert!

Bubblegum Cloud Fudge Recipe FAQs
How do I select the best ingredients for my Bubblegum Cloud Fudge?
Absolutely! When choosing your white chocolate chips, look for high-quality brands that contain cocoa butter for a smoother melt. The sweetened condensed milk should be thick and creamy; avoid brands with excessive additives. As for flavoring, opt for pure bubblegum flavoring or a reputable extract to ensure that delightful nostalgia shines through.
What’s the best way to store Bubblegum Cloud Fudge, and how long will it last?
Store your Bubblegum Cloud Fudge in an airtight container at room temperature for up to 5 days. If refrigerated, it can last up to 2 weeks. Make sure to keep it in a cool, dry place, away from direct sunlight to preserve its vibrant colors and flavor.
Can I freeze Bubblegum Cloud Fudge, and if so, how?
Yes, you can freeze your Bubblegum Cloud Fudge! Wrap it tightly in plastic wrap and place it in a freezer-safe container. This will protect it from freezer burn and maintain its delightful taste. It will stay fresh for up to 3 months. When you’re ready to enjoy it again, simply thaw it in the refrigerator overnight, and it’s good to go!
What should I do if my fudge doesn't set properly?
If your fudge doesn't set, don't worry! You can re-melt it gently in a saucepan over low heat—just enough to soften it, but don’t overheat! Once melted, add a little more sweetened condensed milk or a small amount of powdered sugar to thicken the mixture. Pour it back into the lined pan and allow it to chill again in the refrigerator for at least 3 hours until firm.
Can I make this recipe dairy-free or suitable for allergies?
Certainly! To convert the Bubblegum Cloud Fudge to a dairy-free version, replace unsalted butter with coconut oil, and use dairy-free chocolate chips. Additionally, ensure the bubblegum flavoring and food gels do not contain any allergens. Always check the labels when purchasing ingredients, especially if you’re catering to allergies.
Indulgent Bubblegum Cloud Fudge for Sweet Celebration Magic
Ingredients
Equipment
Method
- Prepare the Baking Pan: Line an 8x8-inch baking pan with parchment paper, ensuring that it overhangs on the sides for easy removal later.
- Melt the Fudge Base: In a medium saucepan, combine the white chocolate chips, sweetened condensed milk, and unsalted butter over low heat. Stir gently for about 5 minutes until melted and smooth.
- Flavor the Mixture: Remove from heat and stir in the bubblegum flavoring and vanilla extract. Mix well to ensure flavors are evenly distributed.
- Divide and Color the Fudge: Divide the fudge mixture into two bowls. Keep one white and add pink food gel to the other. Stir well.
- Assemble the Fudge in the Pan: Spread the white fudge into the baking pan, smoothing the top. Dollop spoonfuls of the pink mixture on top.
- Create the Swirl Effect: Using a toothpick, gently swirl the pink fudge into the white to create a marbled pattern. Avoid overmixing.
- Add Fun Toppings: Sprinkle mini marshmallows and confetti sprinkles over the top and press lightly into the surface.
- Chill the Fudge: Place the pan in the refrigerator and chill for at least 3 hours until firm to the touch.
- Cut and Serve: Lift the fudge out of the pan using parchment overhang, place on a cutting board, and slice into squares.


Leave a Reply