
There’s something incredibly satisfying about using just five ingredients to whip up a dessert that feels like a cheeky indulgence. My 5-Ingredient No-Bake Crunchie Slice is that perfect remedy for sweet cravings, combining rich chocolate and crunchy honeycomb in a way that’s both effortless and impressive. Not only is this recipe a breeze to prepare—it’s also a fantastic go-to for those busy afternoons or last-minute gatherings. With minimal effort, you’ll create a delightful treat that promises to leave your friends and family reaching for seconds. Who knew that such a quick, no-fuss recipe could deliver so much joy? Ready to uncover the secret to your new favorite dessert?
Why is this No-Bake Crunchie Slice special?
Simplicity at Its Best: With just five ingredients, this recipe ensures that even novice cooks can achieve dessert perfection in no time.
Rich, Decadent Flavor: The combination of chocolate and honeycomb creates a delightful burst of sweetness that’ll satisfy any sweet tooth.
Fun for Everyone: This treat is ideal for both kids and adults, making it a family favorite for parties or cozy nights in.
Versatile Options: Feel free to experiment with different ingredients, from dark chocolate to nuts, ensuring it’s tailored to your taste!
Time-Saving Delight: Ready in under 30 minutes, this no-bake dessert allows you to focus on spending quality time with loved ones rather than slaving away in the kitchen.
Make sure to check out more no-bake ideas to expand your dessert repertoire!
No-Bake Crunchie Slice Ingredients
For the Base
- Digestive Biscuits – Provides a sturdy structure for the slice; substitute with Graham crackers if preferred.
- Sweetened Condensed Milk – Acts as a creamy binding agent, ensuring the slice holds together perfectly.
- Salted Butter – Adds richness to the base; unsalted works too with a pinch of added salt.
For the Topping
- Milk Chocolate – Creates a smooth, decadent topping; dark chocolate can be swapped for a richer flavor.
- Crunchie Bars – Offers a sweet honeycomb and chocolate crunch; use 6 for the base and 2 for topping to enhance the no-bake crunchie slice experience.
Step‑by‑Step Instructions for No-Bake Crunchie Slice
Step 1: Prepare the Biscuit Base
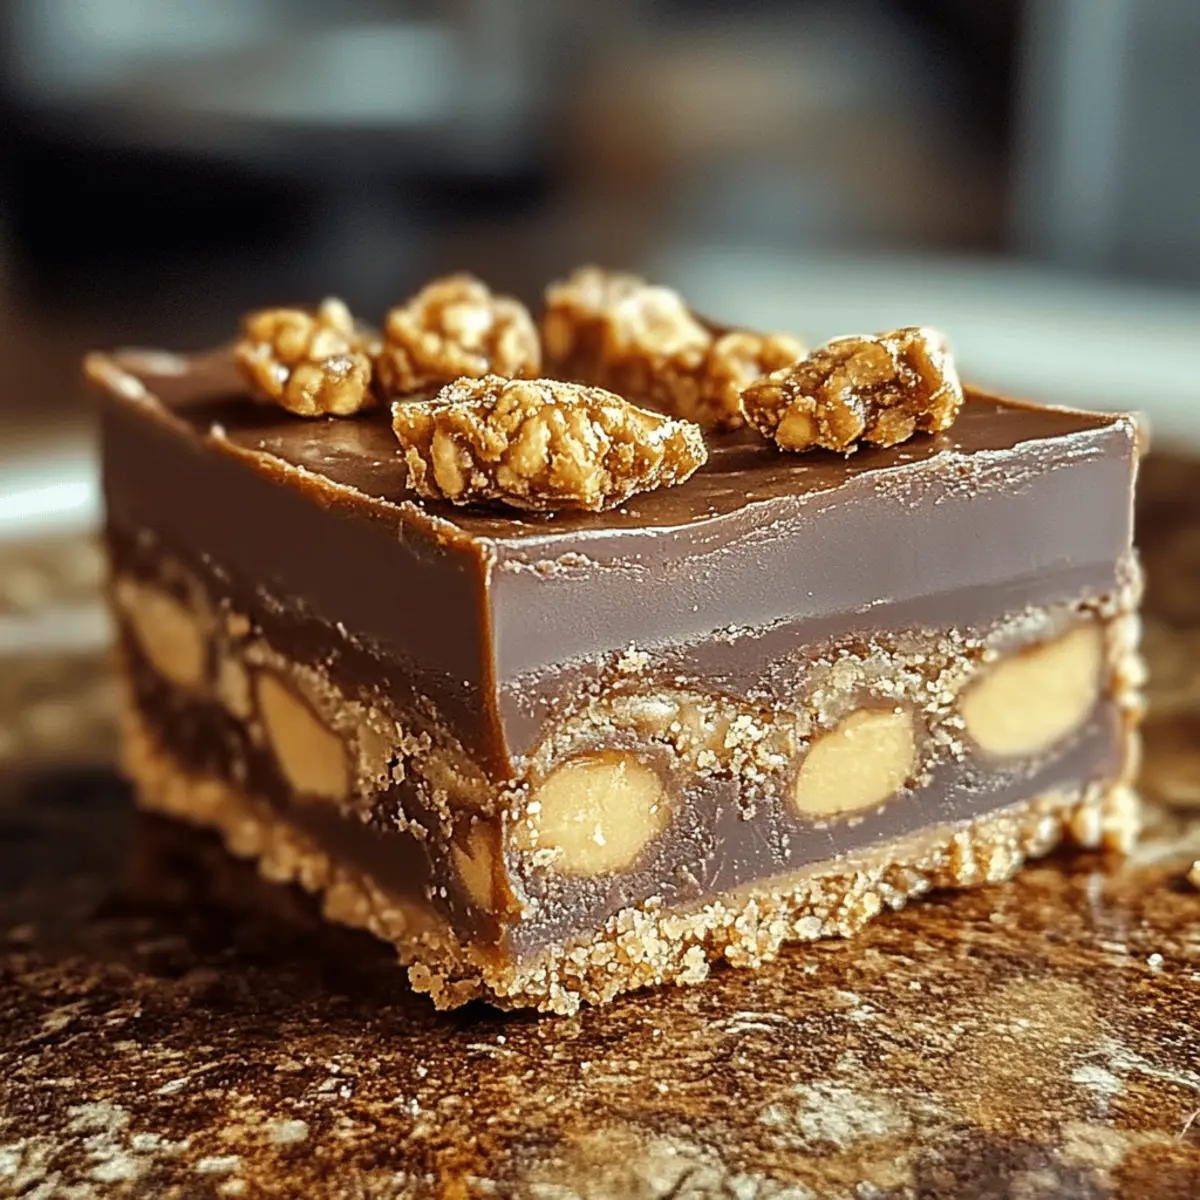
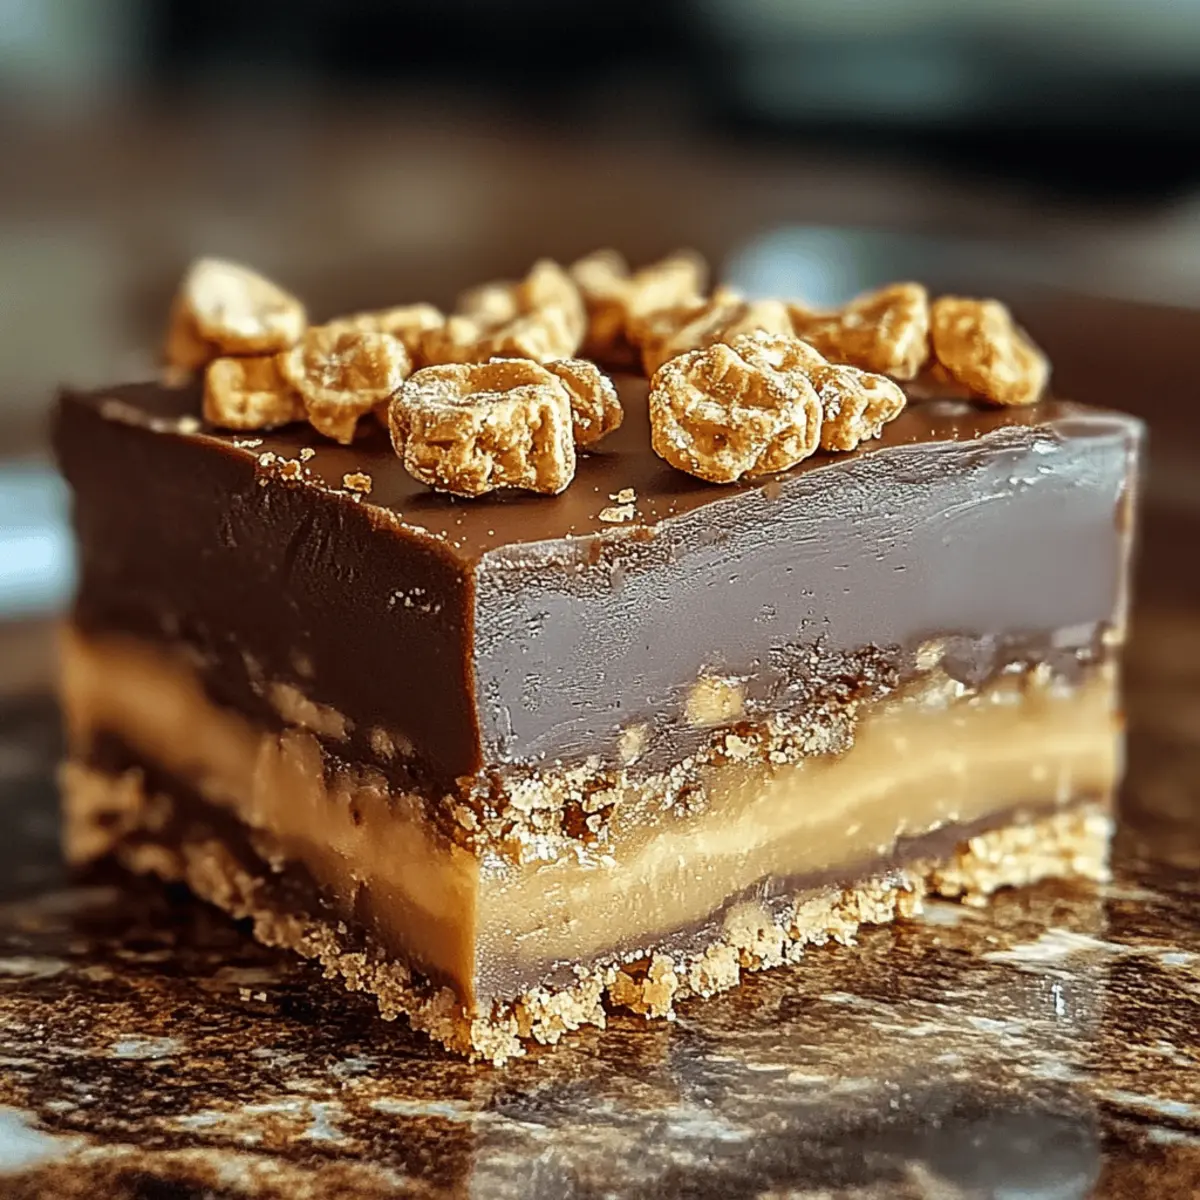
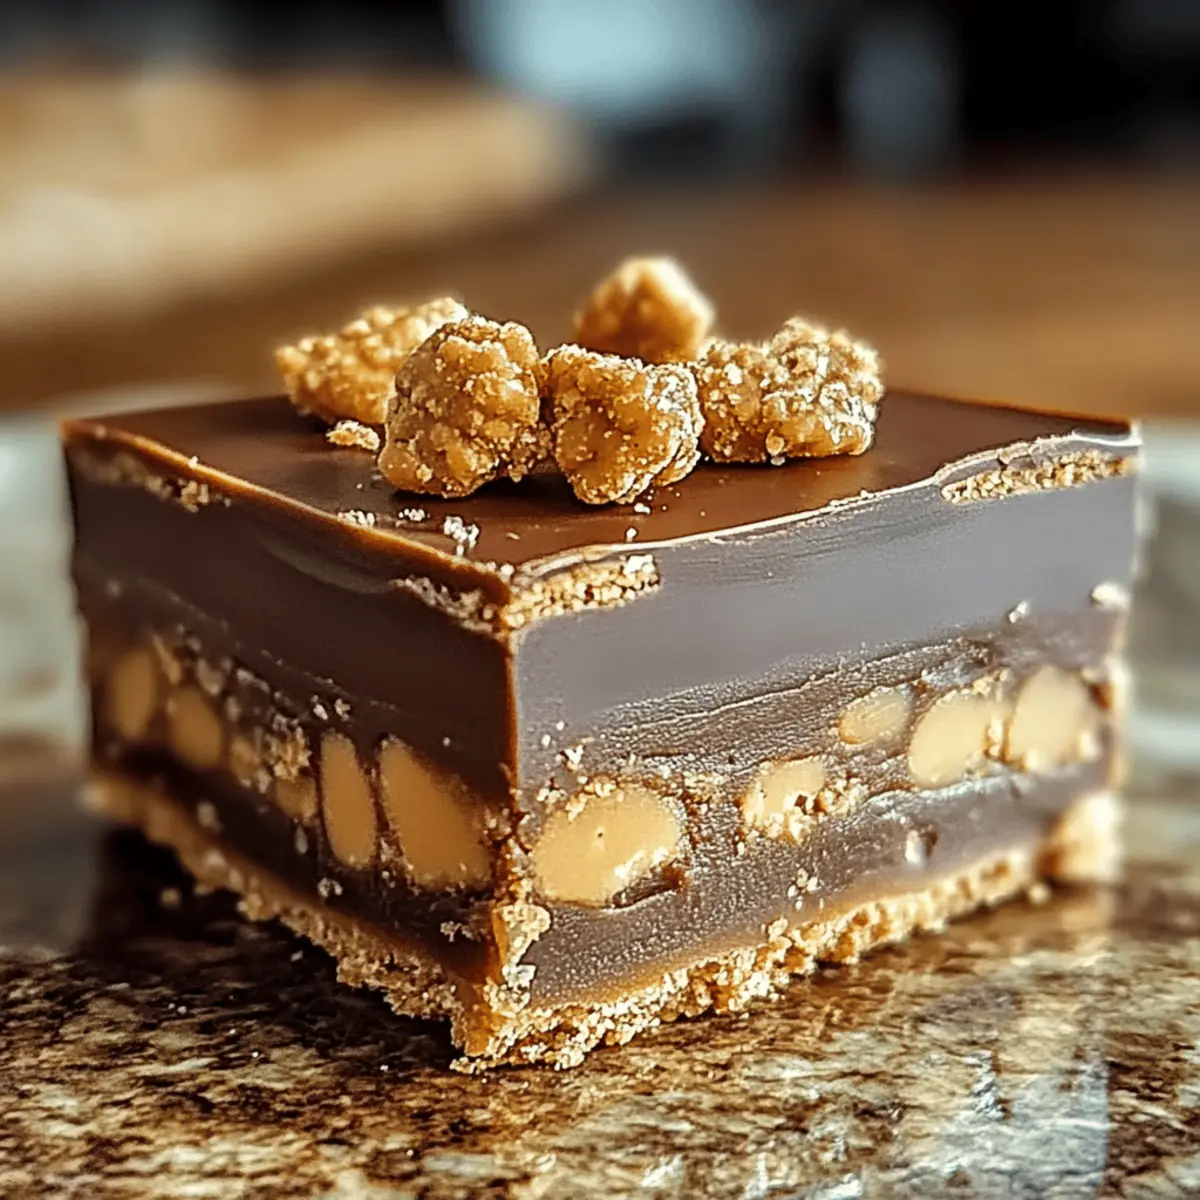
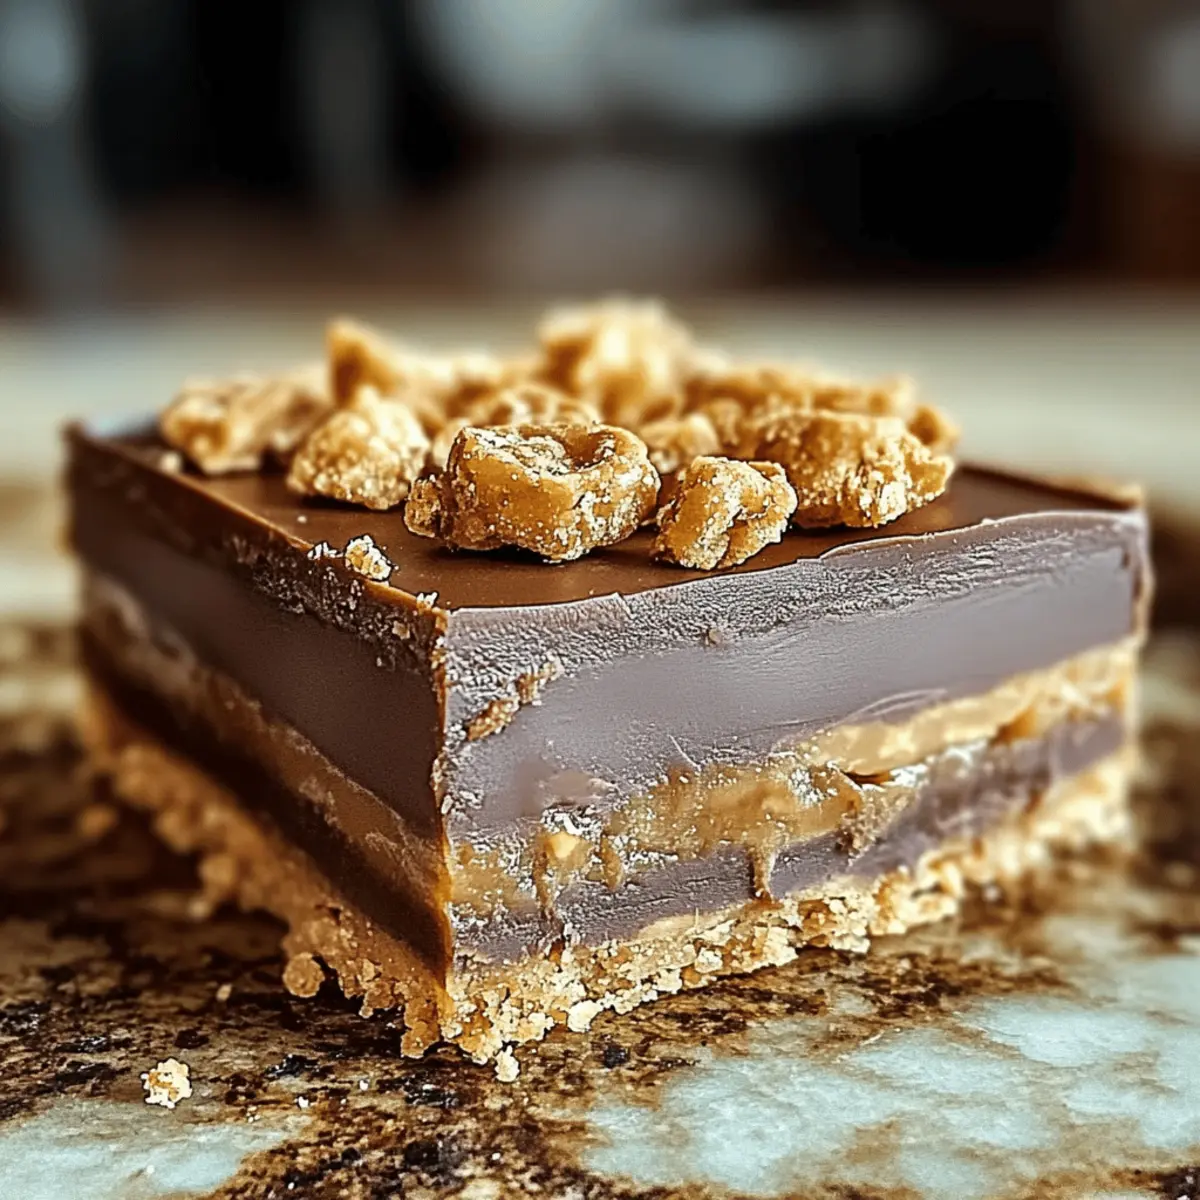
Start by crushing 350 g of digestive biscuits into fine crumbs using a food processor or a rolling pin and a plastic bag. Melt 100 g of salted butter in a microwave or over a stovetop until completely liquefied. In a mixing bowl, combine the biscuit crumbs, melted butter, and 300 g of sweetened condensed milk. Fold in 6 chopped Crunchie bars, ensuring everything is well mixed, then press the mixture firmly into a lined 8×8-inch baking tin, creating an even base.
Step 2: Make the Chocolate Topping
In a microwave-safe bowl, melt 200 g of milk chocolate in 40-second intervals, stirring thoroughly after each round until it is smooth and glossy. To enhance the shine, add 10 g of melted salted butter to the chocolate mixture and mix until fully combined. This will give your topping a delightful luster, making the No-Bake Crunchie Slice even more appealing as you prepare to assemble it.
Step 3: Assemble the Slice
Next, pour the melted chocolate mixture evenly over the prepared biscuit base, using a spatula to spread it out smoothly. For an extra crunch, take the remaining 2 chopped Crunchie bars and sprinkle them over the chocolate layer. Gently press the Crunchie pieces into the chocolate for better adhesion, ensuring each bite features that signature honeycomb crunch in your No-Bake Crunchie Slice.
Step 4: Chill and Serve
Cover the baking tin with plastic wrap and refrigerate the entire slice for at least 3 hours, allowing it to set thoroughly. Once chilled and firm, use a hot knife to cut the slice into 12–16 squares for perfectly neat edges. Serve these delightful No-Bake Crunchie Slices cold for the best flavor and texture, ready to impress your family and friends!
Expert Tips for No-Bake Crunchie Slice
- Firm Base: Make sure to press the biscuit mixture firmly into the baking tin. A solid base will keep the slice intact when serving.
- Gentle Melting: Melt the chocolate carefully in intervals to prevent burning. Smooth, glossy chocolate is essential for that professional appearance.
- Hot Knife Technique: To achieve clean cuts, use a hot knife when slicing your No-Bake Crunchie Slice. It prevents a messy look and maintains the beautiful layers.
- Chill Time Matters: Allow the slice to chill completely for at least 3 hours. Skipping this step can lead to a crumbly texture instead of a firm bite.
- Customization is Key: Feel free to add your favorite twists, like nuts or different chocolates, to make this no-bake crunchie slice uniquely yours!
No-Bake Crunchie Slice Variations
Feel free to let your creativity shine and customize your No-Bake Crunchie Slice to suit your taste!
-
Ginger Nut Base: Swap out the digestive biscuits for ginger nut biscuits to add a spicy kick to your slice. The warm spice enhances the sweetness of the chocolate and honeycomb wonderfully!
-
Nutty Delight: Stir in crushed almonds or hazelnuts to the base for a delightful crunch. This twist not only adds texture but also boosts the overall flavor, creating a more complex dessert experience.
-
Dark Chocolate: Use dark chocolate instead of milk chocolate for a richer, more intense chocolate flavor. This deeper taste balances beautifully with the sweetness of the honeycomb, offering a gourmet touch.
-
Coconut Bliss: Incorporate unsweetened coconut flakes into the base mixture for a tropical twist. This addition provides a hint of coconut flavor and an extra chewy texture you’ll adore!
-
Caramel Drizzle: Drizzle melted caramel sauce over the top before chilling for a decadent layer of sweetness. Adding a pinch of sea salt on top can make each bite pop with flavor.
-
Fruit Fusion: Toss in dried cranberries or apricots with the base for a fruity burst. This wholesome addition brings a chewy, tart note that perfectly complements the slice's richness.
-
Peanut Butter: Swirl in some smooth peanut butter into the chocolate topping for a nutty layer that complements the honeycomb crunch. This combination creates an irresistible treat everyone will love!
Make sure to check out our delicious No-Bake Chocolate Biscuit Cake or for a fruitier option, our Fruit and Nut Bars for more sweet inspirations!
What to Serve with No-Bake Crunchie Slice
Elevate your dessert experience by pairing this indulgent treat with delightful accompaniments that enhance its rich flavors.
-
Fresh Berries: The tartness of raspberries or strawberries adds a refreshing contrast to the decadent sweetness of the slice.
-
Vanilla Ice Cream: A scoop of creamy vanilla ice cream creates a wonderful temperature contrast, melting into the slice and enriching every bite.
-
Chocolate Sauce Drizzle: A light drizzle of warm chocolate sauce not only enhances the appearance but amplifies the chocolatey goodness, making each bite more indulgent.
-
Whipped Cream: Light and fluffy whipped cream provides a luxurious creaminess that balances the rich biscuit base and chocolate topping beautifully.
-
Caramel Sauce: A sweet drizzle of caramel adds a sophisticated touch, embracing the sweetness while introducing a silky texture that compliments the slice.
-
Nutty Crumble Topping: A sprinkle of crushed nuts such as almonds or hazelnuts introduces a delightful crunch, enhancing the overall bite and flavor profile.
Let your creativity shine as you mix and match these suggestions to find the perfect pairing for your No-Bake Crunchie Slice!
How to Store and Freeze No-Bake Crunchie Slice
Fridge: Store your No-Bake Crunchie Slice in an airtight container for up to 1 week. This keeps it fresh and ready for dessert cravings!
Freezer: For longer storage, freeze the slice wrapped tightly in plastic wrap and foil for up to 3 months. Thaw overnight in the fridge before serving.
Serving: To enjoy at its best, serve chilled straight from the fridge. A quick drizzle of chocolate sauce can elevate it even more!
Cutting: Use a warm knife to slice through the frozen treat easily, helping maintain its beautiful layers while avoiding a messy appearance.
Make Ahead Options
Busy home cooks will love the ease of preparing the No-Bake Crunchie Slice ahead of time! You can make the entire base and chilling it in the fridge for up to 3 days before adding the chocolate topping. To maintain quality, simply press the biscuit mixture firmly into the baking tin and cover it well with plastic wrap to prevent drying. When you’re ready to serve, melt the chocolate topping and assemble the slice as directed. This allows you to have a delicious dessert at your convenience, saving valuable time on busy weeknights or last-minute gatherings while still delivering that delightful flavor you adore!
No-Bake Crunchie Slice Recipe FAQs
How do I choose the right digestive biscuits?
Absolutely! When selecting digestive biscuits, look for ones that are fresh and crisp, free from broken pieces or an off smell. The best ones should feel sturdy and provide a solid foundation for your No-Bake Crunchie Slice. If you prefer a different flavor, Graham crackers are a great substitute that will work just as well.
What’s the best way to store the No-Bake Crunchie Slice?
Store your No-Bake Crunchie Slice in an airtight container in the fridge for up to 1 week. This keeps it fresh and ready for any sudden sweet cravings. If you’d like to keep it longer, freeze the slice wrapped tightly in plastic wrap and then foil for up to 3 months. Make sure to thaw it overnight in the fridge before serving for the best flavor and texture.
Can I freeze the No-Bake Crunchie Slice?
Very! To freeze, follow these simple steps: First, cut the slice into squares, then wrap each piece tightly in plastic wrap. Place them inside an airtight container or a heavy-duty freezer bag, removing as much air as possible. Label with the date, and it will keep well in the freezer for up to 3 months. When you’re ready to enjoy, just thaw a square overnight in the refrigerator.
What should I do if my chocolate topping is too thick?
If you find your chocolate topping getting too thick, don’t worry! Simply place the bowl back in the microwave and heat in 20-second intervals, stirring in between, until it reaches your desired consistency. The key is to melt it gently to maintain that silky smooth texture needed for a perfect No-Bake Crunchie Slice.
Is this recipe suitable for those with nut allergies?
Yes, you can easily make this recipe nut-free. Be sure to check all your ingredients, especially the chocolate and any possible add-ins. If you're substituting ingredients, avoid using nuts and choose alternative flavors such as coconut flakes or extra honeycomb for additional crunch without compromising safety.
What’s the best way to cut the No-Bake Crunchie Slice?
For clean, neat squares, use a hot knife! Simply dip your knife in hot water, wipe it dry, and carefully cut through the slice. This technique prevents messy edges and retains the beautiful layers of your No-Bake Crunchie Slice, making your treat as visually appealing as it is delicious.
Irresistibly Easy No-Bake Crunchie Slice You’ll Adore
Ingredients
Equipment
Method
- Crush digestive biscuits into fine crumbs and melt salted butter. Combine crumbs, melted butter, sweetened condensed milk, and chopped Crunchie bars. Press into a lined baking tin.
- Melt milk chocolate in intervals and mix in melted salted butter for shine. Pour over the biscuit base.
- Sprinkle remaining chopped Crunchie bars over the chocolate and press gently for adhesion.
- Refrigerate for at least 3 hours before cutting into squares and serving cold.


Leave a Reply