
Stepping into my kitchen, the delightful aroma of cinnamon and sugar wafts through the air, instantly transporting me to a cozy café filled with sweet indulgences. Today, I'm excited to share my version of Sopapilla Cheesecake, a lovely blend of flaky crescent rolls and creamy cheesecake that’s as easy to make as it is to share. Perfect for those moments when you're craving something sweet without the hassle, this easy dessert comes together in a snap and is sure to impress at any gathering. With its luscious textures and warm, sweet flavor, it's a crowd-pleaser you'll want to keep on repeat. Ready to indulge your taste buds? Let’s dive into this mouthwatering adventure!
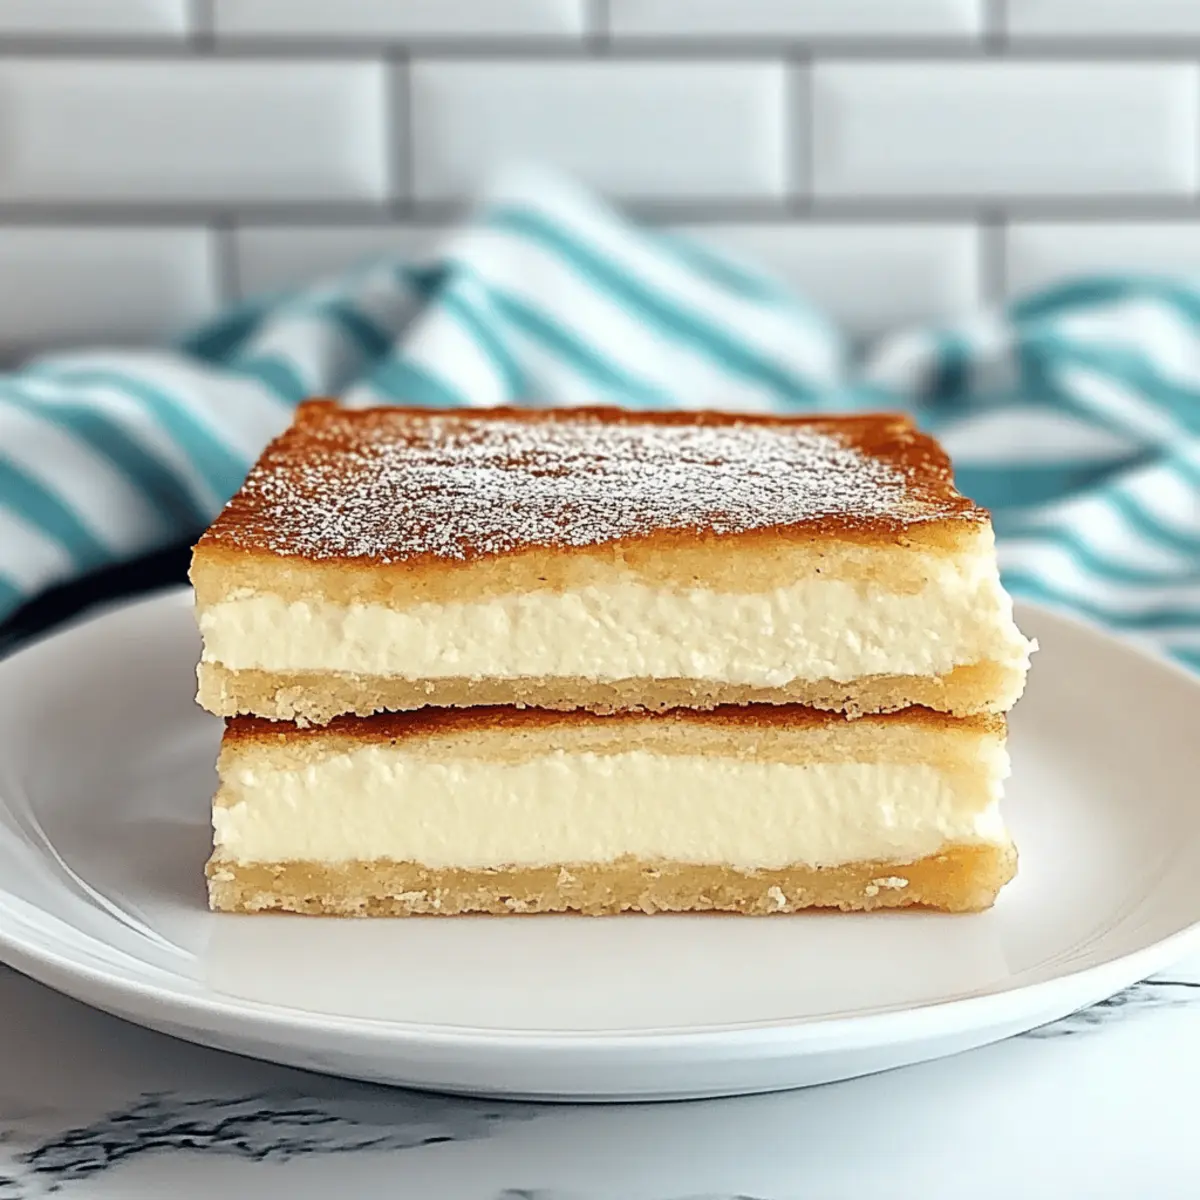
Why is Sopapilla Cheesecake a Must-Try?
Irresistible Flavor: The combination of creamy cheesecake and flaky pastry creates a delicious, decadent treat that’s hard to resist.
Quick & Easy: With minimal prep and just a few ingredients, this easy dessert is perfect for those busy days or last-minute gatherings.
Versatile Delights: Customize your own Sopapilla Cheesecake by adding chocolate chips or fresh berries, making it your own signature dessert.
Crowd Favorite: Whether you're hosting friends or enjoying a sweet night in, this dish is sure to be the star of any occasion.
Well-Deserved Indulgence: Treat yourself to a comfort dessert that brings warmth and smiles, reminding us that homemade sweetness is best.
For more delightful desserts, check out my favorite Velvet Oreo Cheesecake for another indulgent recipe!
Sopapilla Cheesecake Ingredients
For the Crust
- Crescent Rolls – These flaky layers create the perfect base; opt for store-bought dough for convenience.
- Butter – Essential for richness and sticking layers together; melted butter gives a golden touch.
For the Filling
- Cream Cheese – The star of the creamy cheesecake filling; make sure it’s softened for easy blending.
- Condensed Milk – Adds sweetness and moisture; using a sweetened version amps up the flavor.
- Egg – Binds the filling for a velvety texture; crucial for an indulgent dessert.
- Mexican Vanilla – Elevates the flavor; if unavailable, regular vanilla extract works just fine.
For the Topping
- Sugar – Sweetens the top layer; a sprinkle of this combined with cinnamon creates that churros vibe.
- Ground Cinnamon – Key for that warm, inviting flavor; don't skip this ingredient for the signature taste.
Feel free to get creative by experimenting with additional variations or toppings! Enjoy your Sopapilla Cheesecake adventure!
Step‑by‑Step Instructions for Sopapilla Cheesecake
Step 1: Preheat the Oven
Begin by preheating your oven to 350°F (175°C). This step is essential to ensure that your Sopapilla Cheesecake bakes evenly and achieves that golden-brown crust. While the oven warms up, gather your ingredients and prepare your baking dish, which should be a 9x13-inch pan for the perfect fit.
Step 2: Prepare the Cinnamon-Sugar Mix
In a small bowl, combine sugar and ground cinnamon, stirring well to ensure even distribution. This delightful mix will add a sweet and spiced flavor to your Sopapilla Cheesecake. Set it aside as you move on to the dough, allowing the flavors to meld together beautifully.
Step 3: Roll Out the Crescent Dough
Unroll the refrigerated crescent dough on a clean surface. If necessary, stretch and trim the dough to fit your baking dish precisely. This flaky pastry will form the base and top layer of your cheesecake, so ensure it’s evenly spread out and prepared to hold the creamy filling.
Step 4: Brush with Butter and Add Cinnamon-Sugar
Take your melted butter and brush a generous layer on the bottom of your baking dish. Next, sprinkle half of the prepared cinnamon-sugar mix over the butter-coated surface. This step infuses the crust with flavor, setting the stage for a delightful Sopapilla Cheesecake experience.
Step 5: Par-Bake the First Layer
Carefully lay the rolled-out crescent dough into the baking dish, taking care to maintain an even layer. Place the dish in the preheated oven and par-bake the crust for 5-6 minutes, watching for it to slightly set but not brown. This crucial step prevents sogginess in the final dish.
Step 6: Make the Creamy Filling
While the crust is baking, in a mixing bowl, whisk 1 package of softened cream cheese until smooth and creamy. Gradually mix in the sweetened condensed milk, then add the egg and Mexican vanilla, beating until the filling is lump-free and beautifully blended. This rich mixture is the heart of your Sopapilla Cheesecake.
Step 7: Pour the Filling into the Crust
Once the crust has par-baked, remove it from the oven and pour the silky cheesecake filling over the warm base. Spread it out evenly for a luscious layer that will contrast perfectly with your crispy top. This dreamy filling is what makes your Sopapilla Cheesecake so enticing.
Step 8: Add the Top Layer of Dough
Carefully unroll the second sheet of crescent dough and place it over the cheesecake filling. Gently brush the top with melted butter, ensuring a golden finish, and sprinkle the remaining cinnamon-sugar mix on top. This will create a sweet, crunchy topping that’s simply irresistible.
Step 9: Bake to Perfection
Return the dish to the oven and bake for 30-35 minutes, or until the top is golden brown and the filling is set. Keep an eye on it in the final minutes; it should have a slight jiggle but should not be raw. The lovely aroma of your Sopapilla Cheesecake will fill your kitchen.
Step 10: Cool and Chill
Once baked, remove the cheesecake from the oven and allow it to cool completely at room temperature. Afterward, transfer it to the refrigerator to chill for at least 4 hours—this helps the flavors meld together and makes cutting easier, ensuring a perfect presentation when served.
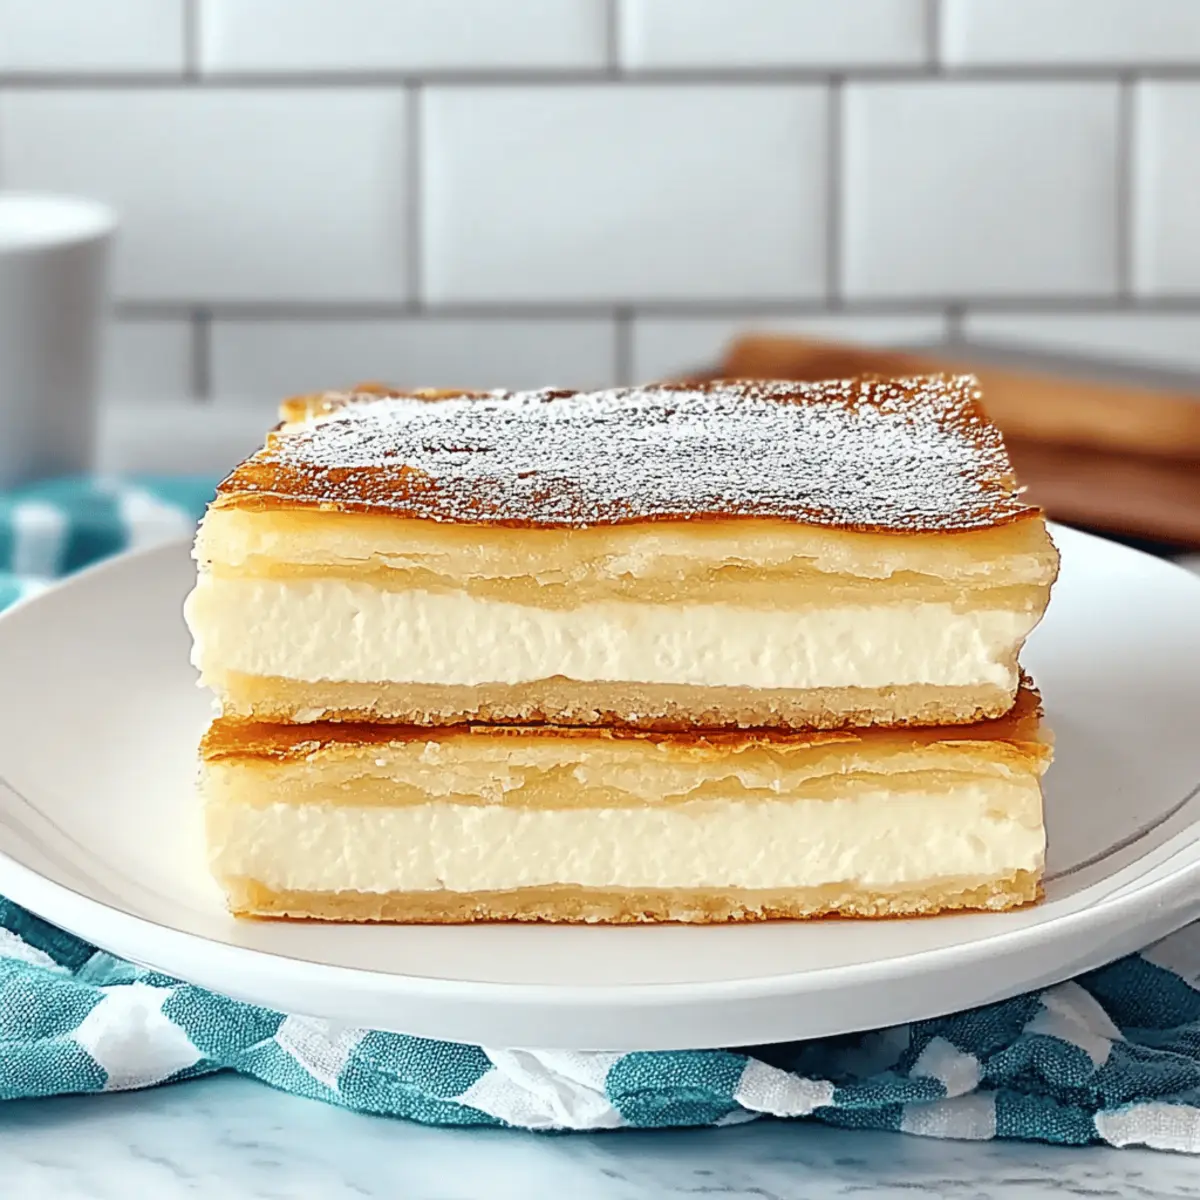
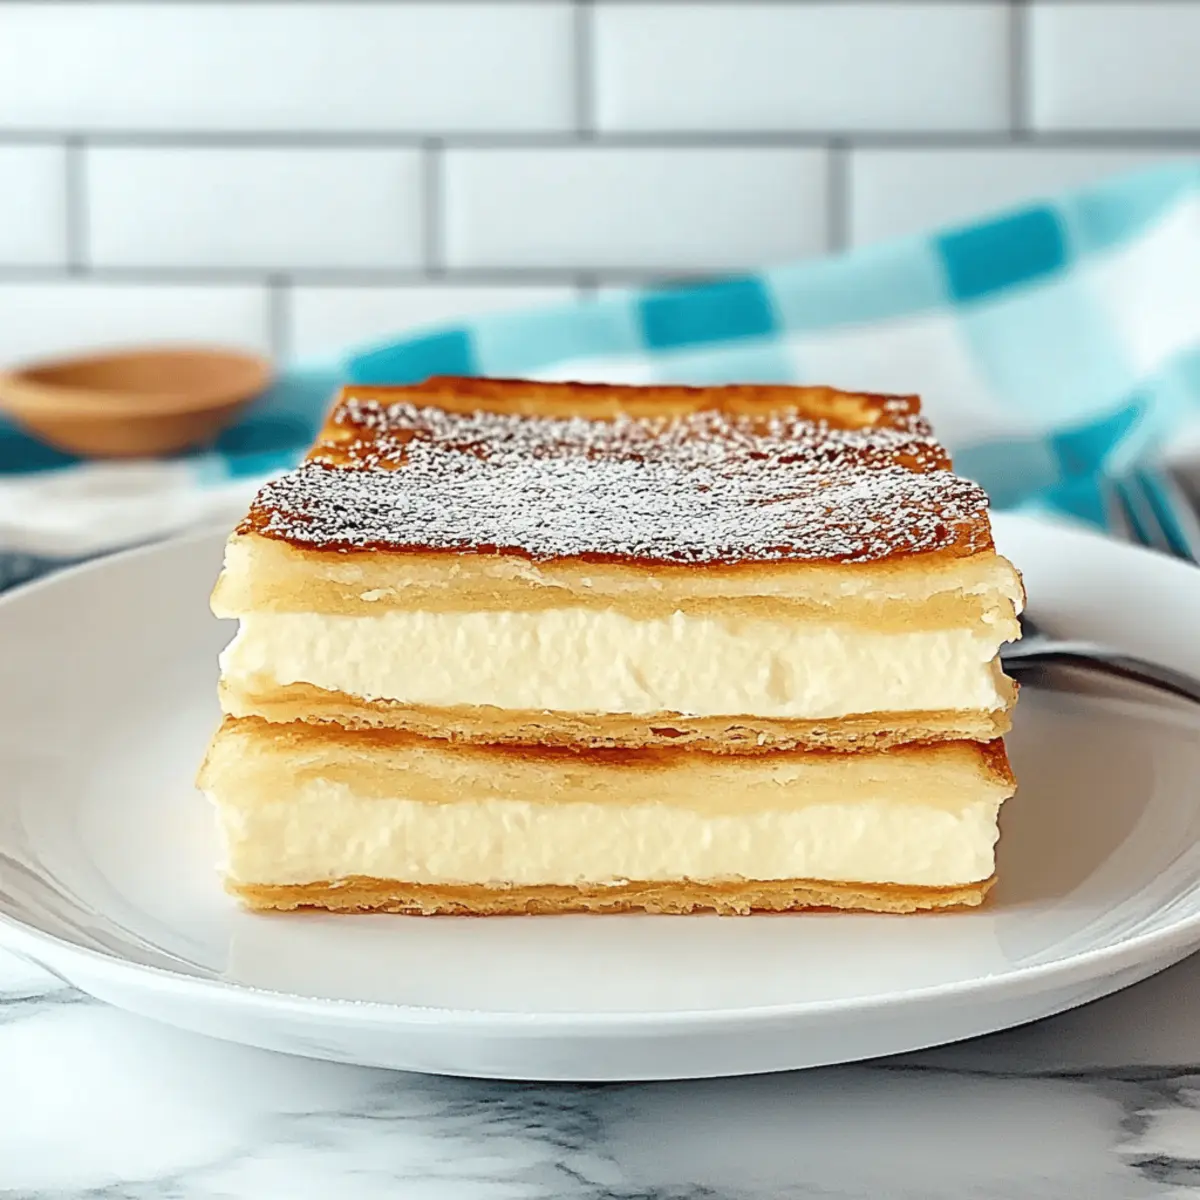
Step 11: Slice and Serve
Once chilled, slice your Sopapilla Cheesecake into bars or squares. To elevate your experience, consider serving each piece drizzled with honey, a scoop of vanilla ice cream, or fresh strawberries. These optional toppings add an extra layer of indulgence to your delightful creation!
Make Ahead Options
Sopapilla Cheesecake is a fantastic choice for meal prep, enabling busy cooks to enjoy a delightful dessert without the last-minute rush! You can prepare the cheesecake filling up to 24 hours in advance and refrigerate it in an airtight container. Additionally, you can also par-bake the crescent dough for the crust up to 3 days ahead; simply keep it covered to maintain its flaky texture. When you're ready to serve, layer the chilled filling over the crust and top with the second layer of dough before baking. This preparation not only saves time but also allows the flavors to meld beautifully, ensuring your Sopapilla Cheesecake remains just as delicious!
How to Store and Freeze Sopapilla Cheesecake
Fridge: Store leftover Sopapilla Cheesecake in an airtight container for up to 3 days. This ensures it stays fresh and maintains its delightful creamy texture.
Freezer: For longer storage, individually wrap slices in plastic wrap and place in a freezer-safe container for up to 3 months. Allow to thaw overnight in the fridge before serving.
Reheating: To enjoy warm, microwave each slice for 15-20 seconds. Avoid overheating to maintain the texture and flavor of the delicious cheesecake filling.
Room Temperature: It's best to avoid leaving Sopapilla Cheesecake out at room temperature for more than 2 hours to ensure food safety.
Sopapilla Cheesecake Variations & Substitutions
Feel free to explore these delightful twists to make your Sopapilla Cheesecake even more exciting and personalized!
-
Puff Pastry: Replace crescent rolls with puff pastry for a richer, flakier crust that elevates the overall experience. This swap adds buttery layers that will melt in your mouth!
-
Chocolate Chips: Fold in mini chocolate chips to the creamy filling for a decadent surprise in every bite. The combination of sweet cream and chocolate is pure indulgence.
-
Fresh Berries: Incorporate fresh berries like strawberries or blueberries into the filling for a delightful fruity flavor that lightens the dish. Each bite will burst with freshness, making it even more irresistible.
-
Nut Toppings: Add chopped nuts, such as pecans or walnuts, between the layers for an appealing crunch. This texture contrast enhances the overall dessert, creating a harmonious balance.
-
Spiced Versions: Experiment with seasonal spices like pumpkin spice or even chai spice in the filling for a cozy twist. This flavorful tilt brings warmth and comfort during the colder months.
-
Coconut Flakes: Mix in unsweetened coconut flakes into the cream cheese filling for a tropical touch. The coconut adds chewiness that beautifully complements the cheesecake's creaminess.
-
Maple Syrup Drizzle: Instead of honey, drizzle maple syrup on top before serving to add an earthier sweetness. This variation creates a warm, inviting flavor profile that is simply delightful.
For more scrumptious delights, consider checking out my easy recipe for No-Bake Cheesecake for another fantastic treat that’s perfect for any occasion!
What to Serve with Sopapilla Cheesecake
Indulging in the sweet, creamy layers of Sopapilla Cheesecake is just the beginning—pair it with delightful sides for a complete experience!
-
Whipped Cream: A dollop of fluffy whipped cream adds an airy texture that beautifully complements the richness of the cheesecake.
-
Fresh Strawberries: Juicy, ripe strawberries bring a refreshing burst of flavor that balances the sweetness of the dessert perfectly.
-
Ice Cream: A scoop of vanilla or cinnamon ice cream on the side elevates the experience, providing a cool contrast that's utterly heavenly. You can even try drizzling a little honey over the ice cream for a sweet twist!
-
Chocolate Sauce: Serve with a drizzle of chocolate sauce for those chocolate lovers who enjoy a decadent touch along with the sweetness of the cheesecake.
-
Honey Drizzle: A light drizzle of honey enhances the natural sweetness of the Sopapilla Cheesecake while adding a glossy finish that’s visually appealing.
-
Coffee or Tea: Pairing your dessert with a warm cup of coffee or tea can elevate the flavors, making for a heartwarming end to your meal.
-
Churros: Keeping with the theme, serve with churros for a fun, interactive dessert experience that echoes the flavors of Sopapilla Cheesecake.
Expert Tips for Sopapilla Cheesecake
-
Proper Softening: Ensure your cream cheese is softened at room temperature for a smooth filling; cold cream cheese can lead to lumps in the cheesecake.
-
Par-Bake Wisely: Always par-bake the crust to avoid a soggy base; underbaking can prevent proper texture in the final Sopapilla Cheesecake.
-
Chill Time Matters: Allow the cheesecake to chill for a minimum of 4 hours; this enhances flavor and makes it easier to slice without crumbling.
-
Avoid Overmixing: When adding the egg, mix until just combined; overmixing can introduce excess air, causing the filling to develop cracks during baking.
-
Customize Your Toppings: Experiment with your favorite toppings like honey or fresh berries for an enhanced flavor experience; this adds a personal touch to your Sopapilla Cheesecake.

Sopapilla Cheesecake Recipe FAQs
How do I choose ripe ingredients for Sopapilla Cheesecake?
Absolutely! When selecting crescent rolls, look for packages without any visible tears or holes. For the cream cheese, ensure it’s at room temperature for easy blending—no lumps allowed! If you’re adding fresh berries, choose ones that are firm and vibrant, avoiding any that have dark spots or are overly soft.
How should I store leftovers?
Keep your leftover Sopapilla Cheesecake in an airtight container in the fridge, where it will stay fresh for up to 3 days. If you notice any signs of drying out, I recommend placing a piece of plastic wrap directly on top of the cheesecake before sealing to keep moisture in!
Can Sopapilla Cheesecake be frozen?
Very! To freeze, wrap individual slices in plastic wrap and then place them in a freezer-safe container. This helps to preserve flavor and texture. It can be stored this way for up to 3 months. When you’re ready to enjoy, simply thaw overnight in the fridge before serving—easy-peasy!
What do I do if my cheesecake filling is lumpy?
No worries! Lumpy filling usually happens if the cream cheese wasn’t softened enough before mixing. To fix this, ensure your cream cheese sits out at room temperature for about 30 minutes prior to making the filling. If you still encounter lumps, try mixing the filling with an electric mixer on low speed until smooth, being careful not to incorporate too much air.
Can I make Sopapilla Cheesecake gluten-free?
Absolutely! Just swap out the crescent rolls for gluten-free dough options available at your local store. Many brands offer gluten-free crescent roll substitutes that can work beautifully. Additionally, always check other ingredients for gluten content, ensuring a delicious treat for those with gluten sensitivities.
Is Sopapilla Cheesecake safe for pets to eat?
When it comes to pets, it’s best to keep Sopapilla Cheesecake away from them. Ingredients like sugar, butter, and cream cheese can upset their stomachs or lead to other health issues. Always stick to pet-friendly treats if you want to spoil your furry friends!
Indulgent Sopapilla Cheesecake: Easy Layers of Bliss
Ingredients
Equipment
Method
- Preheat your oven to 350°F (175°C) and prepare your baking dish.
- Combine sugar and ground cinnamon in a small bowl.
- Unroll the refrigerated crescent dough and fit it in the baking dish.
- Brush the bottom of the baking dish with melted butter and sprinkle half of the cinnamon-sugar mix over it.
- Par-bake the crust for 5-6 minutes until slightly set.
- Whisk softened cream cheese until smooth, then mix in condensed milk, egg, and vanilla until lump-free.
- Pour the filling over the par-baked crust and spread it evenly.
- Place the second sheet of crescent dough on top and brush with melted butter, sprinkling the remaining cinnamon-sugar mix.
- Bake for 30-35 minutes until the top is golden brown and the filling is set.
- Cool at room temperature, then refrigerate for at least 4 hours before serving.
- Slice and serve with optional toppings like honey or fresh berries.


Leave a Reply